Session 11 - JavaScript, Part 4
Harvard Extension School
Fall 2021
Course Web Site: https://cscie12.dce.harvard.edu/
Topics
- jQuery
- "Click" examples
- jQuery UI
- Client-side Form Validation
- Form Validation with jQuery Validation Plugin
- Creating Content with JavaScript
- Apples List - Generating Content with DOM methods
- JavaScript Templates
- XHR or Ajax
- JS Data Structures - array and "object" (key/value pair)
- Ajax - Getting JSON from HTTP request
- Same Origin Policy and CORS
- Javascript Templates
- JavaScript Templates - Apple Picking
- Handlebars - A few more notes
- Handlebars - Compiled Templates
- Final Project - Skeleton
Presentation contains 43 slides
jQuery
What is jQuery?
jQuery is a fast, small, and feature-rich JavaScript library. It makes things like HTML document traversal and manipulation, event handling, animation, and Ajax much simpler with an easy-to-use API that works across a multitude of browsers. With a combination of versatility and extensibility, jQuery has changed the way that millions of people write JavaScript.
- document traversal
- document manipulation
- event handling
- animation
- Ajax

Learning jQuery
jQuery and $(document).ready();
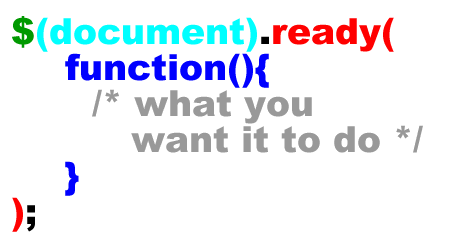
See: $(document).ready() for more explanation, including the shorthand of $().
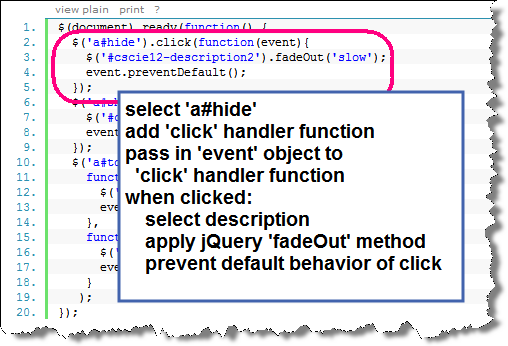
"Click" examples
Let's see how we can do this with jQuery. Items to note:
- CSS selector
- Default behavior stopped
- jQuery effects of transition (yes, we could use CSS transitions instead)
 <div id="cscie12-course2" style="font-family: calibri,verdana,tahoma,helvetica,sans-serif; float: left; width: 50%; padding: 10px; margin: 10px; border: medium solid black; background-color: #ffb;">
   <h3>CSCI E-12: Fundamentals of Website Development   </h3>
   <p>Harvard Extension School
     <br/>
David Heitmeyer
     <br/>
CSCI E-12
   </p>
   <p id="cscie12-description2">This course provides a comprehensive overview of website development. Students explore the prevailing vocabulary, tools, and standards used in the field and learn how the various facets—including HTML5, CSS, JavaScript, Ajax, multimedia, scripting languages, HTTP, clients, servers, and databases—function together in today's web environment. The course provides a solid web development foundation, focusing on content and client-side (browser) components (HTML5, CSS, JavaScript, multimedia), with an overview of the server-side technologies. In addition, software and services that are easily incorporated into a website (for example, maps, checkout, blogs, content management) are surveyed and discussed. Students produce an interactive website on the topic of their choice for the final project and leave the course prepared for more advanced and focused web development studies.
   </p>
 </div>
 <div style="width: 30%; float: left; margin-left: 2em;">
   <p>
     <strong>Hide/Show/Toggle Description     </strong>
   </p>
   <ul>
     <li>
       <a href="#" id="hide">Hide       </a>
     </li>
     <li>
       <a href="#" id="show">Show       </a>
     </li>
     <li>
       <a href="#" id="toggle">Toggle       </a>
     </li>   </ul>
 </div>
In
script element within head element (<script>):
$(document).ready(function() {
             $('#hide').click(
              function(event){
                $('#cscie12-description2').fadeOut('slow');
                event.preventDefault();
              }
             );
             $('#show').click(
              function(event){
                $('#cscie12-description2').fadeIn('slow');
                event.preventDefault();
              }
             );
             $('#toggle').click(
              function(event) {
                console.log('toggle!');
                $('#cscie12-description2').toggle('slow');
                event.preventDefault();
              }
             );
           });
jQuery and Ice Cream
JavaScript
document.addEventListener("DOMContentLoaded", function(){
/* js to be executed when dom is loaded goes here */

  let iceCreamOptions = document.getElementById("icecream_options_v2");
  let wantRadioButtons = document.querySelectorAll("form input[name=want]");

  let icoClasses = iceCreamOptions.classList;
  icoClasses.add("collapsed");

  for (let radio of wantRadioButtons) {
    radio.addEventListener("click",function(){
      let yesRadio = document.getElementById("ic_yes");
      if (yesRadio.checked == true) {
        icoClasses.remove("collapsed");
      } else {
        icoClasses.add("collapsed");
      }
    })
  }

});
jQuery
- jQuery automatically sets up loops if there are multiple items
e.g.$("form input[name=want]")
$(document).ready(function(){
  console.log("jQuery ready!");
  let iceCreamOptions = $("#icecream_options_v2");
  let wantRadioButtons = $("#form input[name=want]");

  iceCreamOptions.addClass("collapsed");
  yesRadio = $('#ic_yes');
  $("form input[name=want]").click( function(){
    if (yesRadio.is(':checked') == true) {
      iceCreamOptions.removeClass("collapsed");
    } else {
      iceCreamOptions.addClass("collapsed");
    }
  })
});
jQuery UI
jQuery UI is a curated set of user interface interactions, effects, widgets, and themes built on top of the jQuery JavaScript Library. Whether you're building highly interactive web applications or you just need to add a date picker to a form control, jQuery UI is the perfect choice.

jQuery UI components
jQuery UI provides abstractions for low-level interaction and animation, advanced effects and high-level, themeable widgets, built on top of the jQuery JavaScript Library, that you can use to build highly interactive web applications.
- Accordion
- Autocomplete
- Button
- Datepicker
- Dialog
- Menu
- Progressbar
- Selectmenu
- Slider
- Spinner
- Tabs
- Tooltip
See jQuery UI Tabs example in slideshow gallery
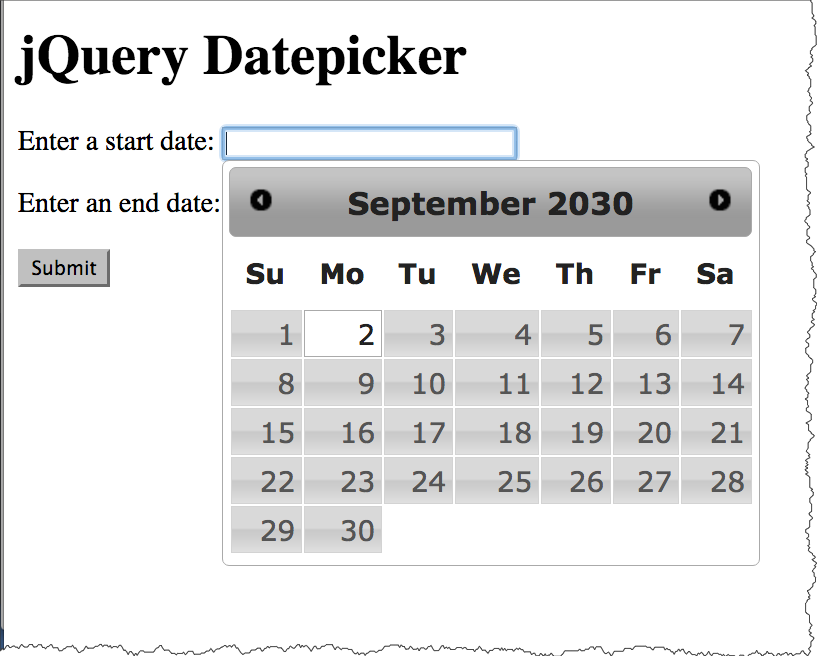
jQuery Datepicker Widget
jQuery has plugins that will provide an unobtrusive "calendar" widget for picking dates.
Markup:
<form action="https://cs12.net/form/submit.php">
 <p>
   Enter a start date: <input class="date" type="text" size="32" name="startdate" id="startdate" />
 </p>
 <p>
   Enter an end date: <input class="date" type="text" size="32" name="enddate" id="enddate" />
 </p>
 <input type="submit"/>
</form>
CSS amd JS:
<link rel="stylesheet"
href="https://ajax.googleapis.com/ajax/libs/jqueryui/1.12.1/themes/smoothness/jquery-ui.css"
media="all" />
<script src="https://ajax.googleapis.com/ajax/libs/jquery/3.5.1/jquery.min.js"
></script>
<script
src="https://ajax.googleapis.com/ajax/libs/jqueryui/1.12.1/jquery-ui.min.js"
></script>
<script >
$(document).ready(function(){
$('input.date').datepicker();
})
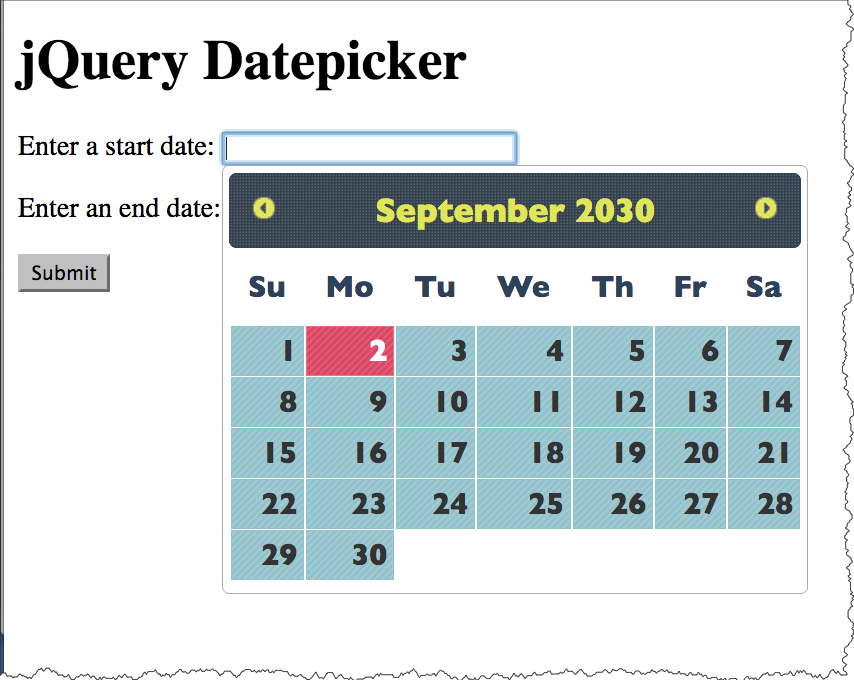
</script>jQuery UI Themes
Apply the "smoothness" theme | Apply the "hot-sneaks" theme |
jQuery Plugins
Tablesorter
tablesorter is a jQuery plugin for turning a standard HTML table with THEAD and TBODY tags into a sortable table without page refreshes. tablesorter can successfully parse and sort many types of data including linked data in a cell.
$(document).ready(function(){
    $("#senatetable").tablesorter(
      {
        "theme"   : "blue",
        "widgets" : ["zebra"]
      }
    );
});
Client-side Form Validation
Provide feedback to users prior to submitting form.
- Native browser functionality with HTML5 form controls (see MDN: Client-side form validation)
- DIY (Do It Yourself) or RYO (Roll Your Own) with JS
- JS libraries — some are 'plain' JS based (e.g. Pristine), others with jQuery (e.g. jQuery Validation Plugin).
JS: Form Validation - DIY (Do It Yourself)
Notes
- Pass in
ev(event) into the submit listener - Get value, test if two or more characters in length.
If true, then let form continue; else stop the form from submitting (ev.preventDefault())
window.addEventListener("DOMContentLoaded", function(){
let form = document.querySelector('#myForm');
form.addEventListener("submit", function(ev){
console.log("Submit event happened!");
console.log(ev);
let nameInput = document.querySelector('#name');
let nameInputValue = nameInput.value;
if (nameInputValue.length >= 2) {
// consider valid
return true;
} else {
// consider invalid
console.log("Please fill out name field");
alert("Please fill out name field");
// would want to have better feedback to user!
ev.preventDefault();
}
})
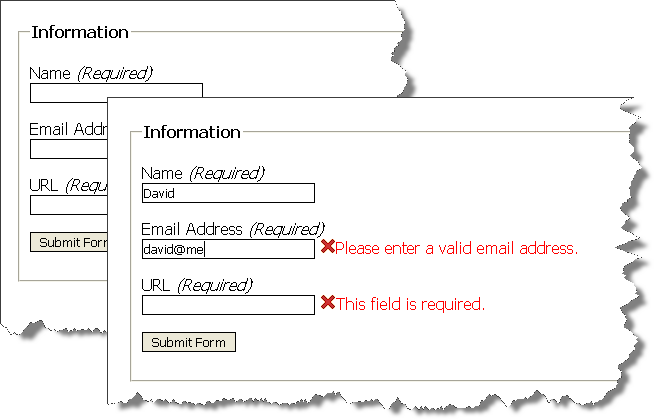
})Form Validation with jQuery Validation Plugin
jQuery Validation Plugin makes validating forms easy and flexible.
You can use it "out of the box" quickly and create validation rules by simply using class names in your input elements. You can use this validation plugin in more sophisticated ways as well, including providing your own validation methods.

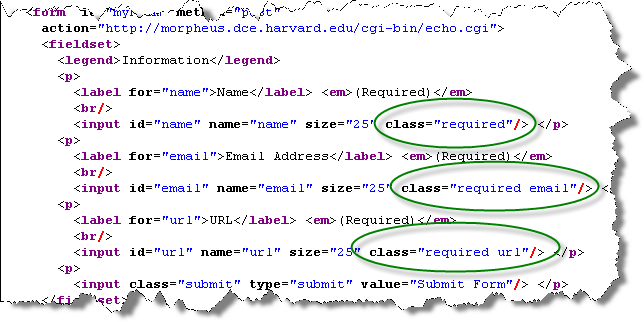
Form Validation - setting rules with 'class' attributes
jQuery Validation Plugin makes validating forms easy and flexible.
- Form 1
- Use the
jquery.validation.jsplugin in a basic way. - jQuery Validation ".validate()" documentation
- Validation rules are specified in "class" attributes
<!DOCTYPE html>
<html lang="en">
<head>
  <title>A Form to Illustrate Validation using the jQuery Validation Plugin</title>
  <meta charset="utf-8" />
  <link rel="stylesheet"  href="form.css" />
  <script src="https://code.jquery.com/jquery-3.6.0.min.js" integrity="sha256-/xUj+3OJU5yExlq6GSYGSHk7tPXikynS7ogEvDej/m4=" crossorigin="anonymous"></script>
  <script src="https://cdnjs.cloudflare.com/ajax/libs/jquery-validate/1.19.3/jquery.validate.min.js" integrity="sha512-37T7leoNS06R80c8Ulq7cdCDU5MNQBwlYoy1TX/WUsLFC2eYNqtKlV0QjH7r8JpG/S0GUMZwebnVFLPd6SU5yg==" crossorigin="anonymous" referrerpolicy="no-referrer"></script>
  <script>
  $(document).ready(function(){
      $("#myForm").validate();
  });
  </script>
</head>
<body>
  <form  id="myForm" method="post"
    action="https://cs12.net/form/submit.php">
    <fieldset>
      <legend>Information</legend>

        <label for="name">Name
        <input id="name" name="name" size="25" type="text" required class="required"/> </label>

        <label for="email">Email Address
        <input id="email" name="email" size="25" type="email" class="required email"/> </label>

        <label for="url">URL
        <input id="url" name="url" size="25" class="required url"/> </label>

        <button type="submit">Submit Form</button>
    </fieldset>
  </form>
</body>
</html>
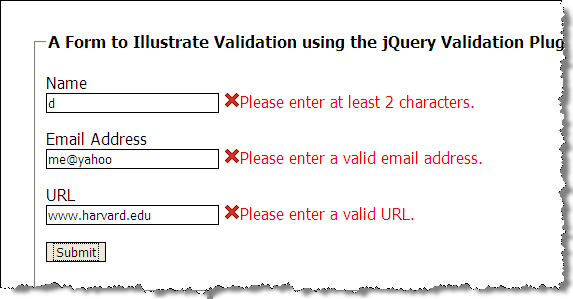
Form Validation - setting rules as configuration
Rules are quite customizable and can be expressed in JavaScript sections and not in the code markup.
- form2.html
- Documentation: jQuery Validation "rules" configuration
  $(document).ready(function(){
    var validation = $("#myForm").validate(
      {
      rules: {
        name:  { required: true, minlength: 2 },
        email: { required: true, email: true },
        url:   { required: true, url: true }
      }
    });
  });
Form Validation - setting custom messages and error placement

  $(document).ready(function(){
      var validation = $("#myForm").validate(
       {
         rules: {
           name: { required: true, minlength: 2 },
           email: { required: true, email: true },
           url: { required: true, url: true },
           favnum: { required: true, number: true },
           favnum10: { required: true, number: true, min: 1, max: 10},
           color: {required: true},
           season: {required: true, minlength: 2},
           yourdate: { required: true, date: true }
         },
         messages: {
                season: { minlength: jQuery.validator.format("Pick a minimum of {0} choices") }
         },
         errorPlacement: function(error,element) {
             if ( element.is("[name=color]") )
                error.appendTo( $('p#color') );
             else if ( element.is("[name=season]") )
                error.appendTo( $('p#season') );
             else if ( element.is("[name=comments]") )
                error.insertAfter( $('label[for=comments]') );
             else
                error.insertAfter(element);
         }
       });
    });
Form Validation - defining a custom rule
Here we define a new validation rule called "netid" (three characters and three numbers, e.g. 'abc123')
- jQuery.validator.addMethod(name, method [,message])
- Regular expression
var pattern = /^[a-zA-Z]{3}[0-9]{3,4}$/;
this is a regular expression pattern (regex) that matches three characters (e.g. abc) followed by three numbers (e.g. 123).- "^" matches the beginning of the string
- "[a-zA-Z]" defines a character class of all lower and upper alphabetic characters
- "{3}" indicates that the character class preceding occurs three times
- "[0-9]" defines a character class of numbers - e.g. 0,1,2,3,4,5,6,7,8,9
- "{3,4}" indicates that the character class preceding occurs at least three times and at most four times
- "$" matches the end of the string
pattern.test(value)returnstrueorfalse, depending on whether the 'value' matches the pattern
$(document).ready( function() {
    /* addMethod for netid validation */
    $.validator.addMethod(
      "netid",
       function(value, element) {
          var pattern = /^[a-zA-Z]{3}[0-9]{3,4}$/;
          return this.optional( element ) || pattern.test( value );
       },
       'Please enter a valid NetID (e.g. abc123).'
     );
    var validation = $("#myForm").validate(
         {
           rules: {
             name: { required: true, minlength: 2 },
             email: { required: true, email: true },
             netid: { required: true, netid: true }
          }
    );
});
Creating Content with JavaScript
- Create using DOM methods
- Create using "strings"
- Create using templates
Where does the data come from?
- JS data structures we provide
- Based on user input
- JavaScript or JSON data
Apples List - Generating Content with DOM methods
Data
{
 "apples": ['Macoun', 'Empire',
            'Honey Crisp',
            'Albemarle Pippin',
            'Pink Lady']
}
DOM methods
- createElement
- createTextNode
- appendChild
 <h1>List of Fruits from Data </h1>
 <div id="fruits"><!-- list goes here -->
 </div>
In head element:
<script src="example2.js"> </script>Contents of example2.js
"use strict";

let fruits = {
  "apples": ['Macoun', 'Empire', 'Honey Crisp', 'Albemarle Pippin', 'Pink Lady']
};
window.addEventListener('DOMContentLoaded',function(){
  buildFruitList();
});

function buildFruitList(){
  let fruitList = document.createElement('ul');

  for (const item of fruits["apples"].sort()) {
      let li = document.createElement('li');
      li.appendChild(document.createTextNode(item));
      fruitList.appendChild(li);
  }
  console.log(fruitList);
  document.getElementById('fruits').appendChild(fruitList);
}
JavaScript
for ( item of arrayList ) to iterate.
"use strict";

let fruits = {
    "apples": ['Macoun', 'Empire',
               'Honey Crisp', 'Albemarle Pippin',
               'Pink Lady']
};
window.addEventListener('DOMContentLoaded',function(){
    buildFruitList();
});

function buildFruitList(){
  let fruitList = document.createElement('ul');

  for (const item of fruits["apples"].sort()) {
      let li = document.createElement('li');
      li.appendChild(document.createTextNode(item));
      fruitList.appendChild(li);
  }
    document.getElementById('fruits').appendChild(fruitList);
}
Apples List - Generating Content with DOM methods
{
"apples": ['Macoun', 'Empire',
     'Honey Crisp',
     'Albemarle Pippin',
     'Pink Lady']
}
fruits["apples"] and
fruits.apples are the same
 <h1>List of Fruits from Data </h1>
 <div id="fruits"><!-- list goes here -->
 </div>
In head element:
<script src="example3.js"> </script>Contents of example3.js
"use strict";

let fruits = {
  "apples": ['Macoun', 'Empire', 'Honey Crisp', 'Albemarle Pippin', 'Pink Lady']
};
window.addEventListener('DOMContentLoaded',function(){
  buildFruitList();
});

function buildFruitList(){
  let fruitList = document.createElement('ul');

  for (const item of fruits.apples.sort()) {
      let li = document.createElement('li');
      li.appendChild(document.createTextNode(item));
      fruitList.appendChild(li);
  }
  console.log(fruitList);
  document.getElementById('fruits').appendChild(fruitList);
}
Apples List - Generating Content with strings
Data
{
 "apples": ['Macoun', 'Empire',
            'Honey Crisp',
            'Albemarle Pippin',
            'Pink Lady']
}
JavaScript
innerHTMLis used to "get" or "set" the string value.- Use "+" to concatenate strings in JavaScript
let fullName = firstName + " " + lastName;
 <h1>List of Fruits from Data </h1>
 <div id="fruits">List will go here.
 </div>
In head element:
<script src="example4.js"> </script>Contents of example4.js
"use strict";

let fruits = {
  "apples": ['Macoun', 'Empire', 'Honey Crisp', 'Albemarle Pippin', 'Pink Lady']
};
window.addEventListener('DOMContentLoaded',function(){
  buildFruitList();
});

function buildFruitList(){
  let fruitList = "<ul>";

  for (const item of fruits["apples"].sort()) {
      let li = "<li>" + item + "</li>";
      fruitList = fruitList + li;
  }
  fruitList = fruitList + "</ul>";
  console.log(fruitList);
  document.getElementById('fruits').innerHTML = fruitList;
}
JavaScript
for ( item of arrayList )to iterate.innerHTMLto set the HTML to a string value (to be parsed into DOM nodes)
"use strict";

let fruits = {
  "apples": ['Macoun', 'Empire', 'Honey Crisp', 'Albemarle Pippin', 'Pink Lady']
};
window.addEventListener('DOMContentLoaded',function(){
  buildFruitList();
});

function buildFruitList(){
  let fruitList = "<ul>";

  for (const item of fruits["apples"].sort()) {
      let li = "<li>" + item + "</li>";
      fruitList = fruitList + li;
  }
  fruitList = fruitList + "</ul>";
  console.log(fruitList);
  document.getElementById('fruits').innerHTML = fruitList;
}
JavaScript Templates
We'll focus on using the Handlebars and Mustache template libraries. Other template systems will do similar things though, with different syntax.
- Mustache, "Logic-less" templates
- Handlebars, Handlebars provides the power necessary to let you build semantic templates effectively with no frustration.
<ul>
    {{#apples}}
    <li>{{.}}</li>
    {{/apples}}
  </ul>
Apples List with Mustache Template
Key Points:
- innerHTML
- template element
- Mustache library
<template id="apple-template">
  <ul>
  {{#apples}}
    <li>{{ . }}
  {{/apples}}
  </ul>
</template>
function buildFruitList(){
let template = document.getElementById('apple-template').innerHTML ;
console.log(template);
let rendered = Mustache.render(template, fruits);
console.log(rendered);
document.getElementById('applelist').innerHTML = rendered;
}Apples List with Handlebars Template
Key Points:
- innerHTML
- "template" element
- Handlebars library
- Template is "compiled" into a function
<template id="apple-template">
  <ul>
  {{#apples}}
    <li>{{ . }}
  {{/apples}}
  </ul>
</template>
function buildFruitList(){
let template = document.getElementById('apple-template').innerHTML ;
console.log(template);
let compiledTemplate = Handlebars.compile(template);
let rendered = compiledTemplate(fruits);
document.getElementById('applelist').innerHTML = rendered;
}XHR or Ajax

XHR/Ajax flow: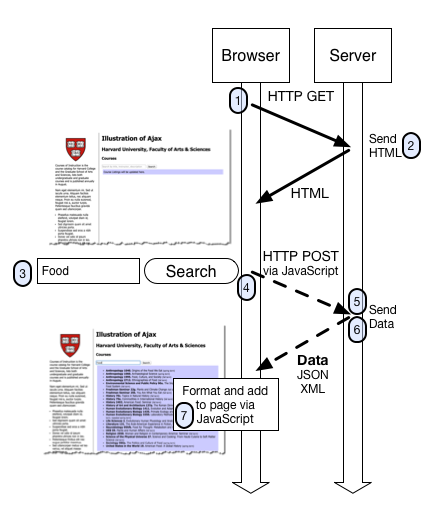
- The browser makes an HTTP GET request for the search page
- The server responds with the HTML content.
Note that we are not showing browser requests for other page resources such as image, CSS, or JavaScript files - The user types in a search term and clicks the submit button (or presses "enter")
- A JavaScript event handler is triggered on the form submit, and JavaScript sends an HTTP request via the browser to the server. This HTTP request contains the search term typed in by the user as a parameter sent to the server
- A program on the server searches the course database for any courses that contain the search term.
- The program (via the web server) returns the matching courses in a data format to the browser (typically in JSON format)
- The browser receives the data, hands it off to the JavaScript, and the JavaScript formats the data into HTML and updates the search area on the page
What the browser does
- Initiates an HTTP request to server, and receives data
An event handler in JavaScript for the form submit is triggered, and JavaScript sends an HTTP request to the server that includes the search term the user typed in. In an Ajax context, the response from the server is not necessarily HTML meant to be displayed directly, but is data. - Formats and Displays Data on the Page
The JavaScript that is part of the page is used to format the data into markup, and then place this newly created markup on the page itself so that it is displayed to the user.
What the server does
The server is simply responding to HTTP requests, and sending responses back to the browser. The "how" of looking up courses in a database based on a keyword search term is beyond the scope of this lesson -- we will demystify that part later in the course.
A Collection of Technologies
So we see Ajax is really a collection of technologies that are working together to send and receive data to and from the web server based on user actions, and to format and display this data to the user.
Some of the key technologies involved are:
- HTML
- CSS
- JavaScript
- DOM (Document Object Model)
The DOM is used to format the content and manipulate the content of the page that is displayed in the browser. This can be done directly with DOM methods, or by using a JS template library to produce content from a template. - XHR object (XHR = XMLHttpRequestObject)
This is the object in JavaScript that constructs and sends the request back to the server
- DOM (Document Object Model)
- Data formats
- JSON (JavaScript Object Notation)
What can you do with Ajax/XHR?
- Partial update of page
- Periodic polling for new/changed data
- "Event"-driven interaction (instead of 'form submit'-driven)
- click, mouseover, submit, etc.
- Incorporate data and functionality from other sites into your web site
- Your data + functionality from elsewhere
- Your functionality + data from elsewhere
JS Data Structures - array and "object" (key/value pair)
JSON - JavaScript Object Notation
JSON array Example:
['Autumn', 'Winter', 'Spring', 'Summer']
JSON object Examples:
Simple "name/value" pairs:
         {
           "lastName" : "Bacow",
           "firstName" : "Lawrence",
           "email" : "president@harvard.edu"
         }
"name/value" pairs, with values being an array (list) of things:
         {
           "apples" : ['Macoun','Empire','Honey Crisp','Albemarle Pippin'],
           "oranges" : ['Navel Orange','Tangelo','Clementine','Valencia Orange']
         }
More about JSON
A data format widely used in Ajax is JSON -- this format is used to pass data from the web server to the browser, and it is in a format that is easily worked with in JavaScript.
We first need to take a look at the JSON format and how we can work with it, and then we'll see how this works together in Ajax.
The introduction to JSON from json.org is a great place to start:
JSON (JavaScript Object Notation) is a lightweight data-interchange format. It is easy for humans to read and write. It is easy for machines to parse and generate. It is based on a subset of the JavaScript Programming Language, Standard ECMA-262 3rd Edition - December 1999. JSON is a text format that is completely language independent but uses conventions that are familiar to programmers of the C-family of languages, including C, C++, C#, Java, JavaScript, Perl, Python, and many others. These properties make JSON an ideal data-interchange language.
JSON is built on two structures:
- A collection of name/value pairs. In various languages, this is realized as an object, record, struct, dictionary, hash table, keyed list, or associative array.
- An ordered list of values. In most languages, this is realized as an array, vector, list, or sequence.
These are universal data structures. Virtually all modern programming languages support them in one form or another. It makes sense that a data format that is interchangeable with programming languages also be based on these structures.
More JSON objects
In short, a JSON object is an unordered list of name/value pairs.
A JSON object example:
Note that the object (collection of name/value pairs) is enclosed in {curly braces}.
The name/value pair has a colon after the name (i.e. name: value), and the name/value pairs are separated by a comma.
So the object above represents the following:
| Name | Value |
|---|---|
| lastName | Bacow |
| firstName | Lawrence |
| president@harvard.edu |
JSON Array
In short, a JSON array is an ordered sequence of values. Values are strings (in quotes), numbers, arrays, objects, or boolean (true/false) values.
A JSON array example
Strings, Objects, and Arrays can all be values!
In the examples above, we've shown the values as strings (e.g. "Spring" or "Bacow"). But values can also be arrays or objects. Below is a more complex JSON object that includes two name/value pairs whose values are an array of strings ("seasons") and the other an array of objects ("days"):
There are several online JSON viewers and validators you can use that are helpful for exploring, writing, or validating JSON structures:
Ajax - Getting JSON from HTTP request
XHR - XMLHttpRequestObject
- Set function for when XHR status changes
- Will need to test if XHR is "DONE" and if we got a successful response (e.g. HTTP 200)
- Will need to parse the text as JSON
Javascript "fetch"
fetch(url).then(response => response.json()).then(data => processData(data));jQuery
jQuery makes this easier with the ".getJSON" method!
Let's Try it Out!
- Apples - https://cscie12.dce.harvard.edu/apples-pyo.php
- MLB Teams
- National Park Service API
National Park Service API

Approach:
- Understand the data
- Static data
- XHR + JSON with static URL
- XHR + JSON with adjustable URL
- Get state data from user
Same Origin Policy and CORS
When working with XHR/Ajax, it is important to understand some basic concepts of web application security. Some concepts we'll briefly describe are:
- Same Origin Policy
- CORS (Cross Origin Resource Sharing)
These are important to understand since the browser restricts the XHR calls allowed.
Same Origin Policy
This is the simplest policy, and will cover all cases where the data you are requesting comes from the same hostname as the page making the request.
Under the same origin policy, a web browser will permit JavaScript contained in a web page to access data from the same origin -- or the same "hostname" of the URL.
So if your JavaScript and the data it is accessing all come from the same origin (hostname in the URL), the browser will permit this communication.
If the JavaScript and the data come from different origins (hostnames), then the browser will block this for security reasons.
For JavaScript to access data that comes from different origins, you'll need to make sure CORS headers are set correctly.
CORS - Cross Origin Resource Sharing
CORS is a common and preferred method for handling cross-origin requests.
Using CORS, it is possible for the browser and server to determine whether or not to allow a cross-origin request. This happens as part of the HTTP request. The server can specify access control rules, which a browser will then use to determine whether a cross-origin request is permitted.
We won't go into how make the server-side CORS compatible right now. From the front-end perspective, it is enough to understand that you are using a CORS-enabled service. You don't need to do anything to enable CORS from within your JavaScript -- it already is there and is used by the browser.
HTTP response header:access-control-allow-origin: *
For example, the service from "cdn.rawgit.com" (e.g. apples.json) uses CORS, which is why the "Pick Your Own Apples" example worked fine, despite the different origins between the page the JSON.
MDN: Cross-Origin Resource Sharing
Javascript Templates
Having the separation of data coming from the server-side in the form of JSON (or even some other format), and doing the work to display and present it on the client-side is a beneficial separation of concerns. If the formatting and display requirements change, it is a change to the front-end (client-side) code (HTML, CSS, JS) as opposed to the server-side. However, while the technique we've seen to process JSON into markup and place it on the page is entirely on the client-side (as opposed to server-side), a big drawback is that we've done this entirely in JavaScript.
For example, to build a list of seasons, we did something like:
Good News: We do have separation between front-end and back-end! Front-end does the structuring and display; the back-end provides the data.
Bad News: We have mixing of concerns between structure (markup) and function (JavaScript). We do not have good separation between structure (HTML), style (CSS), and function (JS) within the front-end. We have to read through the JavaScript to figure out how our data will be structured. If we want to change how the data is structured, we need to edit the JavaScript.
JavaScript Templates - Apple Picking
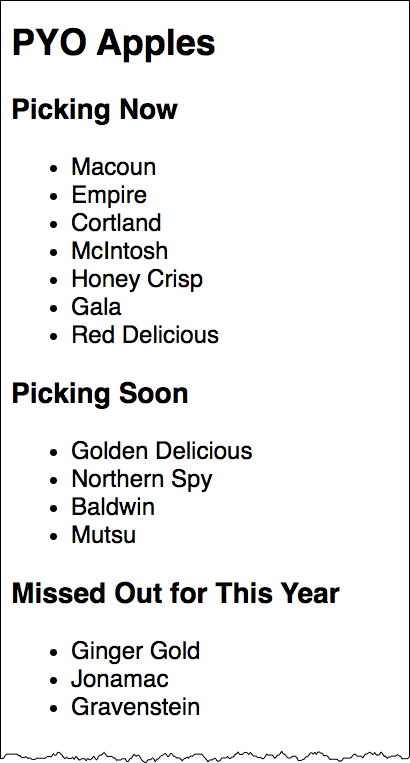
JSON Data
{
    "apples": {
        "picking_now": [
            "Macoun",
            "Empire",
            "Cortland",
            "McIntosh",
            "Honey Crisp",
            "Gala",
            "Red Delicious"
        ],
        "picking_soon": [
            "Golden Delicious",
            "Northern Spy",
            "Baldwin",
            "Mutsu"
        ],
        "picking_done": [
            "Ginger Gold",
            "Jonamac",
            "Gravenstein"
        ]
    }
}
Handlebars Template
<div id="appleslisttemplate" class="handlebars">
  <h3>Picking Now</h3>
  <ul>
    {{#apples.picking_now}}
      <li>{{.}}</li>
    {{/apples.picking_now}}
  </ul>
  <h3>Picking Soon</h3>
  <ul>
    {{#apples.picking_soon}}
      <li>{{.}}</li>
    {{/apples.picking_soon}}
  </ul>
  <h3>Missed Out for This Year</h3>
<ul>
    {{#apples.picking_done}}
    <li>{{.}}</li>
    {{/apples.picking_done}}
</ul>
</div>
JavaScript
let dataUrl = 'https://cdn.rawgit.com/dpheitmeyer/b9fe0838e27b28db1287/raw/38356d6675e355215b7bf22ff75c520a8fbe8850/apples.json'

$(document).ready(function(){
  $.getJSON(dataUrl,
    function (data) {
      var mysource = $('#appleslisttemplate').html();
      var mytemplate = Handlebars.compile(mysource);
      var myresult = mytemplate(data)
      $('#appleslist').html(myresult);
  });
})
Handlebars - A few more notes
See: JSFiddle Example of Handlebars Loop Techniques
With Handlebars, you can also iterate explicitly with {{#each }}
With the context of our "seasons" JSON:
{
  "seasons": [
    "Spring",
    "Summer",
    "Autumn",
    "Winter"
  ]
}
We could do:
<ul>
    {{#each seasons}}
    <li>{{.}}</li>
    {{/each}}
</ul>
We can also specify the name of the parameter to be used within the loop:
<ul>
    {{#each seasons as |season|}}
    <li>{{season}}</li>
    {{/each}}
</ul>
Both of the above would produce: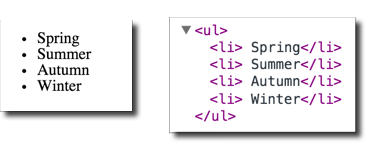
If needed, you can also pass in the index position as well (remember that the first item in an array is index position = 0, second item is index position = 1, etc.).
<ul>
    {{#each seasons as |season pos|}}
    <li>{{pos}} {{season}}</li>
    {{/each}}
</ul>
Which would produce: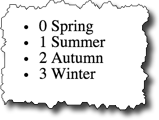
Handlebars Conditionals
Sometimes we might want to format data based on certain conditions. For example, if an email address or URL exists for a person, we might want to include a mailto: link or a link to the URL. Handlebar conditionals allow to do that.
People in JSON:
{
    "people": [
        {
            "name": "Lawrence Bacow",
            "url": "http://president.harvard.edu/"
        },
        {
            "name": "Alan Garber",
            "url": "http://provost.harvard.edu/people/alan-m-garber"
        },
        {
            "name": "Katie Lapp"
        }
    ]
};
For example, if we wanted to hyperlink a name if a URL exists, our Handlebars template could look something like:
<ul>
{{#each people as |person|}}
  <li>
  {{#if person.url }}
    <a href="{{person.url}}">{{person.name}}</a>
  {{else}}
    {{person.name}}
  {{/if}}
  </li>
{{/each}}
</ul>
And this would produce: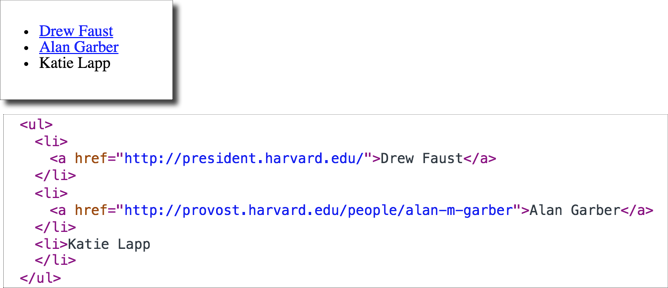
Handlebars - Compiled Templates
It is possible to precompile your Handlebars template (the result is a JavaScript function), and then include the compiled templates via a script element.
Advantages of precompiling the templates include:
- Faster execution
- Can use lighter-weight Handlebars JS library (the "runtime" version, which doesn't have the compiler)
So here's an example where I've compiled the course list template into courseslist.js. Now there's no compile step, just a reference to Handlebars.templates.courseslist to access the template function. Note too that we are using the "runtime" version of the Handlebars library - handlebars.runtime.min.js
Note the command to compile the template looked like:
$ handlebars.js courseslist -f courseslist.jswhere courseslist is the source template, and courseslist.js is the generated compiled JS file
Final Project - Skeleton
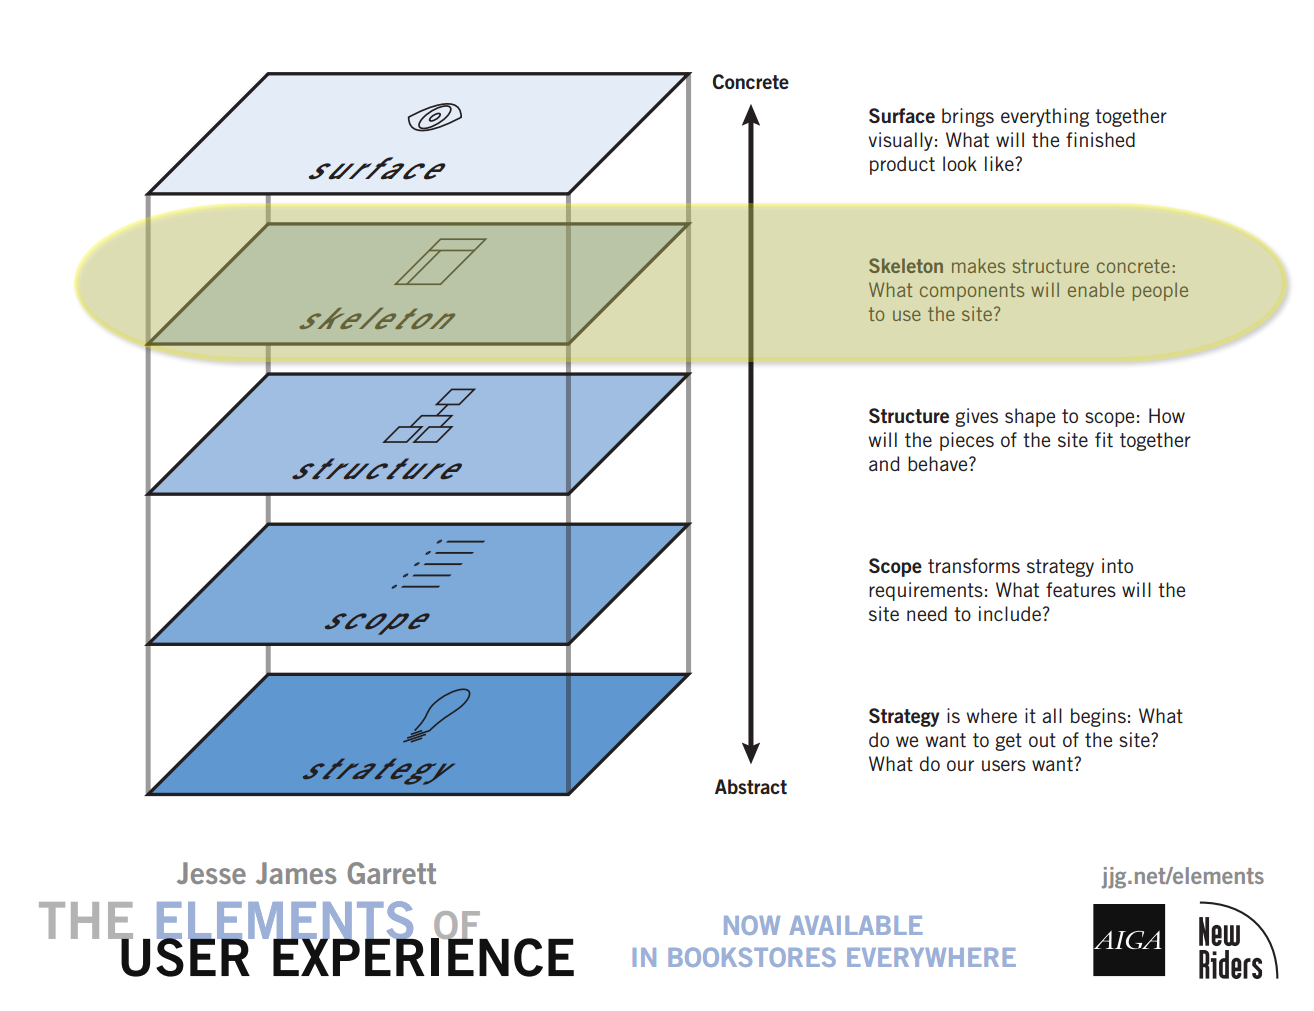
Page Components
- Header
- Navigation
- Content
- Plan out content skeleton
- Footer
Wireframes and Sketches - "Low" to "High" Fidelity
Tools to consider:
Sketches
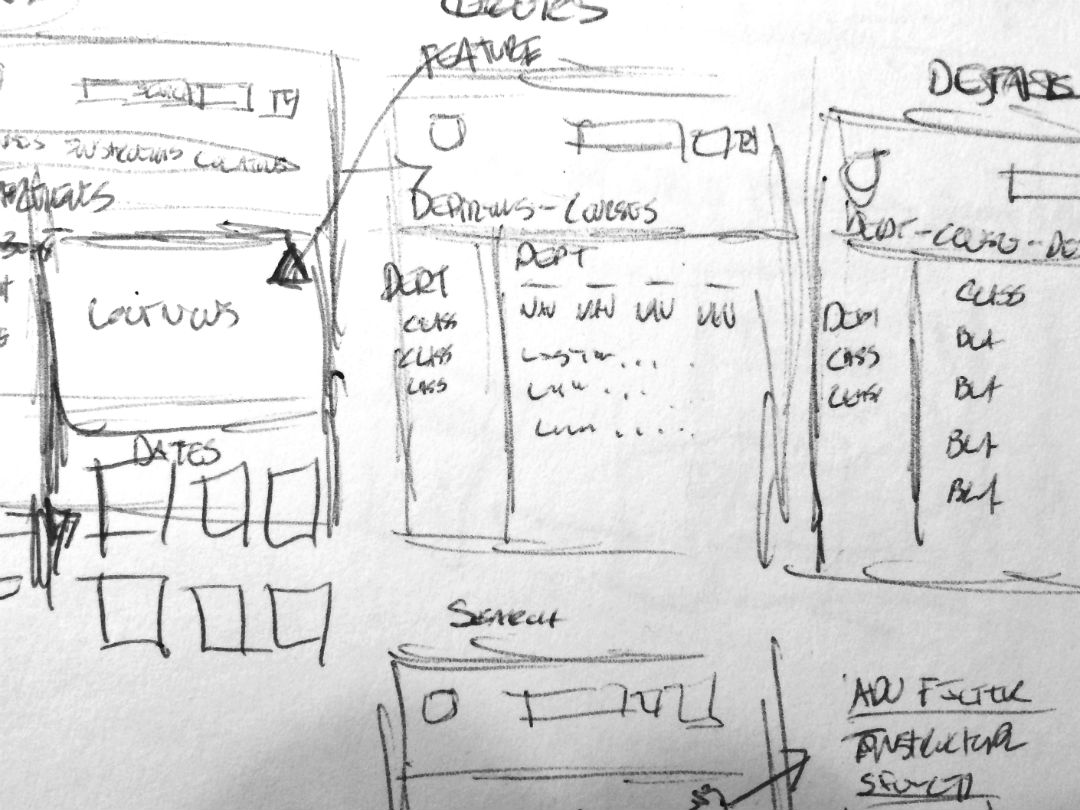
Wireframes - examples from class
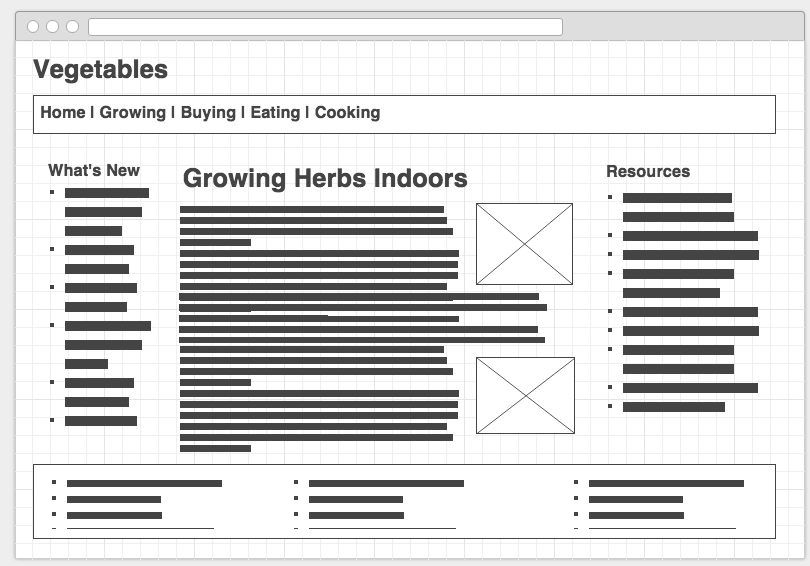
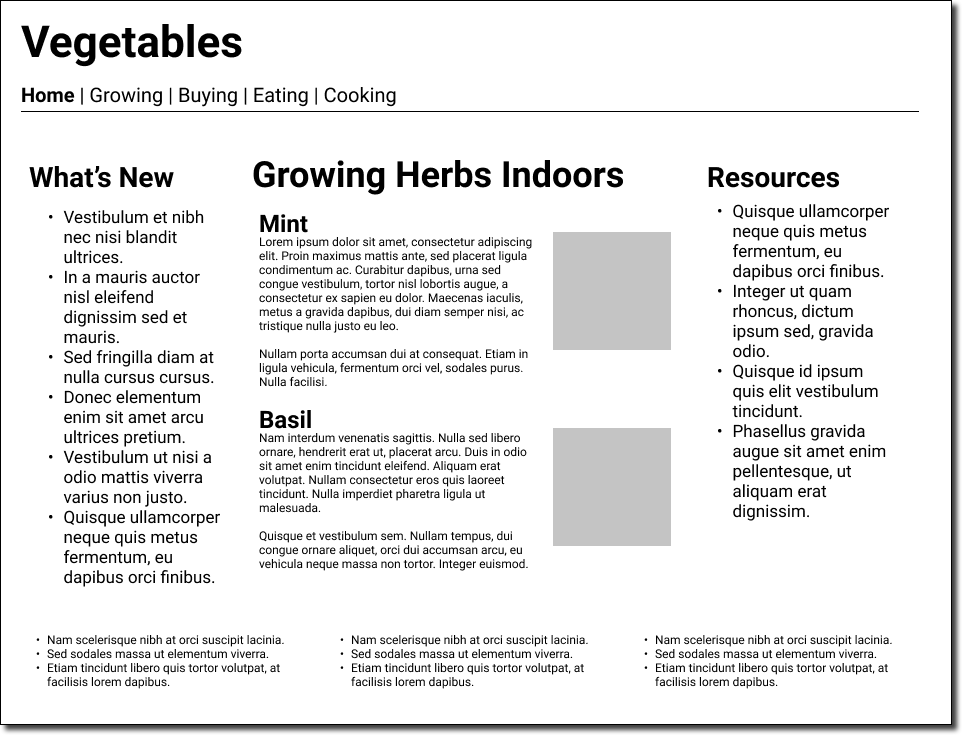
Wireframes - Drawing and prototype