Session 05 - CSS, Part 3 - plus some HTML bits
Harvard Extension School
Fall 2022
Course Web Site: https://cscie12.dce.harvard.edu/
Topics
- CSS Review
- HES CSS Assignment
- Client-side Web Parts: Structure, Style, Function
- CSS Specificity
- CSS Flexbox
- Flex and Simple Layouts
- Continuing an Example - Solar System
- Fonts
- Forms - Basic
- Accessibility: Label Element
- HTML5 forms
- Tables
- Accessibilty of Tables
Presentation contains 46 slides
CSS Review
HES CSS Assignment
- Please read the assignment and the rubric! You will get hints and understand what we are grading on (and also what is not important).

Client-side Web Parts: Structure, Style, Function

- Structure / Markup (HTML)
- Structure
- Content
- Style / Presentation (CSS)
- Style
- Presentation
- Appearance
- Function (JavaScript)
- Actions
- Manipulations
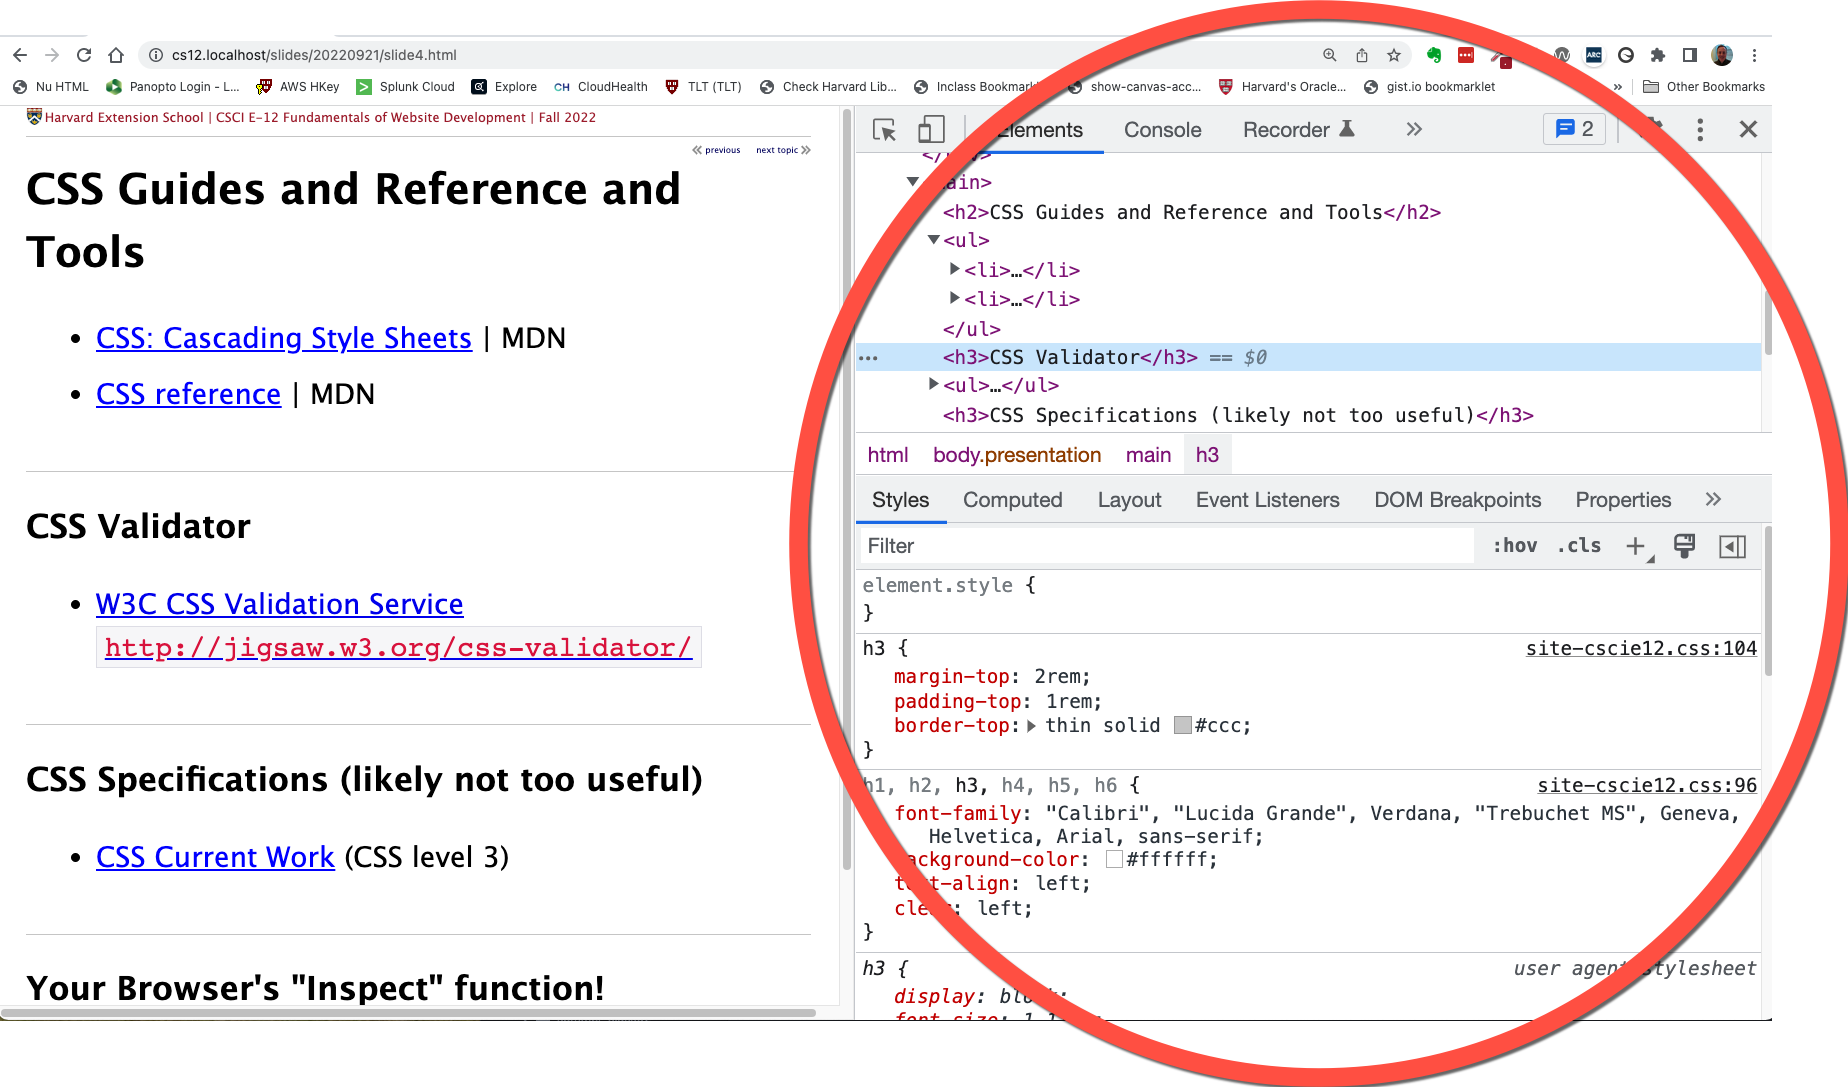
CSS Guides and Reference and Tools
- CSS: Cascading Style Sheets | MDN
- CSS reference | MDN
Your Browser's "Inspect" function!
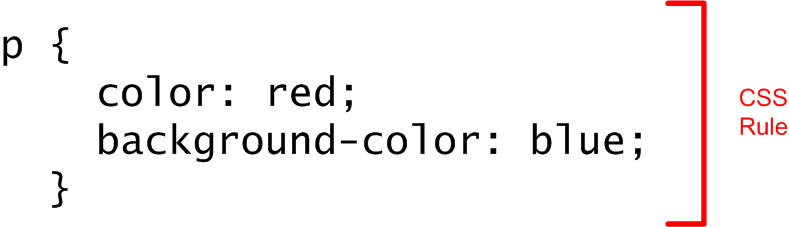
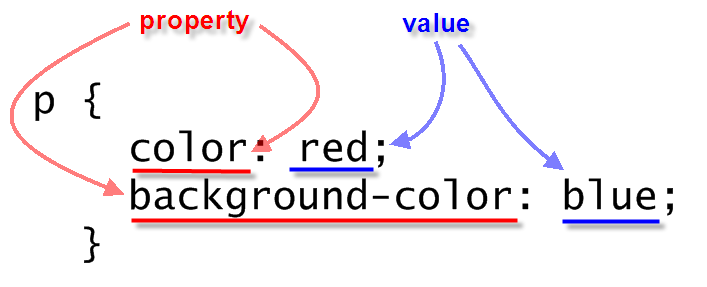
Anatomy of a CSS Rule
CSS Rule
Selector and Declarations
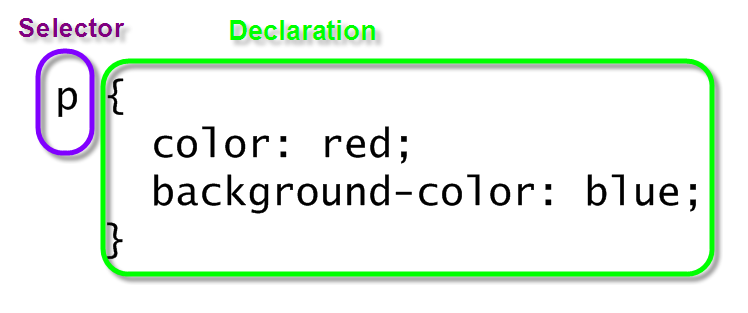
Properties and Values
class selectors
When to use classes?
- Within a page, there are elements that are the "same" from a markup perspective, but need to be styled differently.
- Within a site, there is content that has the "same" markup, but needs to be styled differently.
section {
background-repeat: no-repeat;
background-size: 80px;
padding-left: 100px;
padding-bottom: 1.5rem;
}
section h2 {
color: rgb(163,28,48);
}
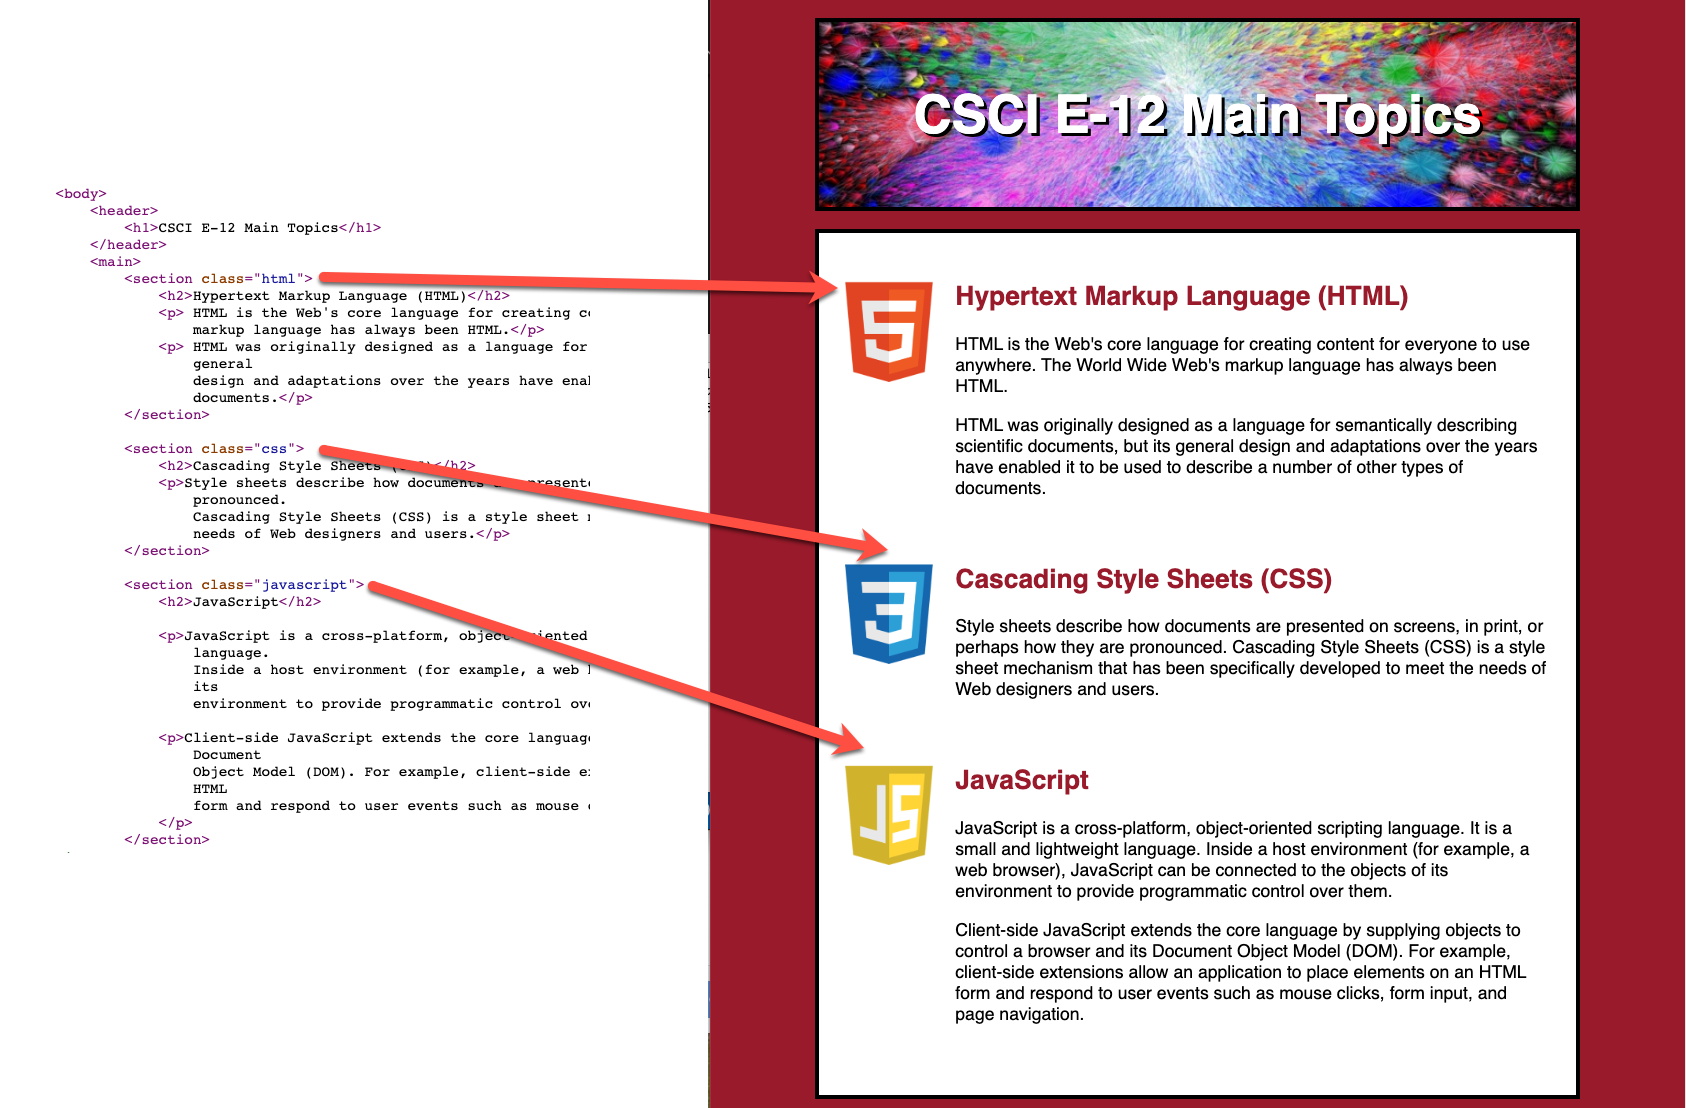
section.html {
background-image: url(../images/logo-html5.png);
}
section.css {
background-image: url(../images/logo-css3.png);
}
section.javascript {
background-image: url(../images/logo-js.png);
}
Contextual Selectors
selector1 selector2 { ...rules... }
Often you'll see this as ways to apply different rules in header,
main, and footer
main p {
/* rules for p inside of main */
}
footer p {
/* rules for p inside of main */
}
h2 {
/* rules for h2 everywhere*/
}
section h2 {
/* rules for h2 inside of section */
}
nav a:link,
nav a:visited,
nav a:hover,
nav a:active {
  /* rules for nav links */
}
footer a:link,
footer a:visited,
footer a:hover,
footer a:active {
  /* rules for nav links */
}
CSS Specificity
See: Calculating a selector's specificity.
Stylesheet Origin
- author stylesheet
- reader (user) stylesheet
- browser (user agent) stylesheet
Specificity of Selector
- style attribute
- count "id" attributes
- count number of other attributes ("class")
- count element names
Order
- last occurence has higher specificity
@import-ed stylesheets come before rules in the importing sheet.
CSS Selector Specificity
Specificity is expressed in a form of a list of four numbers: (a,b,c,d)
- inline style
- id
- class, pseudo-class and attributes
- element and pseudo-elements
Start comparing at "a", if equal go to "b", etc.
nav li {...}                     /* (0,0,0,2) */
nav.primary {...}                /* (0,0,1,1) */
nav.primary li {...}             /* (0,0,1,2) */
nav.primary li:first-child {...} /* (0,0,2,2) */
nav.primary li.getinfo {...}     /* (0,0,2,2) */
#globalnav {...}                 /* (0,1,0,0) */
#globalnav >nav.primary li.getinfo >nav.primary li:first-child >nav.primary li >nav.primary >nav li
CSS Flexbox
Flexbox is a one-dimensional layout method for arranging items in rows or columns. Items flex (expand) to fill additional space or shrink to fit into smaller spaces.
When to use it: Building simple page or content layouts without
having use float or positioning.
Contrasting CSS Flexbox and Grid
Flexbox
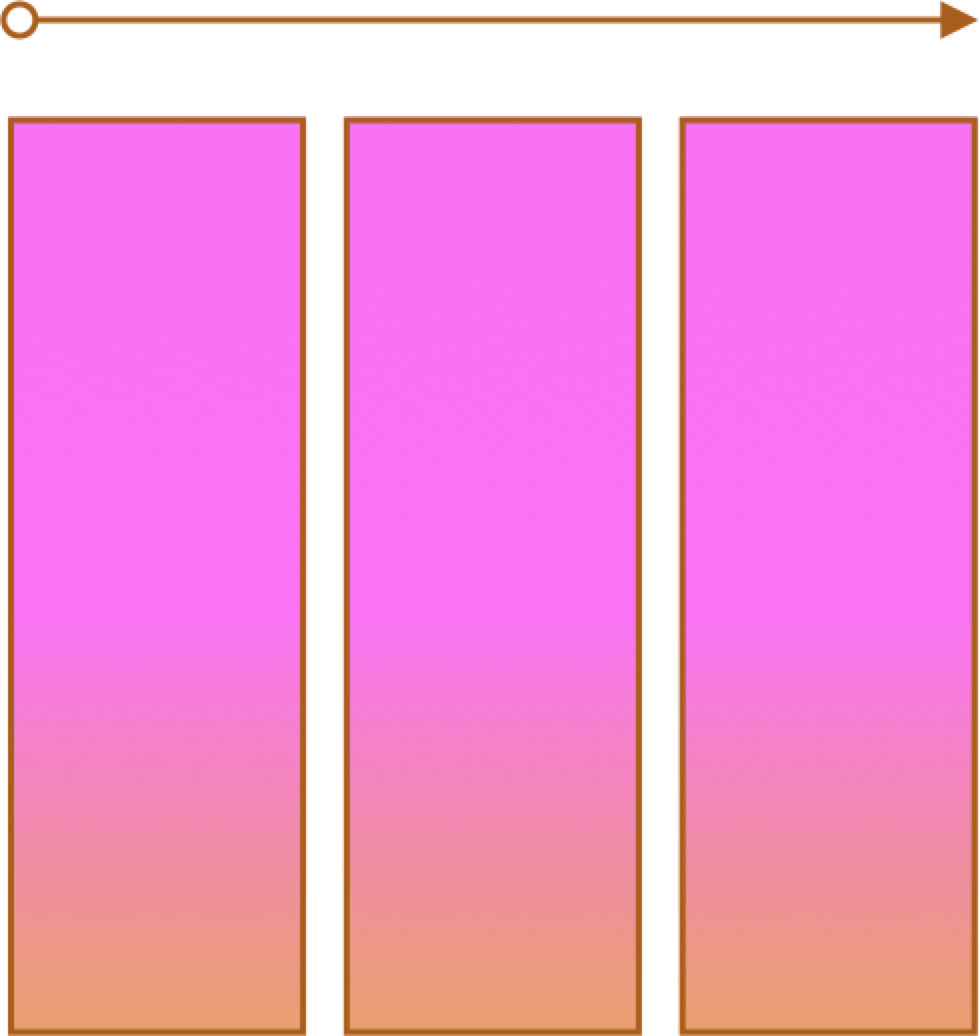
- One primary axis
- Basic layouts for pages and content
- Easier then "grid" (?)
Grid
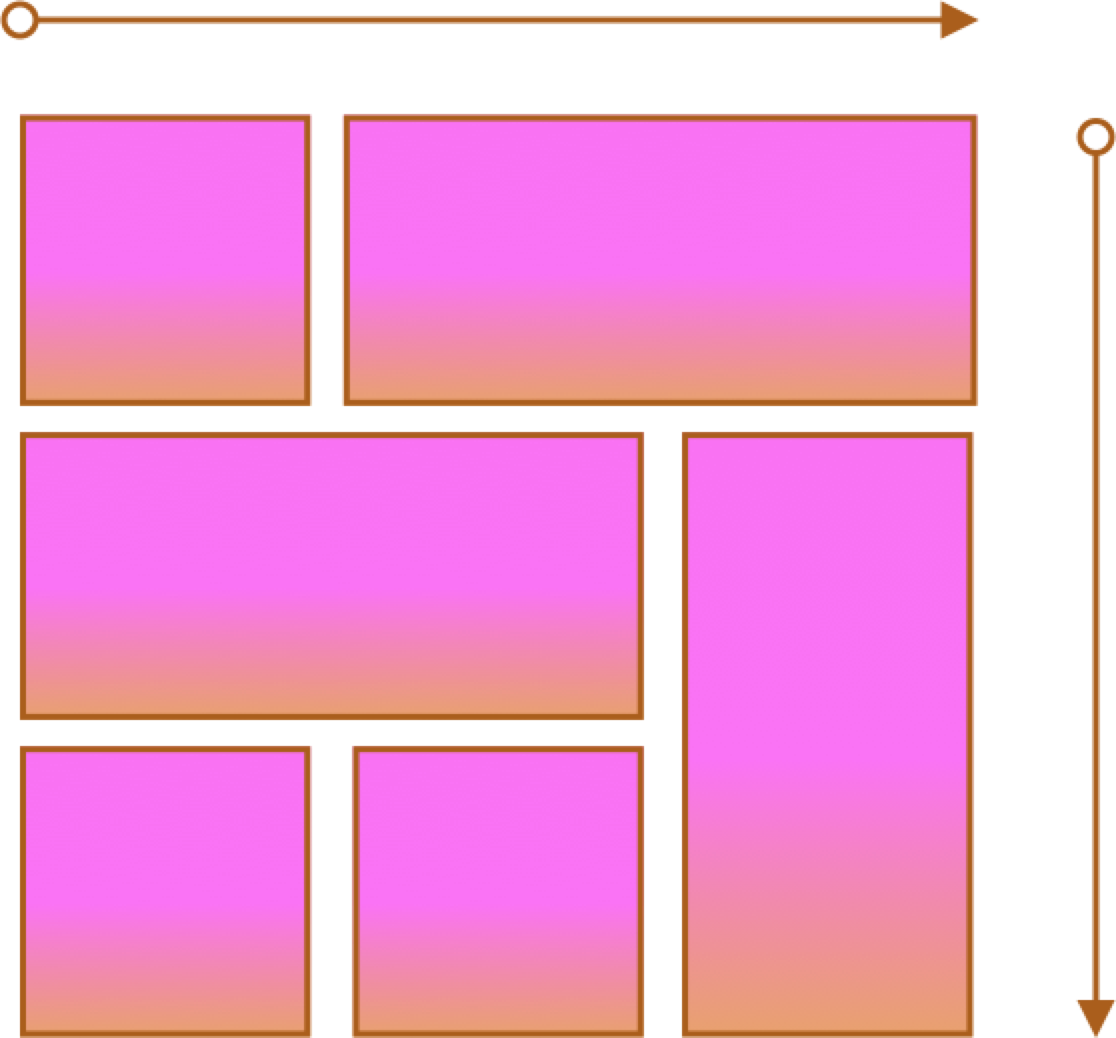
- Two axes
- More complex layouts
- Overlapping items
CSS Flexbox
Container and Items
- Set up your flex container and properties of the container.
- Set the "flex" properties on the items within your container.
- flex-basis
- flex-grow
- flex-shrink
- flex shorthand property (
flex-grow flex-shrink flex-basis)
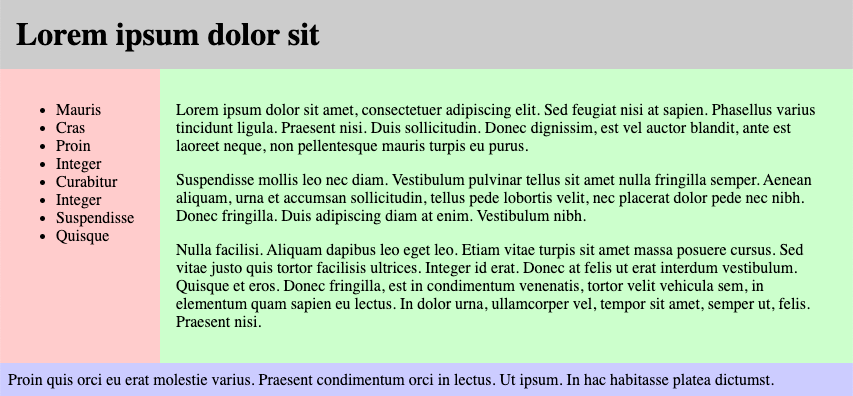
Flex and Simple Layouts

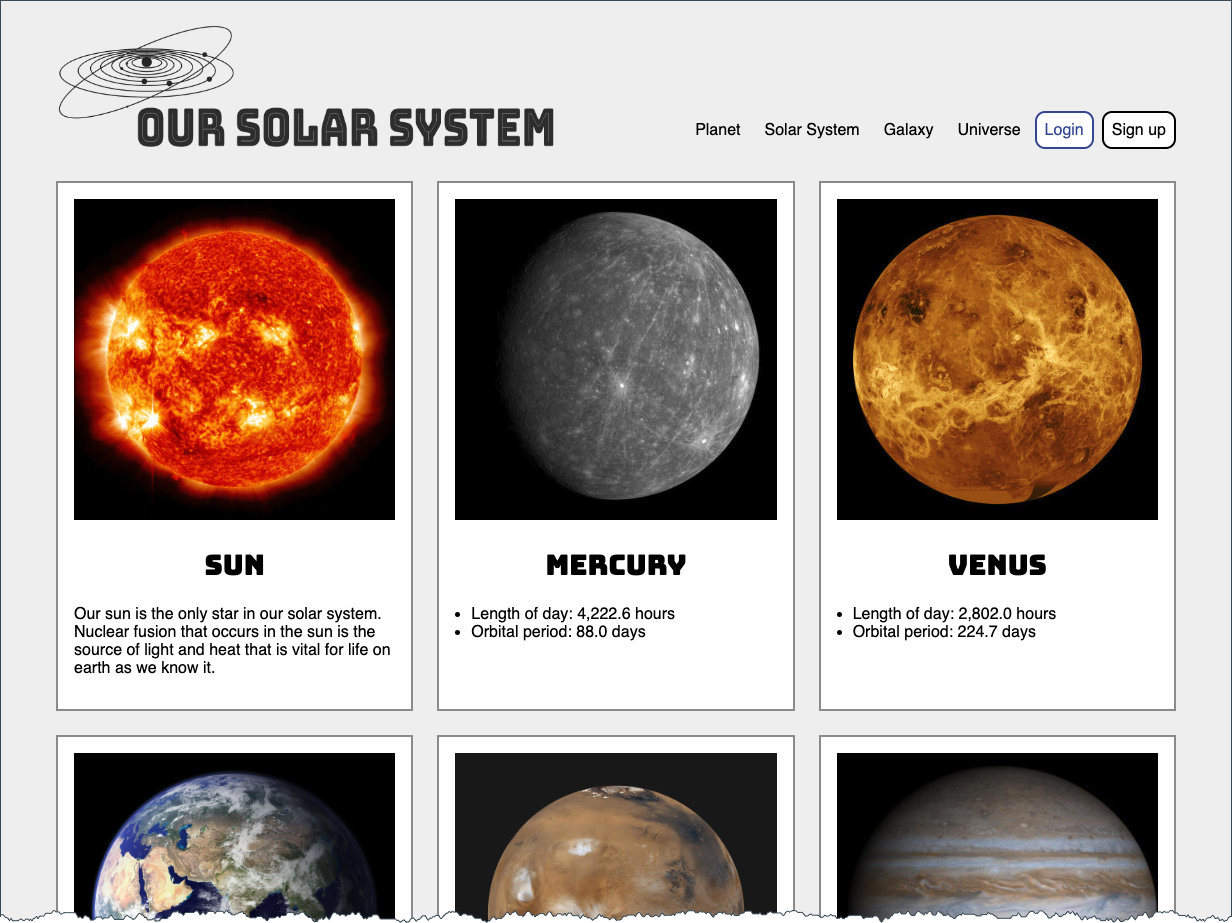
Continuing an Example - Solar System
- Worked Examples in class are with the Lecture Notes -- viewable and downloadable (zip)!
https://cscie12.dce.harvard.edu/lecture_notes/2022-fall/
Example, continued
- Use logo instead of text. See Inclusively Hidden from CSS-Tricks
- Different font for planet titles (Bungee Inline)
- Set a max-width for page content
Fonts
font-family
CSS font-family property takes a comma-separated list of fonts,
and should always end with a generic font-family (e.g. serif, sans-serif, monospace).
body {
font-family: 'Merriweather Regular', 'Times New Roman', serif;
}
How are fonts defined?
Two approaches with fonts:
- Rely on system fonts
- Use web fonts to deliver font definition as part of the resources loaded by a page
- load the font definition
- use in "font-family" CSS property
Note:
- hosted fonts or our fonts
- multiple ways of loading fonts
linkelement inheadof HTML ← use this!@importor@font-facein CSS
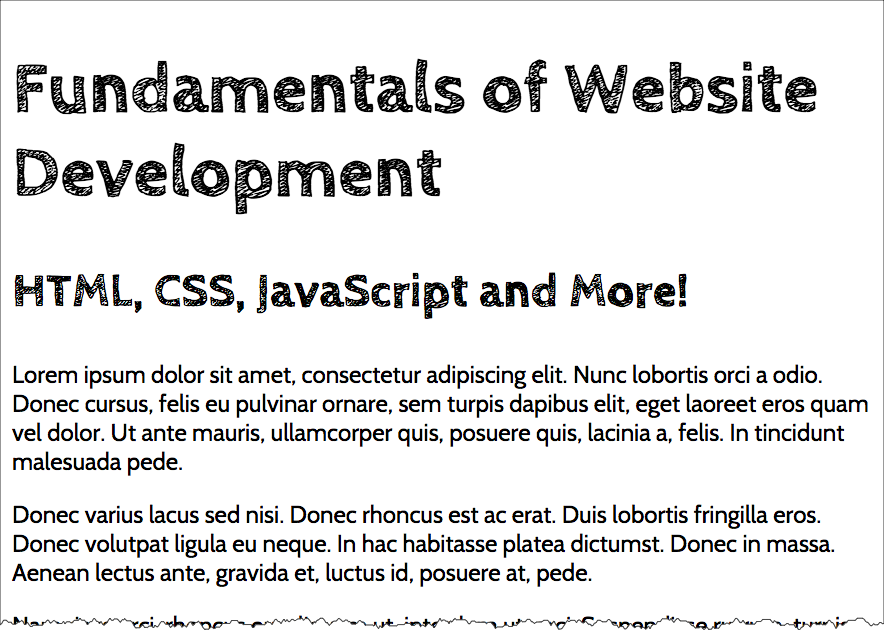
Font - Include through link element
Using a link element to include CSS with @font-face definitions is how some font hosting services recommend including their fonts. Google Fonts does this.
The server delivering the fonts does browser detection and delivers the CSS file with the appropriate font format.
Note that we are having using two Google Fonts -- Cabin Sketch and Cabin. And we also link to our own stylesheet (demo.css).
<link href="https://fonts.googleapis.com/css2?family=Cabin+Sketch:wght@400;700&family=Cabin:wght@400;700&display=swap"
rel="stylesheet" />
<link rel="stylesheet" href="demo.css" />Our CSS in demo.css:
h1,h2,h3,h4,h5,h6 {
font-family:"Cabin Sketch", sans-serif;
}

h1 {
font-size: 3em;
}

h2 {
font-size: 2em;
}

body {
font-family: Cabin, serif;
}
Note that nothing magical is going on here -- Google is simply returning CSS that uses @font-face with the font format appropriate for the browser making the request.
/* latin */
@font-face {
font-family: 'Cabin Sketch';
font-style: normal;
font-weight: 400;
font-display: swap;
src: local('Cabin Sketch Regular'), local('CabinSketch-Regular'), url(https://fonts.gstatic.com/s/cabinsketch/v14/QGYpz_kZZAGCONcK2A4bGOj8mNhNy_r-Kw.woff2) format('woff2');
unicode-range: U+0000-00FF, U+0131, U+0152-0153, U+02BB-02BC, U+02C6, U+02DA, U+02DC, U+2000-206F, U+2074, U+20AC, U+2122, U+2191, U+2193, U+2212, U+2215, U+FEFF, U+FFFD;
}
/* latin */
@font-face {
font-family: 'Cabin Sketch';
font-style: normal;
font-weight: 700;
font-display: swap;
src: local('Cabin Sketch Bold'), local('CabinSketch-Bold'), url(https://fonts.gstatic.com/s/cabinsketch/v14/QGY2z_kZZAGCONcK2A4bGOj0I_1Y5tjzAYOcFg.woff2) format('woff2');
unicode-range: U+0000-00FF, U+0131, U+0152-0153, U+02BB-02BC, U+02C6, U+02DA, U+02DC, U+2000-206F, U+2074, U+20AC, U+2122, U+2191, U+2193, U+2212, U+2215, U+FEFF, U+FFFD;
}
Font Resources
Finding or exploring fonts:
Font Pairing
Try some professional advice on font pairing (a web search on "font pairing"
will get you started.)
Start with a font for headings and another font for body.
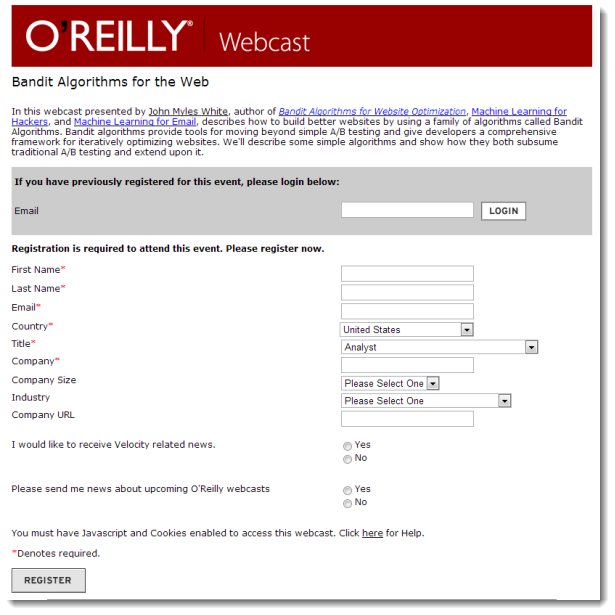
Forms - Basic
Two elements for forms are in our list of most commonly seen elements:
forminputbutton
Forms
Forms are the "front-end" for the HTTP Client to send information back to the HTTP Server. The submitted information is passed from the HTTP Server to a server-side program that processes the information and produces a response for the browser.
Forms
- Text
- Single line (text input)
- Password
- Text area (textarea)
- Choices
- Choose one
- radio group
- option list (menu)
- Choose multiple
- checkbox group
- Choose one
- File Upload
- Hidden
- Submit
Forms
form
- method ("get" or "post")
- action (URL of server-side program to process submitted data/information)
While exploring forms, it is useful to use a simple server-side script that simply echo back the name/value information your form submitted (https://cs12.net/form/submit.php).
 <form method="post" action="https://cs12.net/form/submit.php">Email Address:
   <input type="text" name="email"/>

   <button type="submit">Submit   </button>
 </form>
HTTP Method: Get vs. Post
- Use POST when form action should not be repeated; or when the action "changes the state"
- Use GET when form action is safely repeatable; when the action does not change the state.
The technical term for this is "idempotent".
- Query String
https://host/path?param1=value1¶m2=value2¶m3=value3- Question mark
- Ampersand separated parameter/value pairs
- parameter=value
 <form method="get" action="https://cs12.net/form/submit.php">Email Address:
   <input type="text" name="email"/>

   <button type="submit">Submit   </button>
 </form>
 <form method="post" action="https://cs12.net/form/submit.php">Email Address:
   <input type="text" name="email"/>

   <button type="submit">Submit   </button>
 </form>
Text Field
 <form method="get" action="https://cs12.net/form/submit.php">Email Address:
   <input type="text" name="email"/>

   <br/>
Year of Birth:
   <input type="text" name="year_of_birth" maxlength="4"/>

   <br/>

   <button type="submit">Submit Information   </button>
 </form>
Radio Buttons
 <form method="get" action="https://cs12.net/form/submit.php">Email Address:
   <input type="text" name="email"/>

   <br/>
Please send me email updates:
   <br/>

   <input type="radio" name="sendupdates" value="yes" checked="checked"/>
yes
   <br/>

   <input type="radio" name="sendupdates" value="no"/>
no
   <br/>

   <button type="submit">Submit Information   </button>
 </form>
Checkbox
 <form method="get" action="https://cs12.net/form/submit.php">What ice cream do you like?
   <br/>

   <input type="checkbox" name="icecream" value="chocolate"/>
Chocolate
   <br/>

   <input type="checkbox" name="icecream" value="chocolate peanut butter"/>
Chocolate Peanut Butter
   <br/>

   <input type="checkbox" name="icecream" value="vanilla"/>
Vanilla
   <br/>

   <input type="checkbox" name="icecream" value="strawberry"/>
Strawberry
   <br/>

   <button type="submit">Submit Information   </button>
 </form>
Textarea
 <form method="post" action="https://cs12.net/form/submit.php">
   <strong>Comments   </strong>
   <textarea name="comments" rows="10" cols="50">Please enter comments...   </textarea>
   <button type="submit">Submit Information   </button>
 </form>
In style
element
(<style>) within head element:
textarea {
        display: block;
        margin: 1rem 0;
}
Select and Option
Pull-down menu
 <form method="get" action="https://cs12.net/form/submit.php">Select your favorite New England states:
   <br/>

   <select name="state">
     <option value="CT">Connecticut     </option>
     <option value="ME">Maine     </option>
     <option value="MA">Massachusetts     </option>
     <option value="NH">New Hampshire     </option>
     <option value="RI">Rhode Island     </option>
     <option value="VT">Vermont     </option>   </select>
   <br/>

   <button type="submit">Submit Information   </button>
 </form>
Scrollable list ← DON'T DO THIS!
Note: because scrollable lists are difficult for users, they are not typically used.
A scrollable list (size attribute) that can have multiple selections (multiple attribute):
 <form method="get" action="https://cs12.net/form/submit.php">Select your favorite New England states:
   <br/>

   <select name="state" size="3" multiple="multiple">
     <option value="CT">Connecticut     </option>
     <option value="ME">Maine     </option>
     <option value="MA">Massachusetts     </option>
     <option value="NH">New Hampshire     </option>
     <option value="RI">Rhode Island     </option>
     <option value="VT">Vermont     </option>   </select>
   <br/>

   <button type="submit">Submit Information   </button>
 </form>
Accessibility: Label Element
Label elements are critical for form accessibility.
label element lets us use markup to associate text with an input element.
Using label you can make the association between the text label and the form input explicit, and not just rely on the visual proximity.
Labels - Why?
- Makes text labels associated wtih input elements explicit
- Helps with screen readers!
- Helps with "clicks" and touch screens!
Accessibility: Label Element
 <form method="get" action="https://cs12.net/form/submit.php">
   <p>Do you like to watch NCAA basketball?
   </p>
   <label>
     <input type="radio" name="basketball" value="Y"/>
Yes   </label>
   <label>
     <input type="radio" name="basketball" value="N"/>
No   </label>
   <button type="submit">Submit   </button>
 </form>
In style
element
(<style>) within head element:
label, button { display: block; }
  button { margin-top: 1rem;}
Label Element - using id, label, for
- Explicit
- id attribute for form input
- label element for input label
- for attribute in label to link label element with input via the value of id
 <form method="get" action="https://cs12.net/form/submit.php">
   <p>Do you like to watch NCAA basketball?
   </p>
   <input type="radio" name="basketball" id="basketball_y" value="Y"/>

   <label for="basketball_y">Yes   </label>
   <br/>

   <input type="radio" name="basketball" id="basketball_n" value="N"/>

   <label for="basketball_n">No   </label>
   <br/>

   <input type="submit" value="Submit"/>

 </form>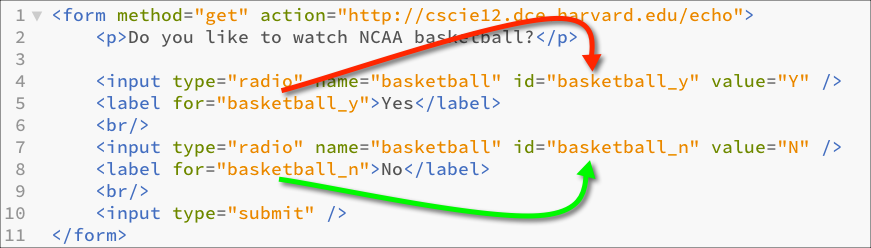
Labels
 <form method="get" action="https://cs12.net/form/submit.php">
   <div>What ice cream do you like?
     <br/>

     <input type="checkbox" name="icecream" id="icecream_chocolate" value="chocolate"/>

     <label for="icecream_chocolate">Chocolate     </label>
     <br/>

     <input type="checkbox" name="icecream" id="icecream_cpb" value="chocolate peanut butter"/>

     <label for="icecream_cpb">Chocolate Peanut Butter     </label>
     <br/>

     <input type="checkbox" name="icecream" id="icecream_vanilla" value="vanilla"/>

     <label for="icecream_vanilla">Vanilla     </label>
     <br/>

     <input type="checkbox" name="icecream" id="icecream_strawberry" value="strawberry"/>

     <label for="icecream_strawberry">Strawberry     </label>
     <br/>

     <button type="submit">Submit Information     </button>
   </div>
 </form>
fieldset and legend
Used to group related choices and even sets.
fieldset and legend elements can further help group related input fields.
 <form method="get" action="https://cs12.net/form/submit.php">
   <div>
     <fieldset>
       <legend>Name       </legend>
       <label>First Name
         <input type="text" name="fname" size="30"/>
       </label>
       <label>Last Name
         <input type="text" name="lname" size="30"/>
       </label>     </fieldset>
     <fieldset>
       <legend>Sports       </legend>
       <fieldset>
         <legend>Do you like basketball?         </legend>
         <label>
           <input type="radio" name="basketball" value="Y"/>
Yes         </label>
         <label>
           <input type="radio" name="basketball" value="N"/>
No         </label>       </fieldset>
       <fieldset>
         <legend>Do you like baseball?         </legend>
         <label>
           <input type="radio" name="baseball" value="Y"/>
Yes         </label>
         <label>
           <input type="radio" name="baseball" value="N"/>
No         </label>       </fieldset>     </fieldset>
     <button type="submit">Submit     </button>
   </div>
 </form>
In style
element
(<style>) within head element:
label { display: block; }
fieldset { margin-top: 1rem;}
button { display: block; margin-top: 1rem; padding: 0.5rem 1rem;}
optgroup
The optgroup element allows you to group a long select list.
 <p>Select a school:
 </p>
 <form method="get" action="https://cs12.net/form/submit.php">
   <select name="school">
     <optgroup label="ACC">
       <option>Boston College       </option>
       <option>Clemson       </option>
       <option>Duke       </option>
       <option>Florida State       </option>
       <option>Georgia Tech       </option>
       <option>Louiville       </option>
       <option>Miami       </option>
       <option>North Carolina       </option>
       <option>North Carolina State       </option>
       <option>Notre Dame       </option>
       <option>Pitt       </option>
       <option>Syracuse       </option>
       <option>Virginia       </option>
       <option>Virginia Tech       </option>
       <option>Wake Forest       </option>     </optgroup>
     <optgroup label="Big 10">
       <option>Illinois       </option>
       <option>Indiana       </option>
       <option>Iowa       </option>
       <option>Maryland       </option>
       <option>Michigan       </option>
       <option>Michigan State       </option>
       <option>Minnesota       </option>
       <option>Nebraska       </option>
       <option>Northwestern       </option>
       <option>Ohio State       </option>
       <option>Penn State       </option>
       <option>Purdue       </option>
       <option>Rutgers       </option>
       <option>Wisconsin       </option>     </optgroup>
     <optgroup label="Big XII">
       <option>Baylor       </option>
       <option>Iowa State       </option>
       <option>Kansas       </option>
       <option>Kansas State       </option>
       <option>Oklahoma       </option>
       <option>Oklahoma State       </option>
       <option>Texas       </option>
       <option>Texas Christian       </option>
       <option>Texas Tech       </option>
       <option>West Virginia       </option>     </optgroup>
     <optgroup label="Ivy League">
       <option>Brown       </option>
       <option>Columbia       </option>
       <option>Cornell       </option>
       <option>Dartmouth       </option>
       <option>Harvard       </option>
       <option>Penn       </option>
       <option>Princeton       </option>
       <option>Yale       </option>     </optgroup>
     <optgroup label="Pac 12">
       <option>Arizona       </option>
       <option>Arizona State       </option>
       <option>California       </option>
       <option>Colorado       </option>
       <option>Oregon       </option>
       <option>Oregon State       </option>
       <option>Stanford       </option>
       <option>UCLA       </option>
       <option>USC       </option>
       <option>Utah       </option>
       <option>Washington       </option>
       <option>Washington State       </option>     </optgroup>   </select>
   <div>
     <button type="submit">Submit     </button>
   </div>
 </form>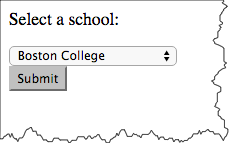

HTML5 forms
- HTML5 - Forms (HTML Living Standard)
- MDN: The form <input> element
HTML5 forms - placeholder, autofocus, and specific input types
- HTML5 Form Example
- placeholder text
- autofocus
- input types for
- url
- number
- range
- date and time
HTML5: email and url
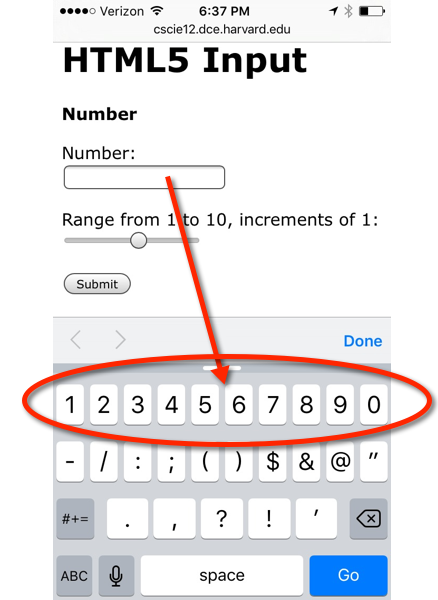
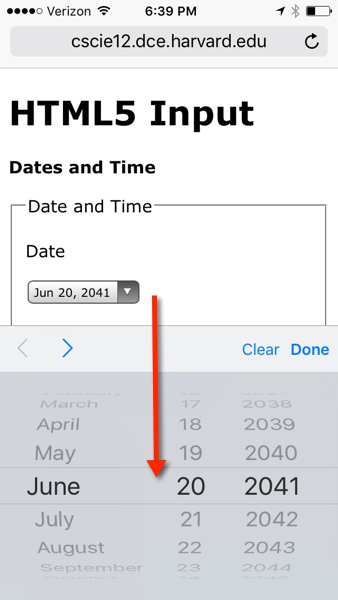
On handheld devices, screen keyboard is optimized for input.
type="email"
 <form action="https://cs12.net/form/submit.php" method="post">
   <label>Email:
     <input type="email" name="email_address"/>
   </label>
   <button type="submit">Submit   </button>
 </form>
In style
element
(<style>) within head element:
label, button { display: block; margin-top: 1rem;}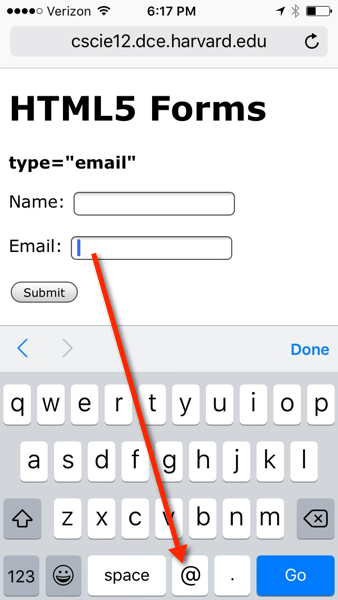
type="url"
 <form action="https://cs12.net/form/submit.php" method="post">
   <label>URL:
     <input type="url" name="url"/>
   </label>
   <button type="submit">Submit   </button>
 </form>
In style
element
(<style>) within head element:
label, button { display: block; margin-top: 1rem;}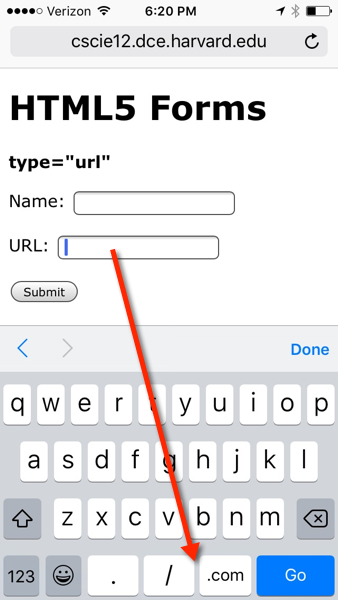

HTML5: number and range
 <form action="https://cs12.net/form/submit.php" method="post">
   <label>Pick a number:
     <input type="number" name="entered_number"/>
   </label>
   <label>How happy are you?
     <input type="range" min="1" max="5" value="3" step="1" name="happy"/>
   </label>
   <button type="submit">Submit   </button>
 </form>
In style
element
(<style>) within head element:
label, button { display: block; margin-top: 1rem;}
input { display: block; }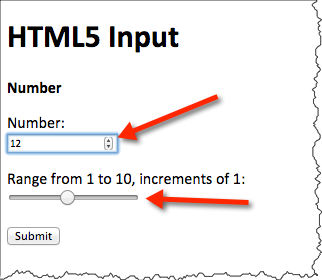
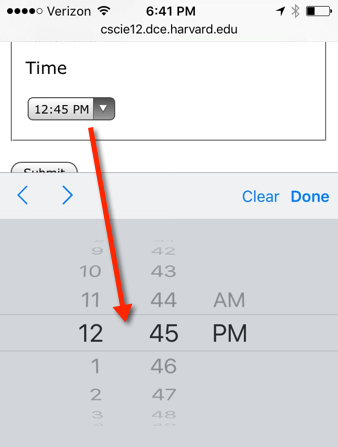
HTML5: date and time
 <form action="https://cs12.net/form/submit.php" method="post">
   <fieldset>
     <legend>Date and Time     </legend>
     <label>Pick a date:
       <input type="date" name="my_date"/>
     </label>
     <label>Pick a datetime
       <input type="datetime-local" name="my_datetime"/>
     </label>
     <label>Pick a time (15 minute increments)
       <input type="time" name="my_time_15" step="900" value="12:00"/>
     </label>
     <label>Pick a time (1 minute increments)
       <input type="time" name="my_time_1" step="60" value="12:00"/>
     </label>
     <label>Pick a time (1 second increments)
       <input type="time" name="my_time_1s" step="1" value="12:00"/>
     </label>   </fieldset>
   <button type="submit">Submit   </button>
 </form>
In style
element
(<style>) within head element:
label, button { display: block; margin-top: 1rem;}
        input { display: block;  margin-top: 0.25rem;}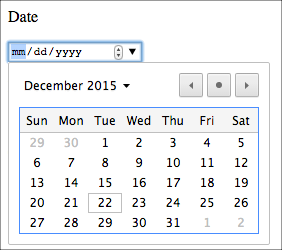

submit.php — it can do more!
Tables
See: Tabular Data from HTML5 Specification
Uses of Tables
- Data
- Layout
Table Elements
table ,
caption ,
colgroup ,
col ,
tbody ,
thead ,
tfoot ,
tr ,
td ,
th
<table>
<caption>A table </caption>
<tr>
<th>Column 1 </th>
<th>Column 2 </th>
<th>Column 3 </th> </tr>
<tr>
<td>row 1 column 1 </td>
<td>row 1 column 2 </td>
<td>row 1 column 3 </td> </tr>
<tr>
<td>row 2 column 1 </td>
<td>row 2 column 2 </td>
<td>row 2 column 3 </td> </tr>
<tr>
<td>row 3 column 1 </td>
<td>row 3 column 2 </td>
<td>row 3 column 3 </td> </tr>
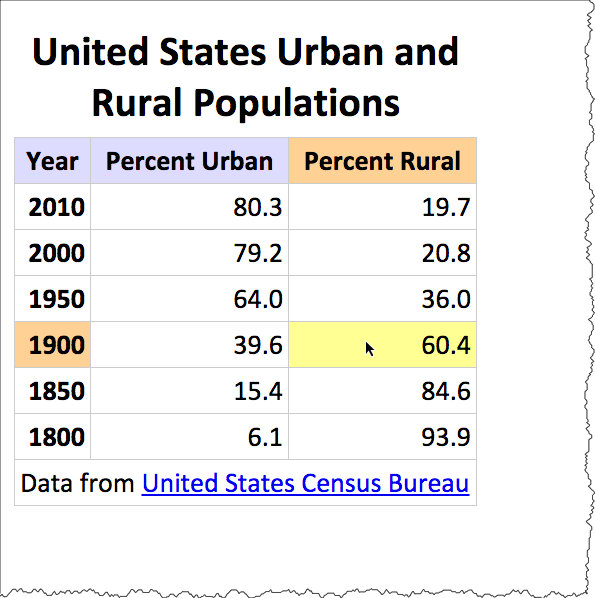
</table>A Simple Table
Data from the US Census Bureau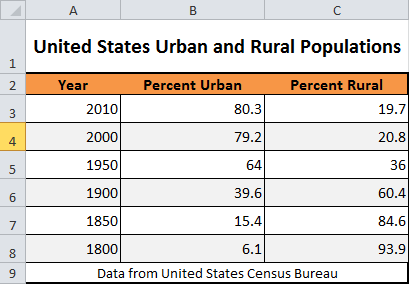
 <p>United States Urban and Rural Populations
 </p>
 <table>
   <tr>
     <td>Year     </td>
     <td>Percent Urban     </td>
     <td>Percent Rural     </td>   </tr>
   <tr>
     <th>2010     </th>
     <td>80.3     </td>
     <td>19.7     </td>   </tr>
   <tr>
     <th>2000     </th>
     <td>79.2     </td>
     <td>20.8     </td>   </tr>
   <tr>
     <th>1950     </th>
     <td>64.0     </td>
     <td>36.0     </td>   </tr>
   <tr>
     <th>1900     </th>
     <td>39.6     </td>
     <td>60.4     </td>   </tr>
   <tr>
     <th>1850     </th>
     <td>15.4     </td>
     <td>84.6     </td>   </tr>
   <tr>
     <th>1800     </th>
     <td>6.1     </td>
     <td>93.9     </td>   </tr>
 </table>
 <p>Data from
   <a href="http://www.census.gov/">United States Census Bureau   </a>
 </p>
Adding thead, tfoot, tbody, caption, and summary
<table summary="This table shows the percentage of the United States population that lived in urban and rural areas from 1800 to 2000.">
<caption>United States Urban and Rural Populations </caption>
<thead>
<tr>
<th>Year </th>
<th>Percent Urban </th>
<th>Percent Rural </th> </tr> </thead>
<tfoot>
<tr>
<td colspan="3">Data from
<a href="http://www.census.gov/">United States Census Bureau </a> </td> </tr> </tfoot>
<tbody>
<tr>
<th>2010 </th>
<td>80.3 </td>
<td>19.7 </td> </tr>
<tr>
<th>2000 </th>
<td>79.2 </td>
<td>20.8 </td> </tr>
<tr>
<th>1950 </th>
<td>64.0 </td>
<td>36.0 </td> </tr>
<tr>
<th>1900 </th>
<td>39.6 </td>
<td>60.4 </td> </tr>
<tr>
<th>1850 </th>
<td>15.4 </td>
<td>84.6 </td> </tr>
<tr>
<th>1800 </th>
<td>6.1 </td>
<td>93.9 </td> </tr> </tbody>
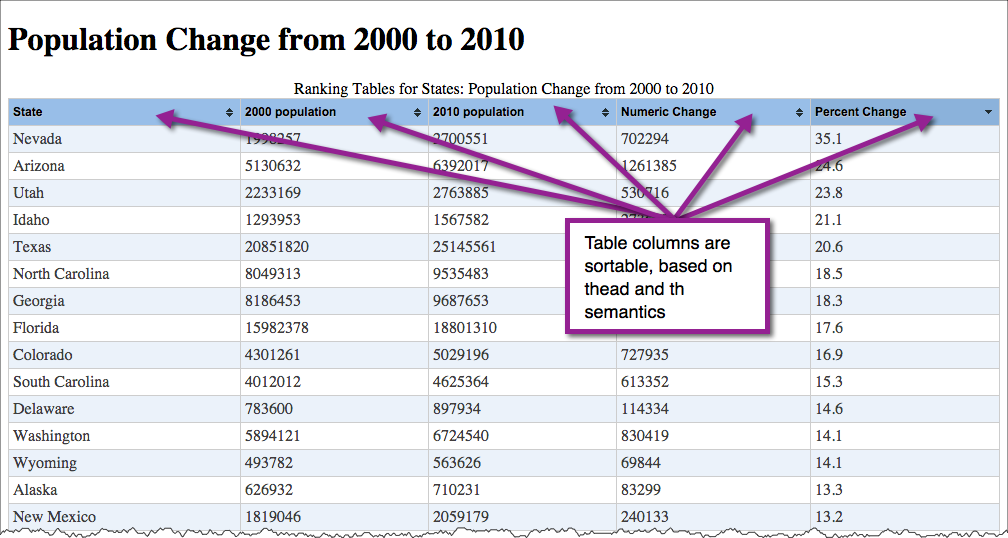
</table>Benefits of Semantics
Semantics lets us selectively manipulate parts of the table -- whether for style or function.
Using "col" and "colgroup"
col and colgroup elements can be used to as a way to apply styles (style or class attribute) to columns.
 <table>
   <caption>United States Urban and Rural Populations   </caption>
   <colgroup span="1">
     <col span="1" style="background-color: lightsalmon;"/>

     <col span="2" style="background-color: wheat;"/>
   </colgroup>
   <thead>
     <tr>
       <th scope="col">Year       </th>
       <th scope="col">Percent Urban       </th>
       <th scope="col">Percent Rural       </th>     </tr>   </thead>
   <tbody>
     <tr>
       <th scope="row">2010       </th>
       <td>80.3       </td>
       <td>19.7       </td>     </tr>
     <tr>
       <th scope="row">2000       </th>
       <td>79.2       </td>
       <td>20.8       </td>     </tr>
     <tr>
       <th scope="row">1950       </th>
       <td>64.0       </td>
       <td>36.0       </td>     </tr>
     <tr>
       <th scope="row">1900       </th>
       <td>39.6       </td>
       <td>60.4       </td>     </tr>
     <tr>
       <th scope="row">1850       </th>
       <td>15.4       </td>
       <td>84.6       </td>     </tr>
     <tr>
       <th scope="row">1800       </th>
       <td>6.1       </td>
       <td>93.9       </td>     </tr>   </tbody>
 </table>
Accessibilty of Tables
Using "scope"
The "scope" attribute can be used to associate header information with columns and rows (and also column groups and row groups).
 <table>
   <caption>United States Urban and Rural Populations   </caption>
   <thead>
     <tr>
       <th scope="col">Year       </th>
       <th scope="col">Percent Urban       </th>
       <th scope="col">Percent Rural       </th>     </tr>   </thead>
   <tfoot>
     <tr>
       <td colspan="3">Data from
         <a href="http://www.census.gov/">United States Census Bureau         </a>       </td>     </tr>   </tfoot>
   <tbody>
     <tr>
       <th scope="row">2010       </th>
       <td>80.3       </td>
       <td>19.7       </td>     </tr>
     <tr>
       <th scope="row">2000       </th>
       <td>79.2       </td>
       <td>20.8       </td>     </tr>
     <tr>
       <th scope="row">1950       </th>
       <td>64.0       </td>
       <td>36.0       </td>     </tr>
     <tr>
       <th scope="row">1900       </th>
       <td>39.6       </td>
       <td>60.4       </td>     </tr>
     <tr>
       <th scope="row">1850       </th>
       <td>15.4       </td>
       <td>84.6       </td>     </tr>
     <tr>
       <th scope="row">1800       </th>
       <td>6.1       </td>
       <td>93.9       </td>     </tr>   </tbody>
 </table>
Accessibility using "headers"
The "headers" attribute can also be used to associate header information with columns and rows. This is typically used in more complicated tables.
id attribute. Note the use of the "id" attribute. This is an attribute that can be applied to most any HTML element. Values for "id" must be unique throughout the document.
The value of "headers" is a space-separated list of IDREFS (references to "id" names in the document).


 <table>
   <caption>United States Urban and Rural Populations   </caption>
   <thead>
     <tr>
       <th id="year">Year       </th>
       <th id="urban">Percent Urban       </th>
       <th id="rural">Percent Rural       </th>     </tr>   </thead>
   <tfoot>
     <tr>
       <td colspan="3">Data from
         <a href="http://www.census.gov/">United States Census Bureau         </a>       </td>     </tr>   </tfoot>
   <tbody>
     <tr>
       <th id="y2010" headers="year">2010       </th>
       <td headers="y2010 urban">80.3       </td>
       <td headers="y2010 rural">19.7       </td>     </tr>
     <tr>
       <th id="y2000" headers="year">2000       </th>
       <td headers="y2000 urban">79.2       </td>
       <td headers="y2000 rural">20.8       </td>     </tr>
     <tr>
       <th id="y1950" headers="year">1950       </th>
       <td headers="y1950 urban">64.0       </td>
       <td headers="y1950 ruran">36.0       </td>     </tr>
     <tr>
       <th id="y1900" headers="year">1900       </th>
       <td headers="y1900 urban">39.6       </td>
       <td headers="y1900 rural">60.4       </td>     </tr>
     <tr>
       <th id="y1850" headers="year">1850       </th>
       <td headers="y1850 urban">15.4       </td>
       <td headers="y1850 rural">84.6       </td>     </tr>
     <tr>
       <th id="y1800" headers="year">1800       </th>
       <td headers="y1800 urban">6.1       </td>
       <td headers="y1800 rural">93.9       </td>     </tr>   </tbody>
 </table>
What can we do now that relationship is clear?
Once semantic markup is in place, adding function with JavaScript becomes much easier. For example, we can write some JavaScript to highlight the column/row headings based on the presence of scope or headers attributes.