
Harvard University Extension School
Spring 2018
Course Web Site: http://cscie12.dce.harvard.edu/
Instructor email: david_heitmeyer@harvard.edu
Course staff email: cscie12@dce.harvard.edu
Ajax flow: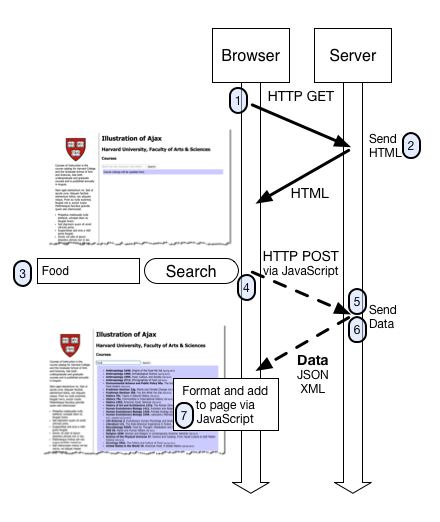
The picture below outlines what we just saw:
The picture below outlines what we just saw:
The server is simply responding to HTTP requests, and sending responses back to the browser. The "how" of looking up courses in a database based on a keyword search term is beyond the scope of this lesson -- we will demystify that part later in the course.
So we see Ajax is really a collection of technologies that are working together to send and receive data to and from the web server based on user actions, and to format and display this data to the user.
Some of the key technologies involved are:
Ajax is a term coined around 2005 - see Ajax: A New Approach to Web Applications by Jesse James Garrett
The Ajax approach has radically changed the way web applications work and have greatly improved the user experience for web-based applications -- allowing for the creation of Rich Internet Applications (RIAs) that to users "look and feel" just like desktop applications (e.g. Google Docs vs. Microsoft Word)
In addition, the Ajax approach has allowed sophisticated functionality to be easily incorporated into pages by website authors via JavaScript applications or "widgets" (e.g. Google Maps, Twitter feeds).
A data format widely used in Ajax is JSON -- this format is used to pass data from the web server to the browser, and it is in a format that is easily worked with in JavaScript.
We first need to take a look at the JSON format and how we can work with it, and then we'll see how this works together in Ajax.
The introduction to JSON from json.org is a great place to start:
JSON (JavaScript Object Notation) is a lightweight data-interchange format. It is easy for humans to read and write. It is easy for machines to parse and generate. It is based on a subset of the JavaScript Programming Language, Standard ECMA-262 3rd Edition - December 1999. JSON is a text format that is completely language independent but uses conventions that are familiar to programmers of the C-family of languages, including C, C++, C#, Java, JavaScript, Perl, Python, and many others. These properties make JSON an ideal data-interchange language.
JSON is built on two structures:
These are universal data structures. Virtually all modern programming languages support them in one form or another. It makes sense that a data format that is interchangeable with programming languages also be based on these structures.
FAQ
Let's take a look at the two data structures that JSON uses: objects and arrays.
In short, a JSON object is an unordered list of name/value pairs.
A JSON object example:
Note that the object (collection of name/value pairs) is enclosed in {curly braces}.
The name/value pair has a colon after the name (i.e. name: value), and the name/value pairs are separated by a comma.
So the object above represents the following:
| Name | Value |
|---|---|
| lastName | Faust |
| firstName | Drew |
| president@harvard.edu |
In short, a JSON array is an ordered sequence of values. Values are strings (in quotes), numbers, arrays, objects, or boolean (true/false) values.
A JSON array example
In the examples above, we've shown the values as strings (e.g. "Spring" or "Faust"). But values can also be arrays or objects. Below is a more complex JSON object that includes two name/value pairs whose values are an array of strings ("seasons") and the other an array of objects ("days"):
There are several online JSON viewers and validators you can use that are helpful for exploring, writing, or validating JSON structures:
Now that we have a sense of JSON and its "object" and "array" structures, let's see how we can create content from JSON using JavaScript.
We'll use the jQuery JavaScript library to build up markup based on data in the JSON structure, and then we'll place it on the page.
We'll use the "seasons" array to build an unordered list of seasons.
The JSON data:
The result we will build: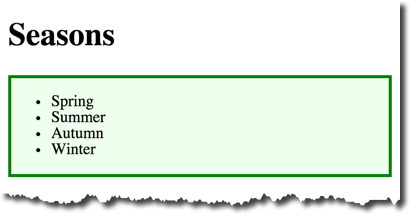
Let's take a look at the important parts:
HTML:
JavaScript:
var mydata = {"seasons":["Spring", "Summer", "Autumn", "Winter"]};var seasons = mydata.seasons;seasons that is equal to mydata.seasons. At this point, the variable seasons is equal to ["Spring", "Summer", "Autumn", "Winter"]var ul_node = $('<ul>');ul node,
for (var i in seasons) { i will be 0, the second time, i will be 1, etc. And to access the value of the array, seasons[i] will be used — seasons[0] is Spring and seasons[1] is Summer, etc.var li_node = $('<li>'); li node.li_node.text(seasons[i]); li node to be the value of the array item (e.g. first time through the loop, this creates 
ul_node.append(li_node); li node to the ul node (e.g. the first time through the loop, we will then have 
} for (var i in seasons) {$('#seasons').append(ul_node);ul is completed, we append it to the element whose id is #seasonsComplete markup is:
So we have some jQuery that will take the "seasons" array and create an unordered list from it. Let's turn this into a generic JS function that will take any array and make an unordered list.
We'll build on the success of what we have -- we've done the work, we just need to organize it a bit differently. We'll define a JS function, "array_to_ul" that accepts an array as an argument (arguments are parameters that are passed to the function when we call it).
So now we'll bring Ajax into the picture by requesting data from the server. The server will return the seasons JSON data, and we will then pass array of seasons to our function that will create the unordered list.
The jQuery library makes working with Ajax requests very easy. jQuery has a getJSON method that makes requesting and receiving JSON data from the server easy. In the simplest case, we'll pass two parameters when we use the getJSON method: a URL that will be requested, and a "callback" function that will be called on a successful retrieval of JSON data. A simple case where we make a JSON request to the url "seasons.json" and simply log the data to the JS console looks like:
$(document).ready(function(){
  $.getJSON("seasons.json",function(data) {
    console.log(data);
  });
});"seasons.json"function(data){ console.log(data); }data is the data from the JSON request.Example of getJSON in JSFiddle
So we take our previous example, where we built a list from a JSON data structure, and change it so that the JSON data comes from an Ajax request (using the getJSON) method of jQuery:
When working with Ajax, it is important to understand some basic concepts of web application security. Some concepts we'll briefly describe are:
These are important to understand since the browser restricts the Ajax calls allowed.
This is the simplest policy, and will cover all cases where the data you are requesting comes from the same hostname as the page making the request.
Under the same origin policy, a web browser will permit JavaScript contained in a web page to access data from the same origin -- or the same "hostname" of the URL.
So if your JavaScript and the data it is accessing all come from the same origin (hostname in the URL), the browser will permit this communication.
If the JavaScript and the data come from different origins (hostnames), then the browser will block this for security reasons.
For JavaScript to access data that comes from different origins, two techniques can be used: CORS and JSONP.
CORS is a common and preferred method for handling cross-origin requests.
Using CORS, it is possible for the browser and server to determine whether or not to allow a cross-origin request. This happens as part of the HTTP request. The server can specify access control rules, which a browser will then use to determine whether a cross-origin request is permitted.
We won't go into how make the server-side CORS compatible right now. From the front-end perspective, it is enough to understand that you are using a CORS-enabled service. You don't need to do anything to enable CORS from within your JavaScript -- it already is there and is used by the browser.
For example, the service from "cdn.rawgit.com" (e.g. apples.json) uses CORS, which is why the "Pick Your Own Apples" example worked fine, despite the different origins between the page the JSON.
Note: the JSONP technique pre-dates CORS. JSONP is still in use, but CORS is the preferred approach.
With JSONP, a new "script" element is dynamically created (no restrictions on cross-origin requests for "script" elements), and the JSON returned is wrapped in a function, which you can then call to get the JSON. Since the JSON is wrapped in a function, the "P" is for the "padding". So depending on your perspective, JSONP exploits a back-door to the cross-origin issue, or it is a clever solution to the cross-origin issue.
So far, we've only discussed the JSON data format. While JSON is a very common format and easy to work with in JavaScript, it is not the only data interchange format used.
XML gives a way of defining other markup languages (for example, HTML is a markup language that has an XML format). The "X" is for extensible, so XML is flexible in the data and documents that it can contain.
There is essentially no computer in the world, desk-top, hand-held, or back-room, that doesn't process XML sometimes. This is a good thing, because it shows that information can be packaged and transmitted and used in a way that's independent of the kinds of computer and software that are involved. XML won't be the last neutral information-wrapping system; but as the first, it's done very well.Tim Bray (Sun Microsystems)Quote from the press release of the W3C XML 10 Celebration in 2008
An example of course data in XML format is:
When working with XML in JavaScript, you can use the DOM, or there are libraries to convert XML to JSON.
One important aspect of XML is that it is really a family of technologies that interoperate quite well -- once you are in the XML world and using XML technologies, working with XML can be easy, straightforward, and even fun. Examples of XML technolgoies are:
So an example where we have the seasons array in XML:
<seasons>
  <season>Spring</season>
  <season>Summer</season>
  <season>Autumn</season>
  <season>Winter</season>
</seasons>
We could process that in jQuery by:
$.get("seasons.xml",function(data){
  var ul_node = $('<ul/>');
  console.log(data);
  $(data).find("season").each(function(){
    var season_string = $(this).text();
    console.log($(this));
    $('<li/>').text(season_string).appendTo(ul_node);
  });
  ul_node.replaceAll($('#seasonslist'));
});
Full code:
Working Examples:
Which is better, JSON or XML ? There are quite a few strong opinions as to whether JSON is better than XML or XML is better than JSON. The answer, of course, is "it depends". For delivering data to a web browser to process with JavaScript and present on a web page, JSON comes out ahead of XML. However, there are many cases where XML will be judged the winner over JSON.
Sometimes a snippet of HTML (not a full document) will be returned by an Ajax service -- this content just needs to be placed on a page. This approach is easy because formatting is not required on the client-side, but this approach is not flexible since changes in formatting have to be implemented on the server-side.
Having the separation of data coming from the server-side in the form of JSON (or even some other format), and doing the work to display and present it on the client-side is a beneficial separation of concerns. If the formatting and display requirements change, it is a change to the front-end (client-side) code (HTML, CSS, JS) as opposed to the server-side. However, while the technique we've seen to process JSON into markup and place it on the page is entirely on the client-side (as opposed to server-side), a big drawback is that we've done this entirely in JavaScript.
For example, to build a list of seasons, we did something like:
Good News: We do have separation between front-end and back-end! Front-end does the structuring and display; the back-end provides the data.
Bad News: We have mixing of concerns between structure (markup) and function (JavaScript). We do not have good separation between structure (HTML), style (CSS), and function (JS) within the front-end. We have to read through the JavaScript to figure out how our data will be structured. If we want to change how the data is structured, we need to edit the JavaScript.
Using JavaScript templates, building a list could look something like:
There are a variety of libraries for making templates in JavaScript. I'll mention four here, and we'll focus on one in our examples (Handlebars):
KISS - Keep It Simple.
Before we get started with an example, I want to put a strong recommendation to follow the keep your templates simple principle. Trimpath JST and Mustache forces you to do this -- with Handlebars, you can keep your templates simple, but you can make them complex. Remember that the prime benefit we want to achieve with templates is for our presentation format to be defined separately from our JavaScript code. The more complex our templates get, the further we get from achieving that benefit.
We'll focus on using the Handlebars template library. Other template systems will do similar things though, with different syntax.
With Handlebars, the key parts are:
Handlebars syntax are based on double curly braces, like {{ handlebar expression }}.
So to iterate through the <code>seasons</code> array, our Handlebars template would look like:
<ul>
  {{#seasons}}
  <li>{{.}}</li>
  {{/seasons}}
</ul>
To re-implement our "seasons list" example using Handlebars, we could something like:
seasons array
{{#seasons}} starts the iteration{{/seasons}} ends the iteration{{.}} refers to item of the arraydisplay: none; by CSS. There are other ways to include templates, which we'll discuss a bit later.#seasonslisttemplate and get the htmlSee the working examples:
Let's take a look at a Handlebars template that processes information about Courses from the Faculty of Arts & Sciences at Harvard University.
Courses - ExampleCourses - JSFiddle
Course data. First, here is a JSON string built based on a query of the course database for all the courses with a keyword of "food". It would be typical to have this query built from a form and return "live" results in JSON, but to keep things simpler for this example, we'll just use this static list: courses.json
Handlebars template. In this JSON structure, there is an array of course objects (the "name" part is courses, the value is the array of course objects). In Mustache, we'll need to iterate through the courses, and for each one, we'll output some information about the course. Assuming we pass the Mustache template the JSON object above, this would look something like:
<div id="courselisttemplate" class="handlebars">
<ul>
{{#courses}}
    <li class="course">
    <span class="number">{{course_group}} {{num_int}}{{num_char}}</span>
    <br/>
    <span class="title">{{title}}</span>
    </li>
{{/courses}}
</ul>
</div>
Notice how we can simply reference the "name" of a name/value pair in an object, like {{title}}.
The above template would render like: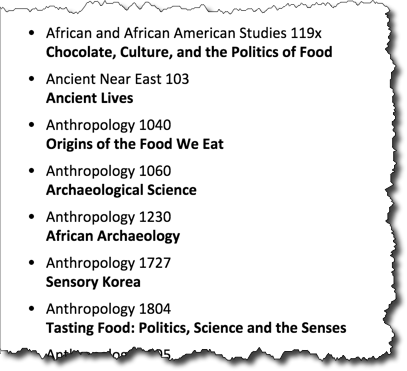
We'll make this example a bit more complete by adding the faculty_text and meeting_text to the output. Also, we can add the number of courses returned by using {{courses.length}}.
<div id="courselisttemplate" class="handlebars">
<p>{{courses.length}} courses were found</p>
<ul>
{{#courses}}
    <li class="course">
    <span class="number">{{course_group}} {{num_int}}{{num_char}}</span>
    <br/>
    <span class="title">{{title}}</span>
    <br/>
    <span class="faculty">{{faculty_text}}</span>
    <br/>
    <span class="meeting">{{meeting_text}}</span>
    </li>
{{/courses}}
</ul>
</div>
And the result would look like:
http://cscie12.dce.harvard.edu/ajax/course_search<form id="course_search_form">
<div>
<input type="text" id="search_query" name="search_query" size="40" placeholder="Search by title, instructor, description" />
<input type="submit" name="submit" value="Search" />
</div>
<div id="courselist">
Course Listings will be updated here.
</div>
</form>$(document).ready(function () {
console.log("DOM READY!");
var course_template_source = $('#courselisttemplate').html();
var course_template_compiled = Handlebars.compile(course_template_source);
console.log(course_template_source);
console.log(course_template_compiled);
$('#course_search_form').submit(function (e) {
console.log("form submitted!")
var search_term = $('#search_query').val();
console.log("search term is: " + search_term);
$.getJSON('/ajax/course_search', {
'keyword': search_term,
'output': 'json'
},
function (data) {
console.log("data retrieved is: ");
console.log(data);
var myresult = course_template_compiled(data);
$('#courselist').html(myresult);
}
)
e.preventDefault();
});
});<div id="courselisttemplate" class="handlebars">
<p>{{courses.length}} courses were found</p>
<ul>
{{#courses}}
<li class="course">
<span class="number">{{course_group}} {{num_int}}{{num_char}}</span>
<br/>
<span class="title">{{title}}</span>
<br/>
<span class="faculty">{{faculty_text}}</span>
<br/>
<span class="meeting">{{meeting_text}}</span>
</li>
{{/courses}}
</ul>
</div>See: JSFiddle Example of Handlebars Loop Techniques
With Handlebars, you can also iterate explicitly with {{#each }}
With the context of our "seasons" JSON:
{
  "seasons": [
    "Spring",
    "Summer",
    "Autumn",
    "Winter"
  ]
}
We could do:
<ul>
    {{#each seasons}}
    <li>{{.}}</li>
    {{/each}}
</ul>
We can also specify the name of the parameter to be used within the loop:
<ul>
    {{#each seasons as |season|}}
    <li>{{season}}</li>
    {{/each}}
</ul>
Both of the above would produce: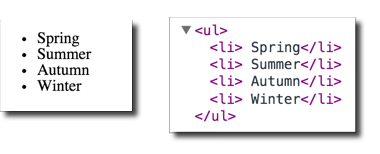
If needed, you can also pass in the index position as well (remember that the first item in an array is index position = 0, second item is index position = 1, etc.).
<ul>
    {{#each seasons as |season pos|}}
    <li>{{pos}} {{season}}</li>
    {{/each}}
</ul>
Which would produce: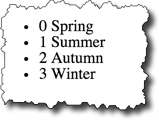
Sometimes we might want to format data based on certain conditions. For example, if an email address or URL exists for a person, we might want to include a mailto: link or a link to the URL. Handlebar conditionals allow to do that.
People in JSON:
{
    "people": [
        {
            "name": "Drew Faust",
            "url": "http://president.harvard.edu/"
        },
        {
            "name": "Alan Garber",
            "url": "http://provost.harvard.edu/people/alan-m-garber"
        },
        {
            "name": "Katie Lapp"
        }
    ]
};
For example, if we wanted to hyperlink a name if a URL exists, our Handlebars template could look something like:
<ul>
{{#each people as |person|}}
  <li>
  {{#if person.url }}
    <a href="{{person.url}}">{{person.name}}</a>
  {{else}}
    {{person.name}}
  {{/if}}
  </li>
{{/each}}
</ul>
And this would produce: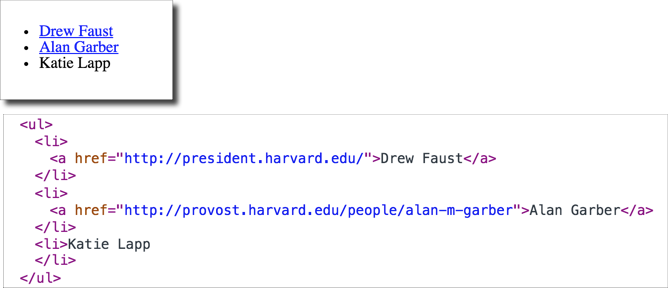
It is possible to precompile your Handlebars template (the result is a JavaScript function), and then include the compiled templates via a script element.
Advantages of precompiling the templates include:
So here's an example where I've compiled the course list template into courseslist.js. Now there's no compile step, just a reference to Handlebars.templates.courseslist to access the template function. Note too that we are using the "runtime" version of the Handlebars library - handlebars.runtime.min.js
Note the command to compile the template looked like:
$ handlebars.js courseslist -f courseslist.jswhere courseslist is the source template, and courseslist.js is the generated compiled JS file
With JavaScript APIs for Google Maps, Bing Maps, and MapQuest, it is very easy to embed customized maps on your website.
We'll focus on using the JavaScript API for Google Maps, although similar capabilities exist with other map platforms. If we want to include a map on our website, there are a few possible ways to solve this problem:
Each approach has some advantages and shortcomings. Essentially the trade-offs will be increased complexity with increased flexibility and control.
You can create a map using Google's tools, and then simply click the cog icon and select "Share or embed". The "embed map" option will give you an iframe code you can use in your web page. It doesn't get much simpler than this. If you want to embed a map with the location of a single store or organization, then this technique will work well.
A map I created for the John Harvard Statue:

The iframe code provided by Google:
<iframe style="border: 0;"
  src="https://www.google.com/maps/embed?pb=!1m14!1m8!1m3!1d1473.7541883076933!2d-71.11691195715973!3d42.37431548010373!3m2!1i1024!2i768!4f13.1!3m3!1m2!1s0x0%3A0x1b5299f9d1edac24!2sJohn+Harvard+Statue!5e0!3m2!1sen!2sus!4v1428381157098"
  width="600" height="450"></iframe>
And the map that is embedded:
For further information about the Google Map Embed API, please see
https://developers.google.com/maps/documentation/embed/guide
Cases where the embed approach wouldn't work so well:
An example where a static embedded map would not work is with the Student Locations tool for this course. This tool allows students to enter their location information, and then the map is built dynamically based on this data. In addition, this tool displays different data, depending on whether the viewer is a student or an instructor. This is a case where we'll need more control over the map than a straightforward embed approach will allow.
The Google Maps JavaScript API will give us that control.
There is extensive documentation for the Google Maps JavaScript API, at
https://developers.google.com/maps/documentation/javascript/tutorial that you can consult. But for now, it will be enough to walk through some examples.
We'll learn by example with a
So first, we'll start with a map that is centered on the John Harvard statue in Harvard Yard.
To use the Google Maps JavaScript API, we'll need to load the Google Map JavaScript via a script element, and then we'll need to configure the map and then place it on the page.
Load the JavaScript:
<script src="https://maps.googleapis.com/maps/api/js?v=3.exp"> </script>Use the JavaScript:
var map;
/* John Harvard Statue
   42.374474,-71.117207 */
var mylat = 42.374474;
var mylng = -71.117207;
function initialize_map() {
    var mapOptions = {
        zoom: 17,
        center: new google.maps.LatLng(mylat, mylng)
    };
    map = new google.maps.Map(document.getElementById('map-canvas'),
    mapOptions);
}
google.maps.event.addDomListener(window, 'load', initialize_map);google.maps.event.addDomListener is the Google Maps way of adding an event handler.initialize_mapinitialize_map function:
mapOptions is a JS data structure. zoom level is how close (larger is closer)google.maps.LatLng is the method that creates a Google Maps LatLng object. In this case, we are setting the center of the map to the location of the John Harvard statuegoogle.maps.Map is the method to create a Google Map. We pass in as parameters where to place it on the page (note the DOM method, document.getElementById), and the second parameter is the data structure of map optionsFull example:
Basic Map working examples:
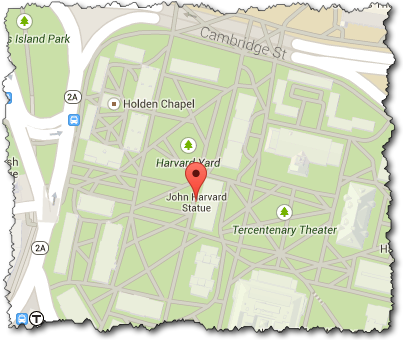
To put a marker on the map, we'll create a google.maps.Marker object. When we create the marker, one of the parameters we'll pass in as part of the configuration data structure is the map we want to place it on.
So if we've created a google.maps.Map object as the variable harvard_yard_map and a googlemaps.LatLng object as the variable latlng_statue, the new JavaScript code to create a marker for the John Harvard statue would look like:
var marker = new google.maps.Marker(
  {
    position: latlng_statue,
    map: harvard_yard_map,
    title: 'John Harvard Statue'
  }
);
Note there is a single parameter passed to the google.maps.Marker method -- this parameter is a JavaScript data structure of name/value pairs.
Full example:
Map with Marker working examples:
Read more about Markers, Google JavaScript API documentation for additional information, such as using customized icons.
Now that we have a marker on the map, we can add an information window.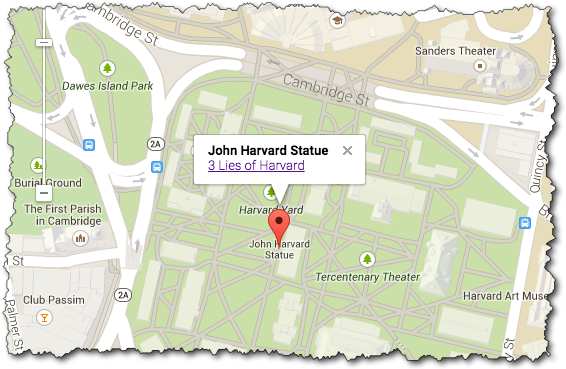
There are three basic things to pay attention to:
google.maps.InfoWindowThese steps are shown below:
/* Create content.  Here we are concatenating strings together with the JS "+" operator */
var statue_info = "<strong>John Harvard Statue</strong><br/>" +
    "<a href='http://www.summer.harvard.edu/blog-news-events/3-lies-harvard'>3 Lies of Harvard</a>";

/* Create the InfoWindow object; note we pass in the content */
var statue_infowindow = new google.maps.InfoWindow({
    content: statue_info
});

/* Create the marker (we've seen this before) */
var statue_marker = new google.maps.Marker({
  position: statue_latlng,
  map: harvard_yard_map,
  title: 'John Harvard Statue'
});

/* Create the listener so that the info window opens when the marker is clicked */
google.maps.event.addListener(statue_marker, 'click', function() {
  statue_infowindow.open(harvard_yard_map,statue_marker);
});
Full example:
Map with Marker working examples:
Now let's use JSON data to add several markers to a page.
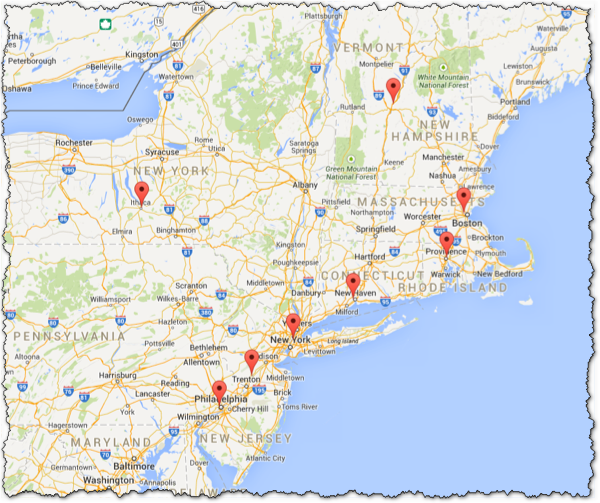
Map with Ivy Schools from JSON Data - Live Example
The JSON data (schools.json) we'll use is a list of schools in the Ivy League -- which contains a latitude, longitude, name, and URL.
We'll use jQuery to get the JSON data, and we'll use the Google Maps API to create the map. The full code is shown below, but the key part to creating the markers is where iterate through the list of schools:
 for (var i in school_list) {
  var school = school_list[i];
  var mylatlng = new google.maps.LatLng(school.lat, school.lng);
  var marker = new google.maps.Marker({
                                       position: mylatlng,
                                       map: ivy_map,
                                       title: "school.name"
                                      });
}
Full code:
We've seen the power of JavaScript, and the ease by which widgets are included on a page, and with a bit of knowledge, we can configure these widgets to work in customized ways.
With JavaScript widgets, it is easy to integrate tie-ins to social media into a site -- making it easy for users to share your site, or making it easy to integrate social media presence onto a site.
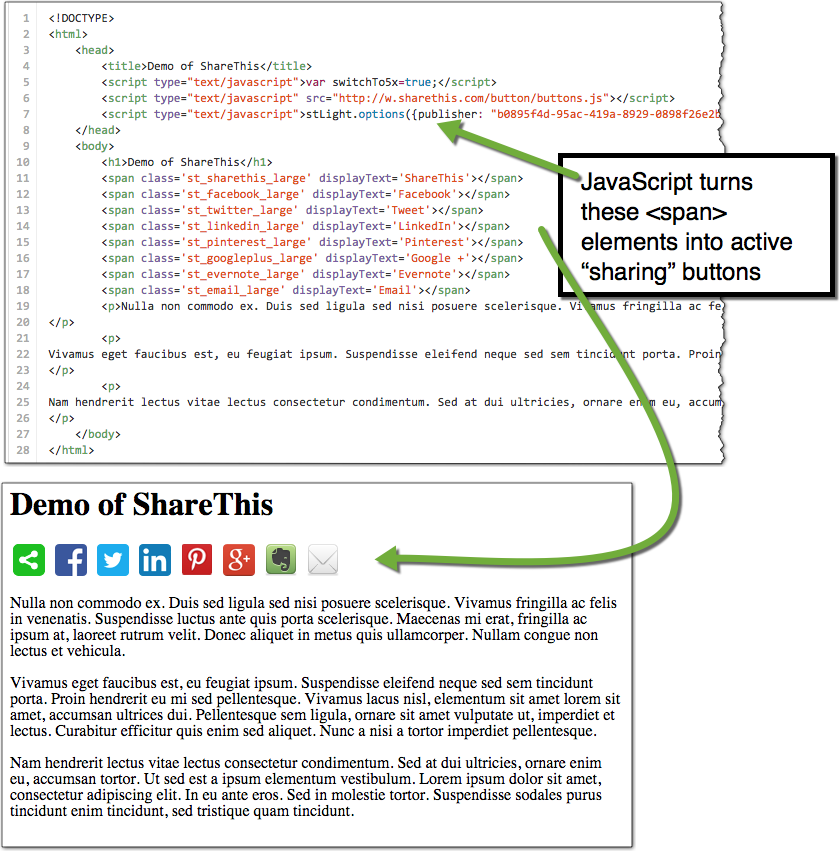
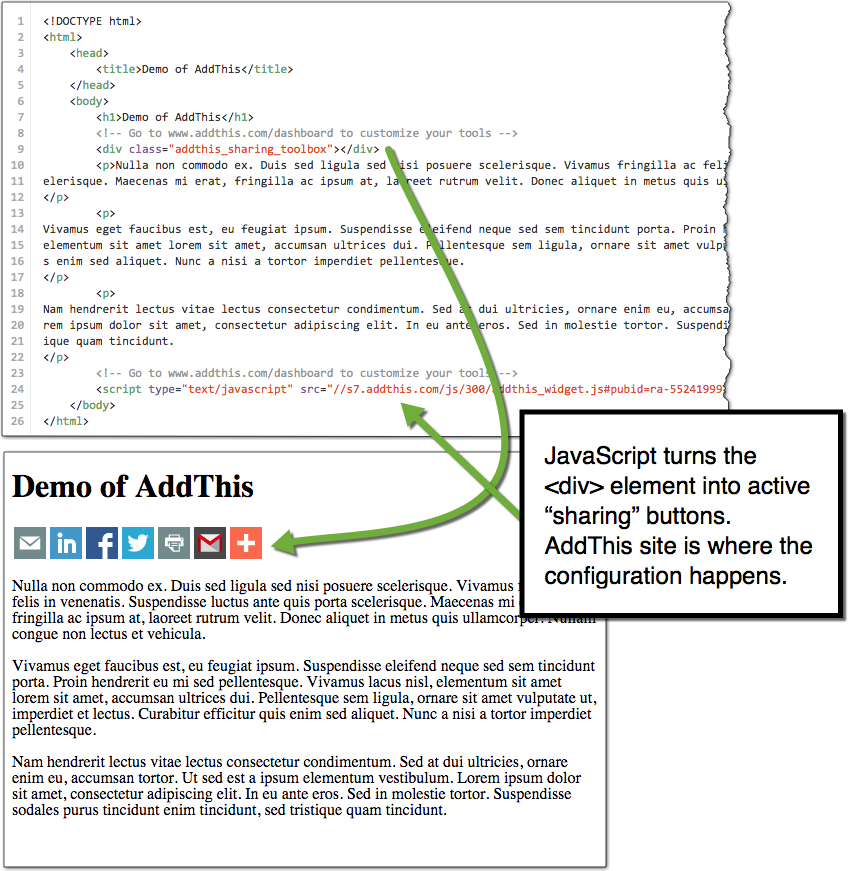
These services (ShareThis and AddThis) make it easy to add "sharing" buttons to your site.
They use the principles we've seen of using JavaScript to alter the page -- the JavaScript is provided by the service, and there are plenty of configuration and customization options to use.
These are configured in a "wizard-like" fashion, so the barrier to entry is quite low.
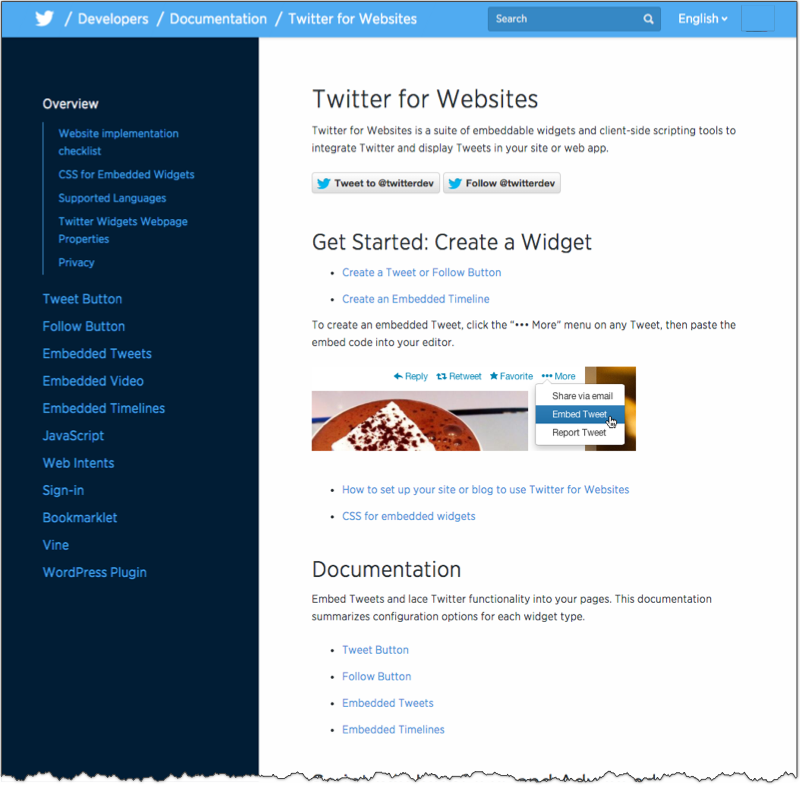
Twitter easily integrates into websites -- see Twitter for Websites. You can create "Tweet" and "Follow" buttons, as well as embed individual tweets and timelines.
Twitter provides the "wizard" tools, so you can easily configure what you want, and then have the code to use on your site.
Facebook also integrates easily into sites using their easily configured Social Plugins (Like, Share, Send buttons; you can also embed posts and parts of your page).
Configuration is through a wizard, and you'll get a combination of markup plus JavaScript to include in your page.
With the power of JavaScript widgets, we've seen how it is possible to embed sophisticated mapping functionality on a site. There are plenty of other JavaScript widgets available that provide additional functionality.
Discussion and comment services can be used by embed this functionality on a site. All the "work" of the discussion / comments (authentication, storing, displaying, etc.) is handled by the third party. For example, comment functionality for WBUR and the Harvard Crimson use the service Disqus. Other examples include Livefyre and Intense Debate


At the beginning of the unit on JavaScript, our goals were:
For those who want more, I recommend the following resources:
Copyright © David Heitmeyer