Session 11 - Javascript, Part 4
Harvard Extension School
Fall 2022
Course Web Site: https://cscie12.dce.harvard.edu/
Topics
- This week's work: JavaScript Choose Your Own Adventures
- Forms - Basic
- Accessibility: Label Element
- HTML5 forms
- Maps
- Google Maps JavaScript API
- Map with Several Markers
- Maps - Leaflet JS and Open Street Map
Presentation contains 30 slides
This week's work: JavaScript Choose Your Own Adventures
Pick two of:
- Templates
- Maps
- Form validation
- Image Gallery
Forms - Basic
Two elements for forms are in our list of most commonly seen elements:
forminputbutton
Forms
Forms are the "front-end" for the HTTP Client to send information back to the HTTP Server. The submitted information is passed from the HTTP Server to a server-side program that processes the information and produces a response for the browser.
Forms
- Text
- Single line (text input)
- Password
- Text area (textarea)
- Choices
- Choose one
- radio group
- option list (menu)
- Choose multiple
- checkbox group
- Choose one
- File Upload
- Hidden
- Submit
Forms
form
- method ("get" or "post")
- action (URL of server-side program to process submitted data/information)
While exploring forms, it is useful to use a simple server-side script that simply echo back the name/value information your form submitted (https://cs12.net/form/submit.php).
 <form method="post" action="https://cs12.net/form/submit.php">Email Address:
   <input type="text" name="email"/>

   <button type="submit">Submit   </button>
 </form>
HTTP Method: Get vs. Post
- Use POST when form action should not be repeated; or when the action "changes the state"
- Use GET when form action is safely repeatable; when the action does not change the state.
The technical term for this is "idempotent".
- Query String
https://host/path?param1=value1¶m2=value2¶m3=value3- Question mark
- Ampersand separated parameter/value pairs
- parameter=value
 <form method="get" action="https://cs12.net/form/submit.php">Email Address:
   <input type="text" name="email"/>

   <button type="submit">Submit   </button>
 </form>
 <form method="post" action="https://cs12.net/form/submit.php">Email Address:
   <input type="text" name="email"/>

   <button type="submit">Submit   </button>
 </form>
Text Field
 <form method="get" action="https://cs12.net/form/submit.php">Email Address:
   <input type="text" name="email"/>

   <br/>
Year of Birth:
   <input type="text" name="year_of_birth" maxlength="4"/>

   <br/>

   <button type="submit">Submit Information   </button>
 </form>
Radio Buttons
 <form method="get" action="https://cs12.net/form/submit.php">Email Address:
   <input type="text" name="email"/>

   <br/>
Please send me email updates:
   <br/>

   <input type="radio" name="sendupdates" value="yes" checked="checked"/>
yes
   <br/>

   <input type="radio" name="sendupdates" value="no"/>
no
   <br/>

   <button type="submit">Submit Information   </button>
 </form>
Checkbox
 <form method="get" action="https://cs12.net/form/submit.php">What ice cream do you like?
   <br/>

   <input type="checkbox" name="icecream" value="chocolate"/>
Chocolate
   <br/>

   <input type="checkbox" name="icecream" value="chocolate peanut butter"/>
Chocolate Peanut Butter
   <br/>

   <input type="checkbox" name="icecream" value="vanilla"/>
Vanilla
   <br/>

   <input type="checkbox" name="icecream" value="strawberry"/>
Strawberry
   <br/>

   <button type="submit">Submit Information   </button>
 </form>
Textarea
 <form method="post" action="https://cs12.net/form/submit.php">
   <strong>Comments   </strong>
   <textarea name="comments" rows="10" cols="50">Please enter comments...   </textarea>
   <button type="submit">Submit Information   </button>
 </form>
In style
element
(<style>) within head element:
textarea {
             display: block;
             margin: 1rem 0;
     }
Select and Option
Pull-down menu
 <form method="get" action="https://cs12.net/form/submit.php">Select your favorite New England states:
   <br/>

   <select name="state">
     <option value="CT">Connecticut     </option>
     <option value="ME">Maine     </option>
     <option value="MA">Massachusetts     </option>
     <option value="NH">New Hampshire     </option>
     <option value="RI">Rhode Island     </option>
     <option value="VT">Vermont     </option>   </select>
   <br/>

   <button type="submit">Submit Information   </button>
 </form>
Scrollable list ← DON'T DO THIS!
Note: because scrollable lists are difficult for users, they are not typically used.
A scrollable list (size attribute) that can have multiple selections (multiple attribute):
 <form method="get" action="https://cs12.net/form/submit.php">Select your favorite New England states:
   <br/>

   <select name="state" size="3" multiple="multiple">
     <option value="CT">Connecticut     </option>
     <option value="ME">Maine     </option>
     <option value="MA">Massachusetts     </option>
     <option value="NH">New Hampshire     </option>
     <option value="RI">Rhode Island     </option>
     <option value="VT">Vermont     </option>   </select>
   <br/>

   <button type="submit">Submit Information   </button>
 </form>
Accessibility: Label Element
Label elements are critical for form accessibility.
label element lets us use markup to associate text with an input element.
Using label you can make the association between the text label and the form input explicit, and not just rely on the visual proximity.
Labels - Why?
- Makes text labels associated wtih input elements explicit
- Helps with screen readers!
- Helps with "clicks" and touch screens!
Accessibility: Label Element
 <form method="get" action="https://cs12.net/form/submit.php">
   <p>Do you like to watch NCAA basketball?
   </p>
   <label>
     <input type="radio" name="basketball" value="Y"/>
Yes   </label>
   <label>
     <input type="radio" name="basketball" value="N"/>
No   </label>
   <button type="submit">Submit   </button>
 </form>
In style
element
(<style>) within head element:
label, button { display: block; }
       button { margin-top: 1rem;}
Label Element - using id, label, for
- Explicit
- id attribute for form input
- label element for input label
- for attribute in label to link label element with input via the value of id
 <form method="get" action="https://cs12.net/form/submit.php">
   <p>Do you like to watch NCAA basketball?
   </p>
   <input type="radio" name="basketball" id="basketball_y" value="Y"/>

   <label for="basketball_y">Yes   </label>
   <br/>

   <input type="radio" name="basketball" id="basketball_n" value="N"/>

   <label for="basketball_n">No   </label>
   <br/>

   <input type="submit" value="Submit"/>

 </form>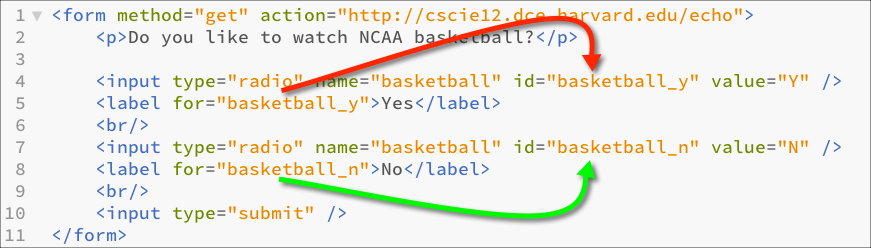
Labels
 <form method="get" action="https://cs12.net/form/submit.php">
   <div>What ice cream do you like?
     <br/>

     <input type="checkbox" name="icecream" id="icecream_chocolate" value="chocolate"/>

     <label for="icecream_chocolate">Chocolate     </label>
     <br/>

     <input type="checkbox" name="icecream" id="icecream_cpb" value="chocolate peanut butter"/>

     <label for="icecream_cpb">Chocolate Peanut Butter     </label>
     <br/>

     <input type="checkbox" name="icecream" id="icecream_vanilla" value="vanilla"/>

     <label for="icecream_vanilla">Vanilla     </label>
     <br/>

     <input type="checkbox" name="icecream" id="icecream_strawberry" value="strawberry"/>

     <label for="icecream_strawberry">Strawberry     </label>
     <br/>

     <button type="submit">Submit Information     </button>
   </div>
 </form>
fieldset and legend
Used to group related choices and even sets.
fieldset and legend elements can further help group related input fields.
 <form method="get" action="https://cs12.net/form/submit.php">
   <div>
     <fieldset>
       <legend>Name       </legend>
       <label>First Name
         <input type="text" name="fname" size="30"/>
       </label>
       <label>Last Name
         <input type="text" name="lname" size="30"/>
       </label>     </fieldset>
     <fieldset>
       <legend>Sports       </legend>
       <fieldset>
         <legend>Do you like basketball?         </legend>
         <label>
           <input type="radio" name="basketball" value="Y"/>
Yes         </label>
         <label>
           <input type="radio" name="basketball" value="N"/>
No         </label>       </fieldset>
       <fieldset>
         <legend>Do you like baseball?         </legend>
         <label>
           <input type="radio" name="baseball" value="Y"/>
Yes         </label>
         <label>
           <input type="radio" name="baseball" value="N"/>
No         </label>       </fieldset>     </fieldset>
     <button type="submit">Submit     </button>
   </div>
 </form>
In style
element
(<style>) within head element:
label { display: block; }
     fieldset { margin-top: 1rem;}
     button { display: block; margin-top: 1rem; padding: 0.5rem 1rem;}
optgroup
The optgroup element allows you to group a long select list.
 <p>Select a school:
 </p>
 <form method="get" action="https://cs12.net/form/submit.php">
   <select name="school">
     <optgroup label="ACC">
       <option>Boston College       </option>
       <option>Clemson       </option>
       <option>Duke       </option>
       <option>Florida State       </option>
       <option>Georgia Tech       </option>
       <option>Louiville       </option>
       <option>Miami       </option>
       <option>North Carolina       </option>
       <option>North Carolina State       </option>
       <option>Notre Dame       </option>
       <option>Pitt       </option>
       <option>Syracuse       </option>
       <option>Virginia       </option>
       <option>Virginia Tech       </option>
       <option>Wake Forest       </option>     </optgroup>
     <optgroup label="Big 10">
       <option>Illinois       </option>
       <option>Indiana       </option>
       <option>Iowa       </option>
       <option>Maryland       </option>
       <option>Michigan       </option>
       <option>Michigan State       </option>
       <option>Minnesota       </option>
       <option>Nebraska       </option>
       <option>Northwestern       </option>
       <option>Ohio State       </option>
       <option>Penn State       </option>
       <option>Purdue       </option>
       <option>Rutgers       </option>
       <option>Wisconsin       </option>     </optgroup>
     <optgroup label="Big XII">
       <option>Baylor       </option>
       <option>Iowa State       </option>
       <option>Kansas       </option>
       <option>Kansas State       </option>
       <option>Oklahoma       </option>
       <option>Oklahoma State       </option>
       <option>Texas       </option>
       <option>Texas Christian       </option>
       <option>Texas Tech       </option>
       <option>West Virginia       </option>     </optgroup>
     <optgroup label="Ivy League">
       <option>Brown       </option>
       <option>Columbia       </option>
       <option>Cornell       </option>
       <option>Dartmouth       </option>
       <option>Harvard       </option>
       <option>Penn       </option>
       <option>Princeton       </option>
       <option>Yale       </option>     </optgroup>
     <optgroup label="Pac 12">
       <option>Arizona       </option>
       <option>Arizona State       </option>
       <option>California       </option>
       <option>Colorado       </option>
       <option>Oregon       </option>
       <option>Oregon State       </option>
       <option>Stanford       </option>
       <option>UCLA       </option>
       <option>USC       </option>
       <option>Utah       </option>
       <option>Washington       </option>
       <option>Washington State       </option>     </optgroup>   </select>
   <div>
     <button type="submit">Submit     </button>
   </div>
 </form>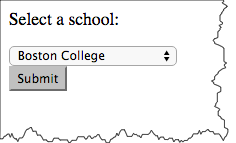

HTML5 forms
- HTML5 - Forms (HTML Living Standard)
- MDN: The form <input> element
HTML5 forms - placeholder, autofocus, and specific input types
- HTML5 Form Example
- placeholder text
- autofocus
- input types for
- url
- number
- range
- date and time
HTML5: email and url
On handheld devices, screen keyboard is optimized for input.
type="email"
 <form action="https://cs12.net/form/submit.php" method="post">
   <label>Email:
     <input type="email" name="email_address"/>
   </label>
   <button type="submit">Submit   </button>
 </form>
In style
element
(<style>) within head element:
label, button { display: block; margin-top: 1rem;}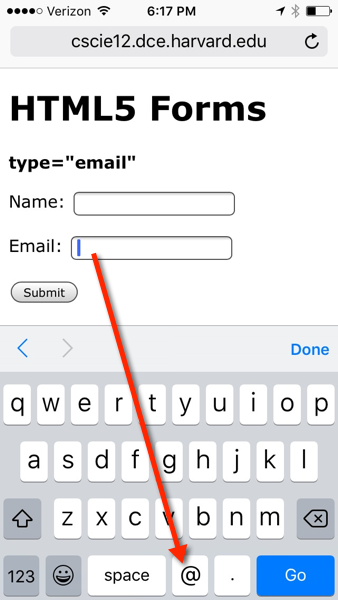
type="url"
 <form action="https://cs12.net/form/submit.php" method="post">
   <label>URL:
     <input type="url" name="url"/>
   </label>
   <button type="submit">Submit   </button>
 </form>
In style
element
(<style>) within head element:
label, button { display: block; margin-top: 1rem;}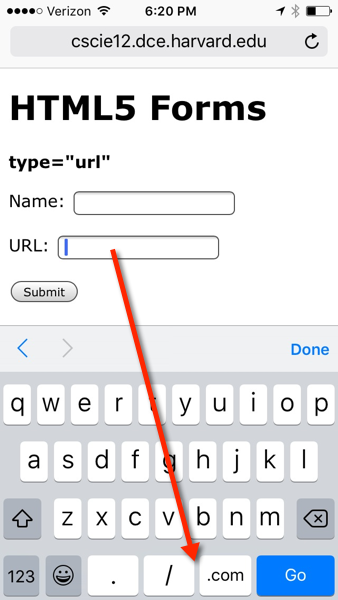

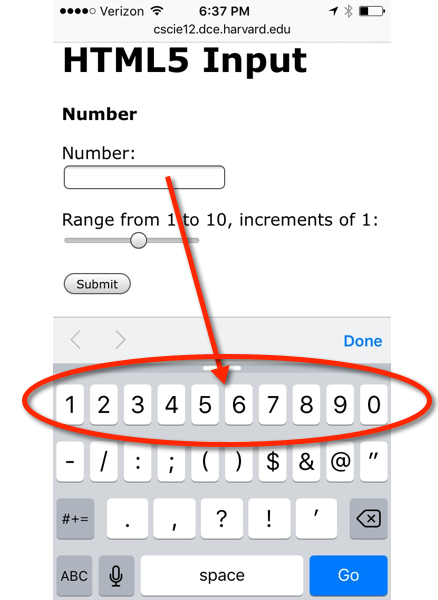
HTML5: number and range
 <form action="https://cs12.net/form/submit.php" method="post">
   <label>Pick a number:
     <input type="number" name="entered_number"/>
   </label>
   <label>How happy are you?
     <input type="range" min="1" max="5" value="3" step="1" name="happy"/>
   </label>
   <button type="submit">Submit   </button>
 </form>
In style
element
(<style>) within head element:
label, button { display: block; margin-top: 1rem;}
     input { display: block; }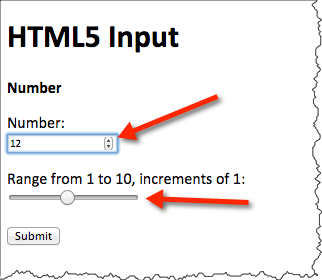
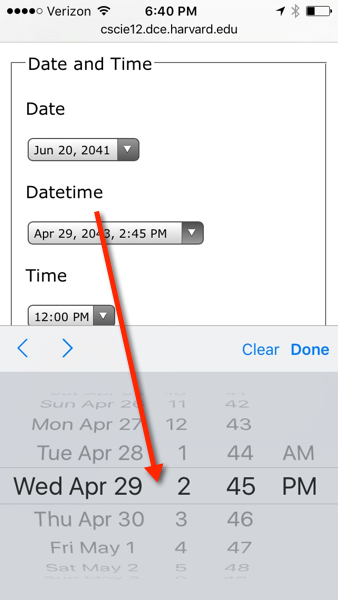
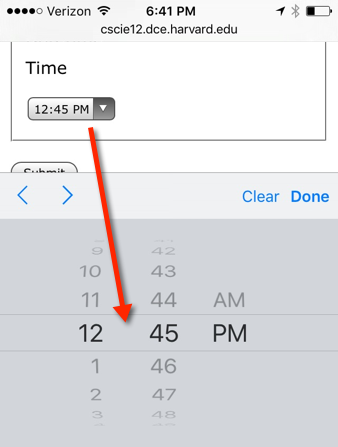
HTML5: date and time
 <form action="https://cs12.net/form/submit.php" method="post">
   <fieldset>
     <legend>Date and Time     </legend>
     <label>Pick a date:
       <input type="date" name="my_date"/>
     </label>
     <label>Pick a datetime
       <input type="datetime-local" name="my_datetime"/>
     </label>
     <label>Pick a time (15 minute increments)
       <input type="time" name="my_time_15" step="900" value="12:00"/>
     </label>
     <label>Pick a time (1 minute increments)
       <input type="time" name="my_time_1" step="60" value="12:00"/>
     </label>
     <label>Pick a time (1 second increments)
       <input type="time" name="my_time_1s" step="1" value="12:00"/>
     </label>   </fieldset>
   <button type="submit">Submit   </button>
 </form>
In style
element
(<style>) within head element:
label, button { display: block; margin-top: 1rem;}
             input { display: block;  margin-top: 0.25rem;}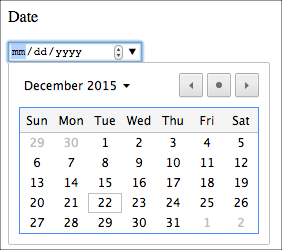

Processing Forms on the server side
- Course Form Submit Script
- Formspree - is a form backend, API, and email service for HTML & JavaScript forms. It's the simplest way to embed custom contact us forms, order forms, or email capture forms on your static website.
Maps
With JavaScript APIs for Google Maps, Bing Maps, and MapQuest, and Open Street Maps (Overpass API), it is very easy to embed customized maps on your website.
We'll take a look at a few different examples of how to include maps on our site:
- Embed a map created using vendor-provided tools
- Use the JavaScript API
- Custom Data
- Use standards such as GeoRSS
Each approach has some advantages and shortcomings. Essentially the trade-offs will be increased complexity with increased flexibility and control.
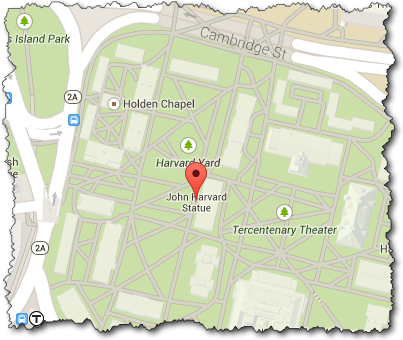
Embed a map created using Google's Tools
You can create a map using Google's tools, and then simply click the cog icon and select "Share or embed". The "embed map" option will give you an iframe code you can use in your web page. It doesn't get much simpler than this. If you want to embed a map with the location of a single store or organization, then this technique will work well.
A map I created for the John Harvard Statue:

The iframe code provided by Google:
<iframe style="border: 0;"
    src="https://www.google.com/maps/embed?pb=!1m14!1m8!1m3!1d1473.7541883076933!2d-71.11691195715973!3d42.37431548010373!3m2!1i1024!2i768!4f13.1!3m3!1m2!1s0x0%3A0x1b5299f9d1edac24!2sJohn+Harvard+Statue!5e0!3m2!1sen!2sus!4v1428381157098"
    width="600" height="450"></iframe>
And the map that is embedded:
For further information about the Google Map Embed API, please see
https://developers.google.com/maps/documentation/embed/guide
Cases where the embed approach wouldn't work so well:
- We need to create a map using information that changes
- We need to create a map using dynamically generated data
An example where a static embedded map would not work is with the Student Locations tool for this course. This tool allows students to enter their location information, and then the map is built dynamically based on this data. In addition, this tool displays different data, depending on whether the viewer is a student or an instructor. This is a case where we'll need more control over the map than a straightforward embed approach will allow.
The Google Maps JavaScript API will give us that control.
Google Maps JavaScript API
There is extensive documentation for the Google Maps JavaScript API, at
https://developers.google.com/maps/documentation/javascript/tutorial that you can consult. But for now, it will be enough to walk through some examples.
We'll learn by example with a
- basic map
- map with a marker
- map with a marker with an information window
- map with several markers
Basic Map
So first, we'll start with a map that is centered on the John Harvard statue in Harvard Yard.
To use the Google Maps JavaScript API, we'll need to load the Google Map JavaScript via a script element, and then we'll need to configure the map and then place it on the page.
Load the JavaScript:
<script src="https://maps.googleapis.com/maps/api/js?v=3.exp"> </script>Use the JavaScript:
var map;
  /* John Harvard Statue
     42.374474,-71.117207 */
  var mylat = 42.374474;
  var mylng = -71.117207;
  function initialize_map() {
      var mapOptions = {
          zoom: 17,
          center: new google.maps.LatLng(mylat, mylng)
      };
      map = new google.maps.Map(document.getElementById('map-canvas'),
      mapOptions);
  }
google.maps.event.addDomListener(window, 'load', initialize_map);- Latitude and Longitude of the John Harvard statue is (42.374474,-71.117207)
google.maps.event.addDomListeneris the Google Maps way of adding an event handler.
In this case, the event is the "load" event of the "window", and the handler is the functioninitialize_map- In the
initialize_mapfunction:mapOptionsis a JS data structure.zoomlevel is how close (larger is closer)google.maps.LatLngis the method that creates a Google Maps LatLng object. In this case, we are setting the center of the map to the location of the John Harvard statuegoogle.maps.Mapis the method to create a Google Map. We pass in as parameters where to place it on the page (note the DOM method,document.getElementById), and the second parameter is the data structure of map options
Full example:
Basic Map working examples:
Placing a Marker
To put a marker on the map, we'll create a google.maps.Marker object. When we create the marker, one of the parameters we'll pass in as part of the configuration data structure is the map we want to place it on.
So if we've created a google.maps.Map object as the variable harvard_yard_map and a googlemaps.LatLng object as the variable latlng_statue, the new JavaScript code to create a marker for the John Harvard statue would look like:
var marker = new google.maps.Marker(
    {
      position: latlng_statue,
      map: harvard_yard_map,
      title: 'John Harvard Statue'
    }
  );
Note there is a single parameter passed to the google.maps.Marker method -- this parameter is a JavaScript data structure of name/value pairs.
Full example:
Map with Marker working examples:
Read more about Markers, Google JavaScript API documentation for additional information, such as using customized icons.
Marker with an Information Window
Now that we have a marker on the map, we can add an information window.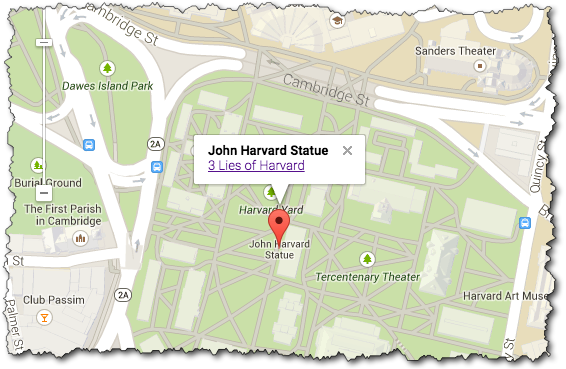
There are three basic things to pay attention to:
- Create content for the information window
- Create the
google.maps.InfoWindow - Add a listener so that a click event on the marker causes the information window to open
These steps are shown below:
/* Create content.  Here we are concatenating strings together with the JS "+" operator */
  var statue_info = "<strong>John Harvard Statue</strong><br/>" +
      "<a href='http://www.summer.harvard.edu/blog-news-events/3-lies-harvard'>3 Lies of Harvard</a>";

  /* Create the InfoWindow object; note we pass in the content */
  var statue_infowindow = new google.maps.InfoWindow({
      content: statue_info
  });

  /* Create the marker (we've seen this before) */
  var statue_marker = new google.maps.Marker({
    position: statue_latlng,
    map: harvard_yard_map,
    title: 'John Harvard Statue'
  });

  /* Create the listener so that the info window opens when the marker is clicked */
  google.maps.event.addListener(statue_marker, 'click', function() {
    statue_infowindow.open(harvard_yard_map,statue_marker);
  });
Full example:
Map with Marker working examples:
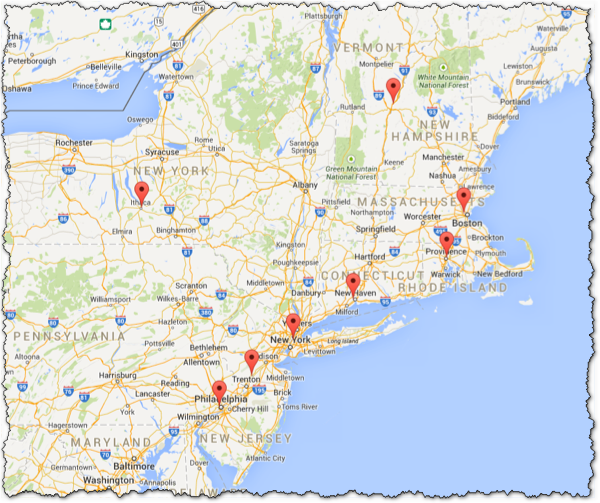
Map with Several Markers
Now let's use JSON data to add several markers to a page.
Map with Ivy Schools from JSON Data - Live Example
The JSON data (schools.json) we'll use is a list of schools in the Ivy League -- which contains a latitude, longitude, name, and URL.
We'll use jQuery to get the JSON data, and we'll use the Google Maps API to create the map. The full code is shown below, but the key part to creating the markers is where iterate through the list of schools:
 for (var i in school_list) {
    var school = school_list[i];
    var mylatlng = new google.maps.LatLng(school.lat, school.lng);
    var marker = new google.maps.Marker({
                                         position: mylatlng,
                                         map: ivy_map,
                                         title: "school.name"
                                        });
  }
Full code:
Maps - Leaflet JS and Open Street Map
Leaflet: an open-source JavaScript library for mobile-friendly interactive maps