Session 10 - Javascript, Part 3
Harvard Extension School
Fall 2022
Course Web Site: https://cscie12.dce.harvard.edu/
Topics
- This week's work: JavaScript Choose Your Own Adventures
- Javascript - What can you do?
- JS Data Structures - array and "object" (key/value pair)
- Arrays
- Loops and Iteration
- How about key/value pairs?
- Document Object Model (DOM)
- Working with Key/Value objects and Arrays
- Same Origin Policy and CORS
- Javascript Templates
- JavaScript Templates - Example
- Handlebars - A few more notes
- Maps
- Google Maps JavaScript API
- Map with Several Markers
- Maps - Leaflet JS and Open Street Map
Presentation contains 31 slides
This week's work: JavaScript Choose Your Own Adventures
Pick two of:
- Templates
- Maps
- Form validation
- Image Gallery
Javascript - What can you do?
Programmatic access to all aspects of your web page!
- Manipulate classes and style properties
- Manipulate content
- Validate user input
- Communicate with Web Server (XHR, Ajax)
JS Data Structures - array and "object" (key/value pair)
array Example:
let seasons = ["Autumn", "Winter", "Spring", "Summer"]
object Examples:
Simple "name/value" pairs:
              let president =  {
                  "lastName" : "Bacow",
                  "firstName" : "Lawrence",
                  "email" : "president@harvard.edu"
                }
"name/value" pairs, with values being an array (list) of things:
                let fruits = {
                  "apples" : ['Macoun','Empire','Honey Crisp','Albemarle Pippin'],
                  "oranges" : ['Naval Orange','Tangelo','Clementine','Valencia Orange']
                }
Arrays
First Steps with Arrays from MDN runs through some basic array operations and manipulations.
Iterate through arrays with for..in
let oranges = ['Naval Orange','Tangelo','Clementine','Valencia Orange'];

/* Iterate with for..of */
console.log("Iterate with: item of array");
for (const myorange of oranges) {
   console.log(myorange);
}
console.log("DONE!");
Each array value has an index
let oranges = ['Naval Orange','Tangelo','Clementine','Valencia Orange'];
/*
 oranges[0] is "Naval Orange"
 oranges[1] is "Tangelo"
 oranges[2] is "Clementine"
 etc.
 oranges.length is 4
*/
Loops and Iteration
let oranges = ['Naval Orange','Tangelo','Clementine','Valencia Orange'];
/* Iterate with for..of */
console.log("Iterate with: item of array");
for (const myorange of oranges) {
   console.log(myorange);
}
console.log("DONE!");

/* Iterate with 'classic' for (i = 0 ; i < LENGTH ; i++) */
console.log("Iterate with classic for i = ;  < ; i++");
for (let i = 0; i < oranges.length; i++ ) {
   console.log(i);
   console.log(oranges[i]);
}
console.log("DONE!");

/* Iterate with '.forEach()' */
console.log("Iterate with forEach()");
oranges.forEach(function(myorange){
  console.log(myorange);
});

/* or with the 'arrow' form of JS functions */
console.log("Iterate with forEach()");
oranges.forEach(myorange => {
  console.log(myorange);
});
console.log("DONE!");
How about key/value pairs?
let fruits = {
  "apples": ['Macoun', 'Empire', 'Honey Crisp', 'Albemarle Pippin'],
  "oranges": ['Naval Orange', 'Tangelo', 'Clementine', 'Valencia Orange']
}
/*
[] square bracket way of accessing values:
fruits["apples"] is the array of apple varieties
fruits["oranges"] is the array of orange varieties

You can also use the .key syntax:
fruits.apples is the same as fruits["apples"]
fruits.oranges is the same as fruits["oranges"]

*/
Getting keys and values through iteration
let fruits = {
  "apples": ['Macoun', 'Empire', 'Honey Crisp', 'Albemarle Pippin'],
  "oranges": ['Naval Orange', 'Tangelo', 'Clementine', 'Valencia Orange']
}

/* iterate through keys */
console.log("Iterate with: 'for ... in'");
for (let type in fruits) {
  console.log(type);
}
console.log("DONE!");

/* and you can use values */
console.log("Iterate with: 'for ... in' for keys and use values");
for (let type in fruits) {
  console.log(type);
  for (let variety of fruits[type]) {
    console.log(variety)
  }
}
console.log("DONE!");
Document Object Model (DOM)

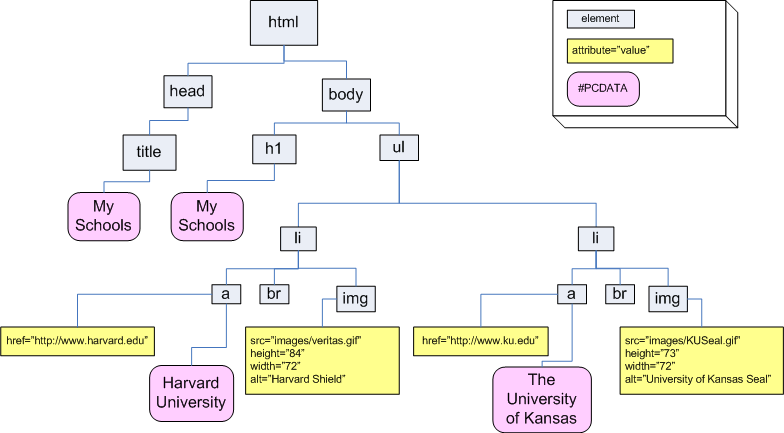
<html lang="en">
  <head>
    <title>My Schools</title>
  </head>
  <body>
    <h1>My Schools</h1>
    <ul>
      <li>
        <a href="http://www.harvard.edu/">Harvard University</a><br/>
        <img src="images/veritas.gif" alt="Harvard Shield" height="84" width="72"/>
      </li>
      <li>
        <a href="http://www.ku.edu/">University of Kansas</a><br/>
        <img src="images/KUSeal.gif" alt="University of Kansas Seal" height="73" width="72"/>
      </li>
    </ul>
  </body>
</html>
DOM Visualizer

JavaScript implements DOM methods we can use
Some common ways of accessing the DOM are getElementById, querySelector, querySelectorAll as well as classList, classList.add,
classList.remove,
classList.toggle.
We can also construct content with methods like
createElement,
createTextNode,
appendChild, and innerHTML
Javascript and DOM: Building Content
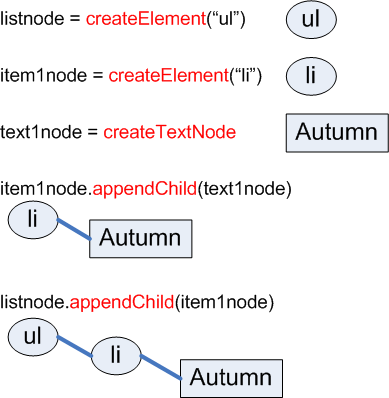
And do the same for the other three seasons to get: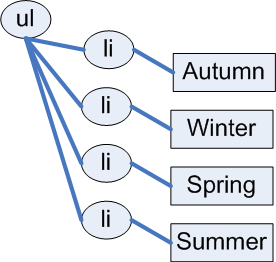
Javascript and DOM: Building Content
 <p>
   <button id="makelist" type="submit">Build List of Seasons   </button>
 </p>
 <div id="seasonslist1">
 </div>
In
script element within head element (<script>):
function makeSeasonsList() {
  let ul_node = document.createElement("ul");

  /* Autumn */
  let li_node1 = document.createElement("li");
  let li_text1 = document.createTextNode("Autumn");
  li_node1.appendChild(li_text1);

  /* Winter */
  let li_node2 = document.createElement("li");
  let li_text2 = document.createTextNode("Winter");
  li_node2.appendChild(li_text2);

  /* Spring */
  let li_node3 = document.createElement("li");
  let li_text3 = document.createTextNode("Spring");
  li_node3.appendChild(li_text3);

  /* Summer */
  let li_node4 = document.createElement("li");
  let li_text4 = document.createTextNode("Summer");
  li_node4.appendChild(li_text4);

  /* Append the list items to the ul */
  ul_node.appendChild(li_node1);
  ul_node.appendChild(li_node2);
  ul_node.appendChild(li_node3);
  ul_node.appendChild(li_node4);

  /* Place on page */
  let container = document.getElementById("seasonslist1");
  container.appendChild(ul_node);
}

/* Wait for DOM to be loaded, then add the click listener
   to the button */
document.addEventListener('DOMContentLoaded',function(){
  document.getElementById('makelist').addEventListener('click', makeSeasonsList);
});
Javascript and DOM: Building Content
Using an array (a list).
let seasons = ['Spring', 'Summer', 'Autumn', 'Winter'];
Iterate through Array
 <p>
   <button id="makelist" type="submit">Build List of Seasons   </button>
 </p>
 <div id="seasonslist2">
 </div>
In head element:
<script src="example2.js"> </script>Contents of example2.js
function makeSeasonsList() {
ul_node = document.createElement("ul");
let seasons = ['Spring', 'Summer', 'Autumn', 'Winter'];
for (let i = 0 ; i < seasons.length ; i++ ) {
  let mytext = i + " " + seasons[i];
  let text_node = document.createTextNode(mytext);
  let li_node = document.createElement("li");
  li_node.appendChild(text_node);
  ul_node.appendChild(li_node);
};
let container = document.getElementById("seasonslist2");
container.appendChild(ul_node);
}
/* Wait for DOM to be loaded, then add the click listener
   to the button */
document.addEventListener('DOMContentLoaded',function(){
  document.getElementById('makelist').addEventListener('click', makeSeasonsList);
});
Using forEach array method
 <p>
   <button id="makelist" type="submit">Build List of Seasons   </button>
 </p>
 <div id="seasonslist3">
 </div>
In head element:
<script src="example3.js"> </script>Contents of example3.js
function makeSeasonsList() {
  ul_node = document.createElement("ul");
  let seasons = ['Spring', 'Summer', 'Autumn', 'Winter'];
  seasons.forEach(function(s){
    let text_node = document.createTextNode(s);
    let li_node = document.createElement("li");
    li_node.appendChild(text_node);
    ul_node.appendChild(li_node);
  });
  let container = document.getElementById("seasonslist3");
  container.appendChild(ul_node);
}

/* Wait for DOM to be loaded, then add the click listener
   to the button */
document.addEventListener('DOMContentLoaded',function(){
  document.getElementById('makelist').addEventListener('click', makeSeasonsList);
});
DOM methods vs innerHTML
- With DOM methods, we are creating nodes
- With
innerHTMLwe are getting are setting the HTML string values.
Working with Key/Value objects and Arrays
Data:
{
  "apples" : ['Macoun','Empire','Honey Crisp','Albemarle Pippin'],
  "oranges" : ['Naval Orange','Tangelo','Clementine','Valencia Orange']
}
 <h1>List of Fruits from Data </h1>
 <div id="fruits"><!-- list goes here -->
 </div>
In
script element within head element (<script>):
"use strict";

let fruits = {
    "apples": ['Macoun', 'Empire', 'Honey Crisp', 'Albemarle Pippin'],
    "oranges": ['Naval Orange', 'Tangelo', 'Clementine', 'Valencia Orange']
};
document.addEventListener('DOMContentLoaded',function(){
    buildFruitList();
});

function buildFruitList(){
    let fruitList = document.createElement('ul');
    for (const f in fruits) {
        console.log(f);
        let li = document.createElement('li');
        li.appendChild(document.createTextNode(f));
        if (Array.isArray(fruits[f])) {
            console.log(fruits[f]);
            let itemList = document.createElement('ul');
            for (const item of fruits[f]) {
                let li = document.createElement('li');
                li.appendChild(document.createTextNode(item));
                itemList.appendChild(li);
            }
            li.appendChild(itemList);
        }
        fruitList.appendChild(li);
    }
    document.getElementById('fruits').appendChild(fruitList);
}
JavaScript:
"use strict";

let fruits = {
    "apples": ['Macoun', 'Empire', 'Honey Crisp', 'Albemarle Pippin'],
    "oranges": ['Naval Orange', 'Tangelo', 'Clementine', 'Valencia Orange']
};
document.addEventListener('DOMContentLoaded',function(){
    buildFruitList();
});

function buildFruitList(){
    let fruitList = document.createElement('ul');
    for (const f in fruits) {
        console.log(f);
        let li = document.createElement('li');
        li.appendChild(document.createTextNode(f));
        if (Array.isArray(fruits[f])) {
            console.log(fruits[f]);
            let itemList = document.createElement('ul');
            for (const item of fruits[f]) {
                let li = document.createElement('li');
                li.appendChild(document.createTextNode(item));
                itemList.appendChild(li);
            }
            li.appendChild(itemList);
        }
        fruitList.appendChild(li);
    }
    document.getElementById('fruits').appendChild(fruitList);
}
"use strict"; - what is strict mode?
Strict mode- Eliminates some JavaScript silent errors by changing them to throw errors.
- Fixes mistakes that make it difficult for JavaScript engines to perform optimizations: strict mode code can sometimes be made to run faster than identical code that's not strict mode.
- Prohibits some syntax likely to be defined in future versions of ECMAScript.
About JSON
A data format widely used on the web is JSON -- this format is used to pass data from the web server to the browser, and it is in a format that is easily worked with in JavaScript.
We first need to take a look at the JSON format and how we can work with it, and then we'll see how this works together in Ajax.
The introduction to JSON from json.org is a great place to start:
JSON (JavaScript Object Notation) is a lightweight data-interchange format. It is easy for humans to read and write. It is easy for machines to parse and generate. It is based on a subset of the JavaScript Programming Language, Standard ECMA-262 3rd Edition - December 1999. JSON is a text format that is completely language independent but uses conventions that are familiar to programmers of the C-family of languages, including C, C++, C#, Java, JavaScript, Perl, Python, and many others. These properties make JSON an ideal data-interchange language.
JSON is built on two structures:
- A collection of name/value pairs. In various languages, this is realized as an object, record, struct, dictionary, hash table, keyed list, or associative array.
- An ordered list of values. In most languages, this is realized as an array, vector, list, or sequence.
These are universal data structures. Virtually all modern programming languages support them in one form or another. It makes sense that a data format that is interchangeable with programming languages also be based on these structures.
More JSON objects
In short, a JSON object is an unordered list of name/value pairs.
A JSON object example:
Note that the object (collection of name/value pairs) is enclosed in {curly braces}.
The name/value pair has a colon after the name (i.e. name: value), and the name/value pairs are separated by a comma.
So the object above represents the following:
| Name | Value |
|---|---|
| lastName | Bacow |
| firstName | Lawrence |
| president@harvard.edu |
JSON Array
In short, a JSON array is an ordered sequence of values. Values are strings (in quotes), numbers, arrays, objects, or boolean (true/false) values.
A JSON array example
Strings, Objects, and Arrays can all be values!
In the examples above, we've shown the values as strings (e.g. "Spring" or "Bacow"). But values can also be arrays or objects. Below is a more complex JSON object that includes two name/value pairs whose values are an array of strings ("seasons") and the other an array of objects ("days"):
There are several online JSON viewers and validators you can use that are helpful for exploring, writing, or validating JSON structures:
Working with JS data structure to create content
- Iterate through data structures, build up DOM!
Examples
- Seasons list - DOM
- Seasons list - innerHTML
- Fruits - DOM
- Fruits - innerHTML
- Seasons list - from URL
Notes on fetch and arrow function expressions
Same Origin Policy and CORS
When working with XHR/fetch, it is important to understand some basic concepts of web application security. Some concepts we'll briefly describe are:
- Same Origin Policy
- CORS (Cross Origin Resource Sharing)
These are important to understand since the browser restricts the XHR/fetch calls allowed.
Same Origin Policy
This is the simplest policy, and will cover all cases where the data you are requesting comes from the same hostname as the page making the request.
Under the same origin policy, a web browser will permit JavaScript contained in a web page to access data from the same origin -- or the same "hostname" of the URL.
So if your JavaScript and the data it is accessing all come from the same origin (hostname in the URL), the browser will permit this communication.
If the JavaScript and the data come from different origins (hostnames), then the browser will block this for security reasons.
For JavaScript to access data that comes from different origins, you'll need to make sure CORS headers are set correctly.
CORS - Cross Origin Resource Sharing
CORS is a common and preferred method for handling cross-origin requests.
Using CORS, it is possible for the browser and server to determine whether or not to allow a cross-origin request. This happens as part of the HTTP request. The server can specify access control rules, which a browser will then use to determine whether a cross-origin request is permitted.
We won't go into how make the server-side CORS compatible right now. From the front-end perspective, it is enough to understand that you are using a CORS-enabled service. You don't need to do anything to enable CORS from within your JavaScript -- it already is there and is used by the browser.
HTTP response header:access-control-allow-origin: *
For example, the service from "cdn.rawgit.com" (e.g. apples.json) uses CORS, which is why the "Pick Your Own Apples" example worked fine, despite the different origins between the page the JSON.
MDN: Cross-Origin Resource Sharing
Javascript Templates
Having the separation of data coming from the server-side in the form of JSON (or even some other format), and doing the work to display and present it on the client-side is a beneficial separation of concerns. If the formatting and display requirements change, it is a change to the front-end (client-side) code (HTML, CSS, JS) as opposed to the server-side. However, while the technique we've seen to process JSON into markup and place it on the page is entirely on the client-side (as opposed to server-side), a big drawback is that we've done this entirely in JavaScript.
For example, to build a list of oranges, we could do something like something like:
Good News: We do have separation between front-end and back-end! Front-end does the structuring and display; the back-end provides the data.
Bad News: We have mixing of concerns between structure (markup) and function (JavaScript). We do not have good separation between structure (HTML), style (CSS), and function (JS) within the front-end. We have to read through the JavaScript to figure out how our data will be structured. If we want to change how the data is structured, we need to edit the JavaScript.
Better with Templates!
Using JavaScript templates, building a list could look something like:
There are a variety of libraries for making templates in JavaScript. I'll mention four here, and we'll focus on one in our examples (Handlebars):
- Handlebars, Handlebars provides the power necessary to let you build semantic templates effectively with no frustration.
- Mustache, "Logic-less" templates
- Trimpath JavaScript Templates (JST)
JavaScript Templates - Example
We'll focus on using the Handlebars template library. Other template systems will do similar things though, with different syntax.
With Handlebars, the key parts are:
- Write a "Handlebars" template
- Load the "Handlebars" JavaScript library
- Compile the template using Handlebars
- Evaluate the template, passing in the data
- Add the result of the processed template to the page
Handlebars syntax are based on double curly braces, like {{ handlebar expression }}.
So to iterate through the seasons array, our Handlebars template would look like:
<ul>
  {{#seasons}}
  <li>{{.}}</li>
  {{/seasons}}
</ul>
To re-implement our "seasons list" example using Handlebars, we could something like:
- The Handlebars template is defined in Lines 49 — 55.
This template iterates through theseasonsarray{{#seasons}}starts the iteration{{/seasons}}ends the iteration- Within the loop,
{{.}}refers to item of the array
- The Handlebars template is process in
buildSeasonsContent- Load the library (line 6)
- Get the template as text (line 32)
- Compile the template (line 34)
- Process the template with the data (line 36)
- Add result to page (line 39)
See the working examples:
Handlebars - A few more notes
See: JSFiddle Example of Handlebars Loop Techniques
With Handlebars, you can also iterate explicitly with {{#each }}
With the context of our "seasons" JSON:
{
  "seasons": [
    "Spring",
    "Summer",
    "Autumn",
    "Winter"
  ]
}
We could do:
<ul>
    {{#each seasons}}
    <li>{{.}}</li>
    {{/each}}
</ul>
We can also specify the name of the parameter to be used within the loop:
<ul>
    {{#each seasons as |season|}}
    <li>{{season}}</li>
    {{/each}}
</ul>
Both of the above would produce: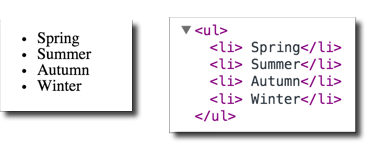
If needed, you can also pass in the index position as well (remember that the first item in an array is index position = 0, second item is index position = 1, etc.).
<ul>
    {{#each seasons as |season pos|}}
    <li>{{pos}} {{season}}</li>
    {{/each}}
</ul>
Which would produce: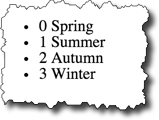
Handlebars Conditionals
Sometimes we might want to format data based on certain conditions. For example, if an email address or URL exists for a person, we might want to include a mailto: link or a link to the URL. Handlebar conditionals allow to do that.
People in JSON:
{
          "people": [
              {
                  "name": "Lawrence Bacow",
                  "url": "http://president.harvard.edu/"
              },
              {
                  "name": "Alan Garber",
                  "url": "http://provost.harvard.edu/people/alan-m-garber"
              },
              {
                  "name": "Katie Lapp"
              }
          ]
      };
For example, if we wanted to hyperlink a name if a URL exists, our Handlebars template could look something like:
<ul>
{{#each people as |person|}}
  <li>
  {{#if person.url }}
    <a href="{{person.url}}">{{person.name}}</a>
  {{else}}
    {{person.name}}
  {{/if}}
  </li>
{{/each}}
</ul>
And this would produce: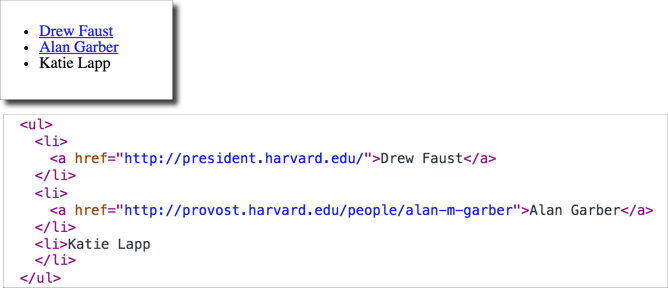
There are lots of JS Template systems
- Mustache
- Handlebars
- Nunjucks
- Liquid
Maps
With JavaScript APIs for Google Maps, Bing Maps, and MapQuest, and Open Street Maps (Overpass API), it is very easy to embed customized maps on your website.
We'll take a look at a few different examples of how to include maps on our site:
- Embed a map created using vendor-provided tools
- Use the JavaScript API
- Custom Data
- Use standards such as GeoRSS
Each approach has some advantages and shortcomings. Essentially the trade-offs will be increased complexity with increased flexibility and control.
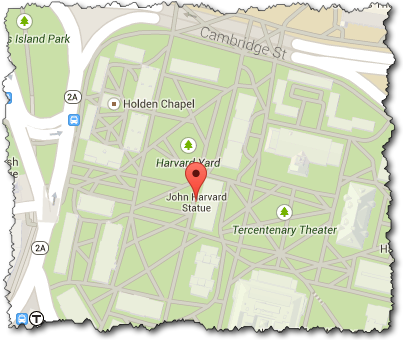
Embed a map created using Google's Tools
You can create a map using Google's tools, and then simply click the cog icon and select "Share or embed". The "embed map" option will give you an iframe code you can use in your web page. It doesn't get much simpler than this. If you want to embed a map with the location of a single store or organization, then this technique will work well.
A map I created for the John Harvard Statue:

The iframe code provided by Google:
<iframe style="border: 0;"
    src="https://www.google.com/maps/embed?pb=!1m14!1m8!1m3!1d1473.7541883076933!2d-71.11691195715973!3d42.37431548010373!3m2!1i1024!2i768!4f13.1!3m3!1m2!1s0x0%3A0x1b5299f9d1edac24!2sJohn+Harvard+Statue!5e0!3m2!1sen!2sus!4v1428381157098"
    width="600" height="450"></iframe>
And the map that is embedded:
For further information about the Google Map Embed API, please see
https://developers.google.com/maps/documentation/embed/guide
Cases where the embed approach wouldn't work so well:
- We need to create a map using information that changes
- We need to create a map using dynamically generated data
An example where a static embedded map would not work is with the Student Locations tool for this course. This tool allows students to enter their location information, and then the map is built dynamically based on this data. In addition, this tool displays different data, depending on whether the viewer is a student or an instructor. This is a case where we'll need more control over the map than a straightforward embed approach will allow.
The Google Maps JavaScript API will give us that control.
Google Maps JavaScript API
There is extensive documentation for the Google Maps JavaScript API, at
https://developers.google.com/maps/documentation/javascript/tutorial that you can consult. But for now, it will be enough to walk through some examples.
We'll learn by example with a
- basic map
- map with a marker
- map with a marker with an information window
- map with several markers
Basic Map
So first, we'll start with a map that is centered on the John Harvard statue in Harvard Yard.
To use the Google Maps JavaScript API, we'll need to load the Google Map JavaScript via a script element, and then we'll need to configure the map and then place it on the page.
Load the JavaScript:
<script src="https://maps.googleapis.com/maps/api/js?v=3.exp"> </script>Use the JavaScript:
var map;
  /* John Harvard Statue
     42.374474,-71.117207 */
  var mylat = 42.374474;
  var mylng = -71.117207;
  function initialize_map() {
      var mapOptions = {
          zoom: 17,
          center: new google.maps.LatLng(mylat, mylng)
      };
      map = new google.maps.Map(document.getElementById('map-canvas'),
      mapOptions);
  }
google.maps.event.addDomListener(window, 'load', initialize_map);- Latitude and Longitude of the John Harvard statue is (42.374474,-71.117207)
google.maps.event.addDomListeneris the Google Maps way of adding an event handler.
In this case, the event is the "load" event of the "window", and the handler is the functioninitialize_map- In the
initialize_mapfunction:mapOptionsis a JS data structure.zoomlevel is how close (larger is closer)google.maps.LatLngis the method that creates a Google Maps LatLng object. In this case, we are setting the center of the map to the location of the John Harvard statuegoogle.maps.Mapis the method to create a Google Map. We pass in as parameters where to place it on the page (note the DOM method,document.getElementById), and the second parameter is the data structure of map options
Full example:
Basic Map working examples:
Placing a Marker
To put a marker on the map, we'll create a google.maps.Marker object. When we create the marker, one of the parameters we'll pass in as part of the configuration data structure is the map we want to place it on.
So if we've created a google.maps.Map object as the variable harvard_yard_map and a googlemaps.LatLng object as the variable latlng_statue, the new JavaScript code to create a marker for the John Harvard statue would look like:
var marker = new google.maps.Marker(
    {
      position: latlng_statue,
      map: harvard_yard_map,
      title: 'John Harvard Statue'
    }
  );
Note there is a single parameter passed to the google.maps.Marker method -- this parameter is a JavaScript data structure of name/value pairs.
Full example:
Map with Marker working examples:
Read more about Markers, Google JavaScript API documentation for additional information, such as using customized icons.
Marker with an Information Window
Now that we have a marker on the map, we can add an information window.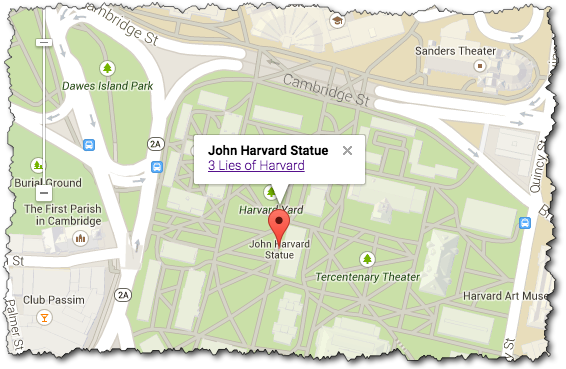
There are three basic things to pay attention to:
- Create content for the information window
- Create the
google.maps.InfoWindow - Add a listener so that a click event on the marker causes the information window to open
These steps are shown below:
/* Create content.  Here we are concatenating strings together with the JS "+" operator */
  var statue_info = "<strong>John Harvard Statue</strong><br/>" +
      "<a href='http://www.summer.harvard.edu/blog-news-events/3-lies-harvard'>3 Lies of Harvard</a>";

  /* Create the InfoWindow object; note we pass in the content */
  var statue_infowindow = new google.maps.InfoWindow({
      content: statue_info
  });

  /* Create the marker (we've seen this before) */
  var statue_marker = new google.maps.Marker({
    position: statue_latlng,
    map: harvard_yard_map,
    title: 'John Harvard Statue'
  });

  /* Create the listener so that the info window opens when the marker is clicked */
  google.maps.event.addListener(statue_marker, 'click', function() {
    statue_infowindow.open(harvard_yard_map,statue_marker);
  });
Full example:
Map with Marker working examples:
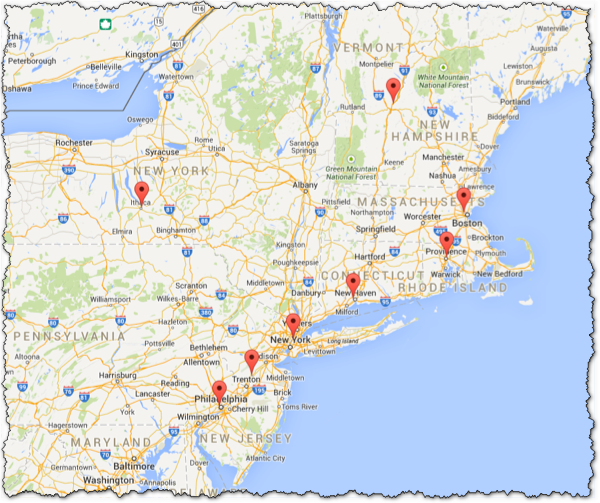
Map with Several Markers
Now let's use JSON data to add several markers to a page.
Map with Ivy Schools from JSON Data - Live Example
The JSON data (schools.json) we'll use is a list of schools in the Ivy League -- which contains a latitude, longitude, name, and URL.
We'll use jQuery to get the JSON data, and we'll use the Google Maps API to create the map. The full code is shown below, but the key part to creating the markers is where iterate through the list of schools:
 for (var i in school_list) {
    var school = school_list[i];
    var mylatlng = new google.maps.LatLng(school.lat, school.lng);
    var marker = new google.maps.Marker({
                                         position: mylatlng,
                                         map: ivy_map,
                                         title: "school.name"
                                        });
  }
Full code:
Maps - Leaflet JS and Open Street Map
Leaflet: an open-source JavaScript library for mobile-friendly interactive maps