Session 09 - JavaScript, Part 2
Harvard Extension School
Spring 2021
Course Web Site: https://cscie12.dce.harvard.edu/
Topics
- JavaScript
- JS Data Structures - array and "object" (key/value pair)
- Review: Building a List
- Separate JavaScript from HTML Markup wtih "addEventListener"
- Table striping with Javascript
- Things will go wrong...the Javascript Console is your friend
- Your work easier with jQuery
- jQuery Plugin - Tablesorter
- Separation from Markup
- jQuery Examples
- Add Another
- Unobtrusive Javascript / Progressive Enhancement
- JavaScript - Minifying and CDNs
Presentation contains 29 slides
JavaScript
Goals for the JavaScript Unit- Understand basics of JavaScript
- events
- DOM
- Troubleshooting console
- Understand basics of jQuery
- Understand how to use JavaScript
- Separate JS from Markup
- Be able to incorporate JavaScript functionality into a site
- Be able to "hack" JavaScript and jQuery to find solutions
- Ready for more!
Javascript
"JavaScript is now a language every developer should know."
– Mike Loukides, Vice President of Content Strategy for O'Reilly Media
What is it?
- Programming language
- Runs within web browser
- Browser runs Javascript based upon events
- [Server-side language as well!]
What can it do?
Javascript provides programmatic access to virtually all aspects of a page.
- CSS properties
- Markup content
- Forms, communication to Server
- Add functionality
ECMAScript and JavaScript
The standard for JavaScript is called ECMAScript.
- ECMAScript v 5 (2009) and 5.1 (2011)
- ECMAScript v 6 (2015) -- you'll also see this as "ES6".
Javascript Resources
jQuery
jQuery is a JavaScript library that we will begin discussing next week!
JS Data Structures - array and "object" (key/value pair)
JSON - JavaScript Object Notation
JSON array Example:
['Autumn', 'Winter', 'Spring', 'Summer']
JSON object Examples:
Simple "name/value" pairs:
                {
                  "lastName" : "Bacow",
                  "firstName" : "Lawrence",
                  "email" : "president@harvard.edu"
                }
"name/value" pairs, with values being an array (list) of things:
                {
                  "apples" : ['Macoun','Empire','Honey Crisp','Albemarle Pippin'],
                  "oranges" : ['Naval Orange','Tangelo','Clementine','Valencia Orange']
                }
More about JSON
A data format widely used in Ajax is JSON -- this format is used to pass data from the web server to the browser, and it is in a format that is easily worked with in JavaScript.
We first need to take a look at the JSON format and how we can work with it, and then we'll see how this works together in Ajax.
The introduction to JSON from json.org is a great place to start:
JSON (JavaScript Object Notation) is a lightweight data-interchange format. It is easy for humans to read and write. It is easy for machines to parse and generate. It is based on a subset of the JavaScript Programming Language, Standard ECMA-262 3rd Edition - December 1999. JSON is a text format that is completely language independent but uses conventions that are familiar to programmers of the C-family of languages, including C, C++, C#, Java, JavaScript, Perl, Python, and many others. These properties make JSON an ideal data-interchange language.
JSON is built on two structures:
- A collection of name/value pairs. In various languages, this is realized as an object, record, struct, dictionary, hash table, keyed list, or associative array.
- An ordered list of values. In most languages, this is realized as an array, vector, list, or sequence.
These are universal data structures. Virtually all modern programming languages support them in one form or another. It makes sense that a data format that is interchangeable with programming languages also be based on these structures.
Loops and Iteration
var oranges = ['Naval Orange','Tangelo','Clementine','Valencia Orange'];

console.log("Iterate with: item of array");
for (var myorange of oranges) {
   console.log(myorange);
}
console.log("DONE!");

console.log("Iterate with classic for i = ;  < ; i++");
for (var i = 0; i < oranges.length; i++ ) {
   console.log(i);
   console.log(oranges[i]);
}
console.log("DONE!");
Review: Building a List
Data:
{
    "apples" : ['Macoun', 'Empire', 'Honey Crisp', 'Albemarle Pippin']
}
JavaScript:
function makeApplesList() {
    ul_node = document.createElement("ul");
    mydata= {"apples" : ['Macoun','Empire','Honey Crisp','Albemarle Pippin']};
    var itemlist = mydata.apples;
    for (var myitem of itemlist) {
       var text_node = document.createTextNode(myitem);
       var li_node = document.createElement("li");
       li_node.appendChild(text_node);
       ul_node.appendChild(li_node);
    };
    var container = document.getElementById("itemlistcontainer");
    container.appendChild(ul_node);
}
Invoking the script with a "click" event:
<button onclick="makeApplesList();">Build List of Apples</button>Entire Example:
 <div id="itemlistcontainer">
   <button onclick="makeApplesList();" type="submit">Build List of Apples   </button>
 </div>
In
script element within head element (<script>):
function makeApplesList() {
     ul_node = document.createElement("ul");
     mydata= {"apples" : ['Macoun','Empire','Honey Crisp','Albemarle Pippin']};
     var itemlist = mydata.apples;
     for (var myitem of itemlist) {
        var text_node = document.createTextNode(myitem);
        var li_node = document.createElement("li");
        li_node.appendChild(text_node);
        ul_node.appendChild(li_node);
     };
     var container = document.getElementById("itemlistcontainer");
     container.appendChild(ul_node);
 }
Separate JavaScript from HTML Markup wtih "addEventListener"
- load external JS file
- set "DOMContentLoaded" event handler which will then...
- set "click" handler for button
window.addEventListener('DOMContentLoaded', function() {
    var myButton = document.getElementById("makelistbutton");
    myButton.addEventListener("click", makeApplesList);
});
Table striping with Javascript
- Use
onloadevent attribute ofbodyelement to call striping function. - Will use Document Object Model to access parts of the page
- Basic flow:
- Get the table to stripe (
getElementById) - Get the table body (
getElementsByTagName) - Get the rows within the table body (
getElementsByTagName) - Go through each row, and assign an "evenRow" or "oddRow" class attribute
(forloop andsetAttributeDOM method)
- Get the table to stripe (
function stripeTable(tableid) {
         let mytable = document.getElementById(tableid);
         // get tbody (i.e. we do not want to stripe the thead)
         let mytbody = mytable.getElementsByTagName('tbody');
         /*   getElementsByTagName gives us a Node List, so we need
            to access it as a list (Array), arrayname[i].
            Find all the tr within the tbody
         */
         let myrows =  mytbody[0].getElementsByTagName('tr');
         /*  Iterate over the node list of "tr" returned, setting
             the class appropriately
           */
         for(let i=0; i<myrows.length; i++) {
           if ((i + 1) % 2 == 0) {
             // even row -- the "%" operator is the "modulus" or remainder
             myrows[i].setAttribute('class','evenRow');
           } else {
             // odd row
             myrows[i].setAttribute('class','oddRow');
           }
         }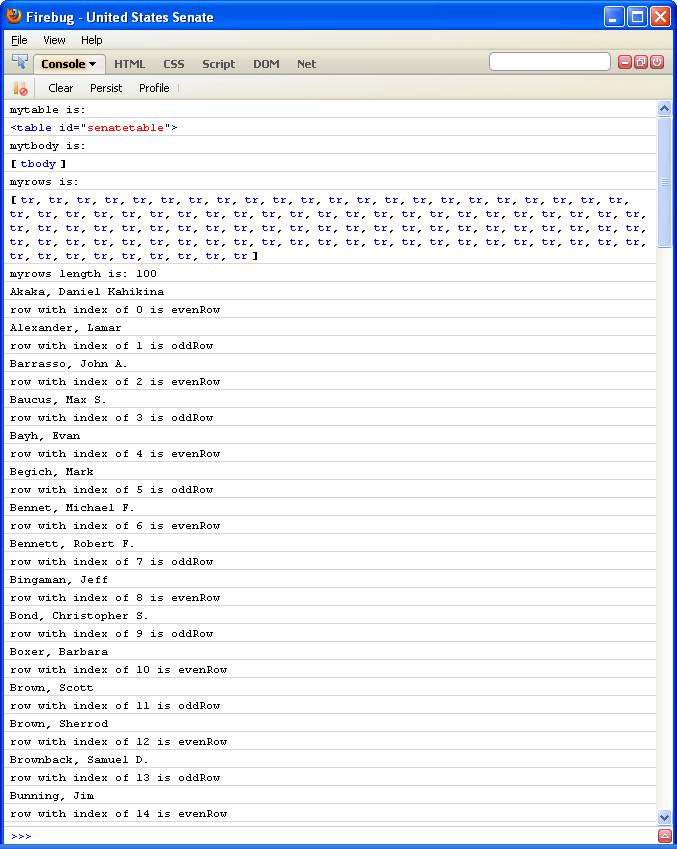
}Things will go wrong...the Javascript Console is your friend
- United States Senate Table - Plain
- United States Senate Table - Striped with JS
- United States Senate Table - Striped with JS and Console Messages
function stripeTable(tableid) {
         let mytable = document.getElementById(tableid);
         console.log("mytable is:");
         console.log(mytable);
         // get tbody (i.e. we dont' want to stripe the thead)
         let mytbody = mytable.getElementsByTagName('tbody');
         console.log("mytbody is:");
         console.log(mytbody);
         /*   getElementsByTagName gives us a Node List, so we need
            to access it as a list (Array), arrayname[i].
            Find all the tr within the tbody
         */
         let myrows =  mytbody[0].getElementsByTagName('tr');
         console.log("myrows is:");
         console.log(myrows);
         console.log("myrows length is: " + myrows.length);

         /*  Iterate over the node list of "tr" returned, setting
             the class appropriately
           */
         for(let i=0; i<myrows.length; i++) {
             let senatorname = myrows[i].getElementsByTagName('td')[0].firstChild.nodeValue;
             console.log(senatorname);
           if ((i + 1) % 2 == 0) {
             // even rows
             console.log("row with index of " + i + " is evenRow");
             myrows[i].setAttribute('class','evenRow');
           } else {
             // odd rows
             console.log("row with index of " + i + " is oddRow");
             myrows[i].setAttribute('class','oddRow');
           }
         }
       }
console.log() allows you output messages to a console.
Example: Highlight By Age
function highlightByAge() {
    let tableid = 'senatetable';
    let older = 70;
    let younger = 50;
    let mytable = document.getElementById(tableid);
    console.log("mytable is:");
    console.log(mytable);
    // get tbody (i.e. we dont' want to stripe the thead)
    let mytbody = mytable.getElementsByTagName('tbody');
    console.log("mytbody is:");
    console.log(mytbody);
    /*   getElementsByTagName gives us a Node List, so we need
       to access it as a list (Array), arrayname[i].
       Find all the tr within the tbody
    */
    let myrows =  mytbody[0].getElementsByTagName('tr');
    console.log("myrows is:");
    console.log(myrows);
    console.log("myrows length is: " + myrows.length);

    /*  Iterate over the node list of "tr" returned, setting
        the class appropriately
      */
    for(var i=0; i<myrows.length; i++) {
      let bdaystr = myrows[i].getElementsByTagName('td')[3].firstChild.nodeValue;
      console.log("bdaystr is " + bdaystr);
      let [month, day, year] = bdaystr.split('/');
      console.log(month + " " + day + " " + year);
      let bday = new Date(year, month, day);
      console.log("bday as Date object:");
      console.log(bday)
      let now = Date.now();
      console.log("now is " + now);
      let age = (now - bday)/(1000 * 365.25 * 24 * 60 * 60);
      age = Math.round(age);
      console.log(age);
      if (age >= older) {
        myrows[i].setAttribute('class','older');
      } else if (age <= younger) {
        myrows[i].setAttribute('class','younger');
      }
    }
  }
Highlight By Age Example
- Instead of using DOM methods to get nodes, use CSS selectors to get a list of nodes:
document.querySelectoranddocument.querySelectorAll - Instead of setting class attribute value in its entirity, add classes to the list of classes:
classListandaddandremove
Your work easier with jQuery
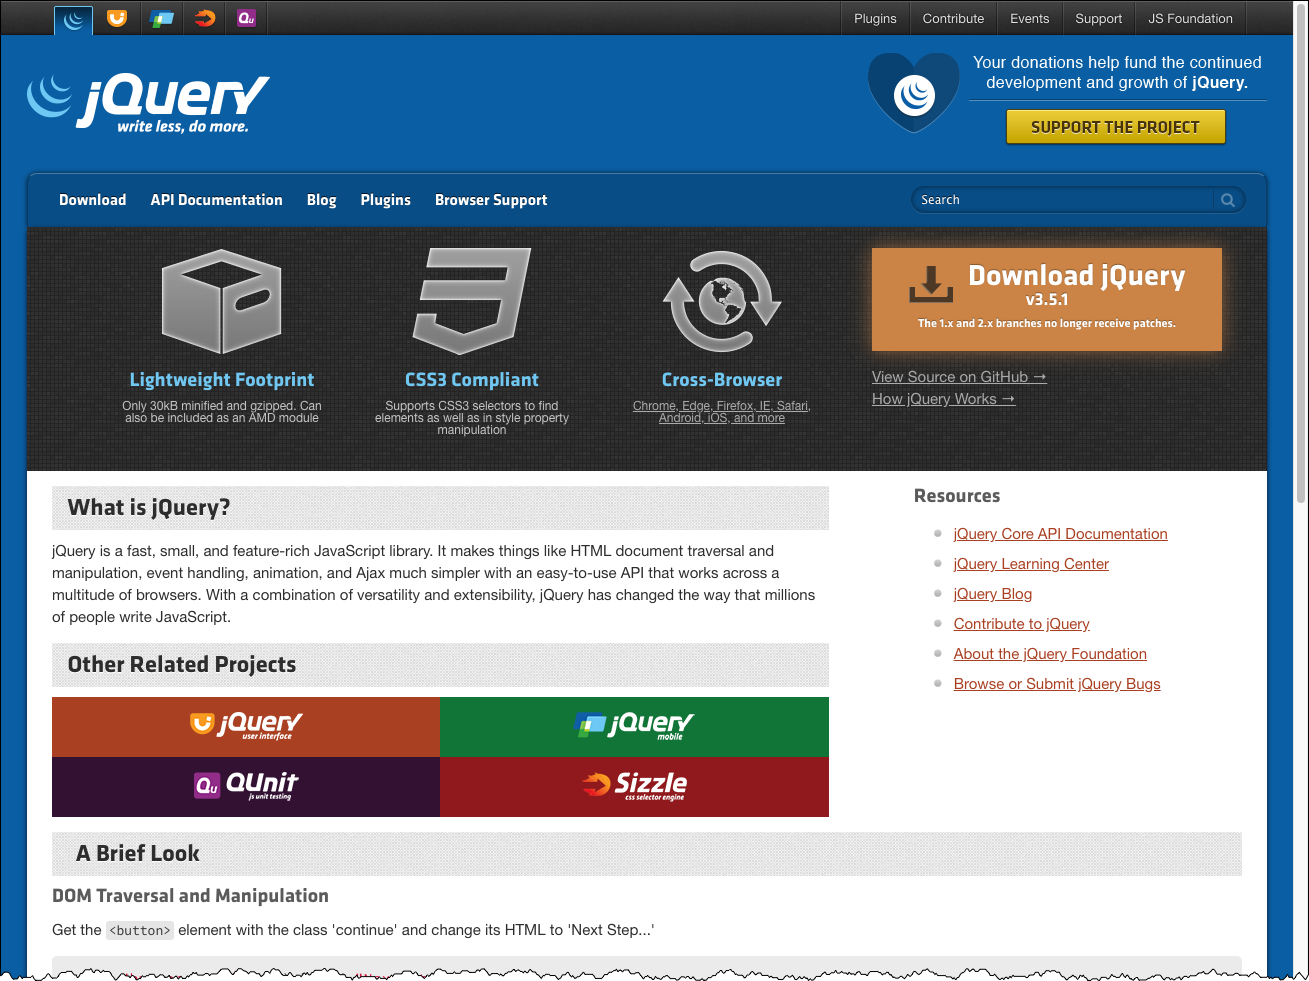
What is jQuery?
jQuery is a fast, small, and feature-rich JavaScript library. It makes things like HTML document traversal and manipulation, event handling, animation, and Ajax much simpler with an easy-to-use API that works across a multitude of browsers. With a combination of versatility and extensibility, jQuery has changed the way that millions of people write JavaScript.
- document traversal
- document manipulation
- event handling
- animation
- Ajax
- cross-browser
Learning jQuery
jQuery: Table Striping
Let's get started with jQuery by "striping" a table. The plain table comes from a list of United States Senators.
- Plain table: senate-plain.html
- Striped table: senate-jquery-striped.html
Include some Javascript libraries (jquery.js) and write a function that selects the table rows and applies a class. Note that the jQuery selectors are like CSS selectors (and here we see custom jQuery selectors of:evenand:odd).
<script src="https://code.jquery.com/jquery-3.6.0.min.js"
             integrity="sha256-/xUj+3OJU5yExlq6GSYGSHk7tPXikynS7ogEvDej/m4="
             crossorigin="anonymous"></script>
<script>
   $(document).ready(function()
       {
           $("#senatetable tbody tr:even").addClass('evenRow');
           $("#senatetable tbody tr:odd").addClass('oddRow');
       }
   );
 </script>
Plain table:
Striped table: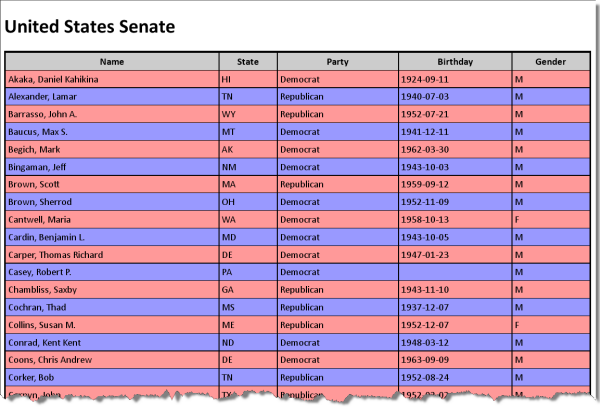
jQuery and $(document).ready();
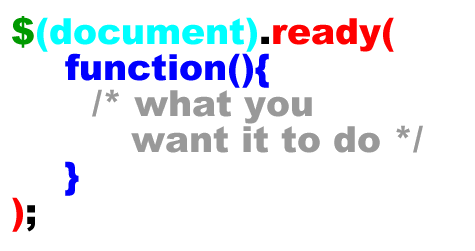
See: $(document).ready() for more explanation, including the shorthand of $().
This is the jQuery way of doing the window.addEventListener("DOMContentLoaded",function(){});
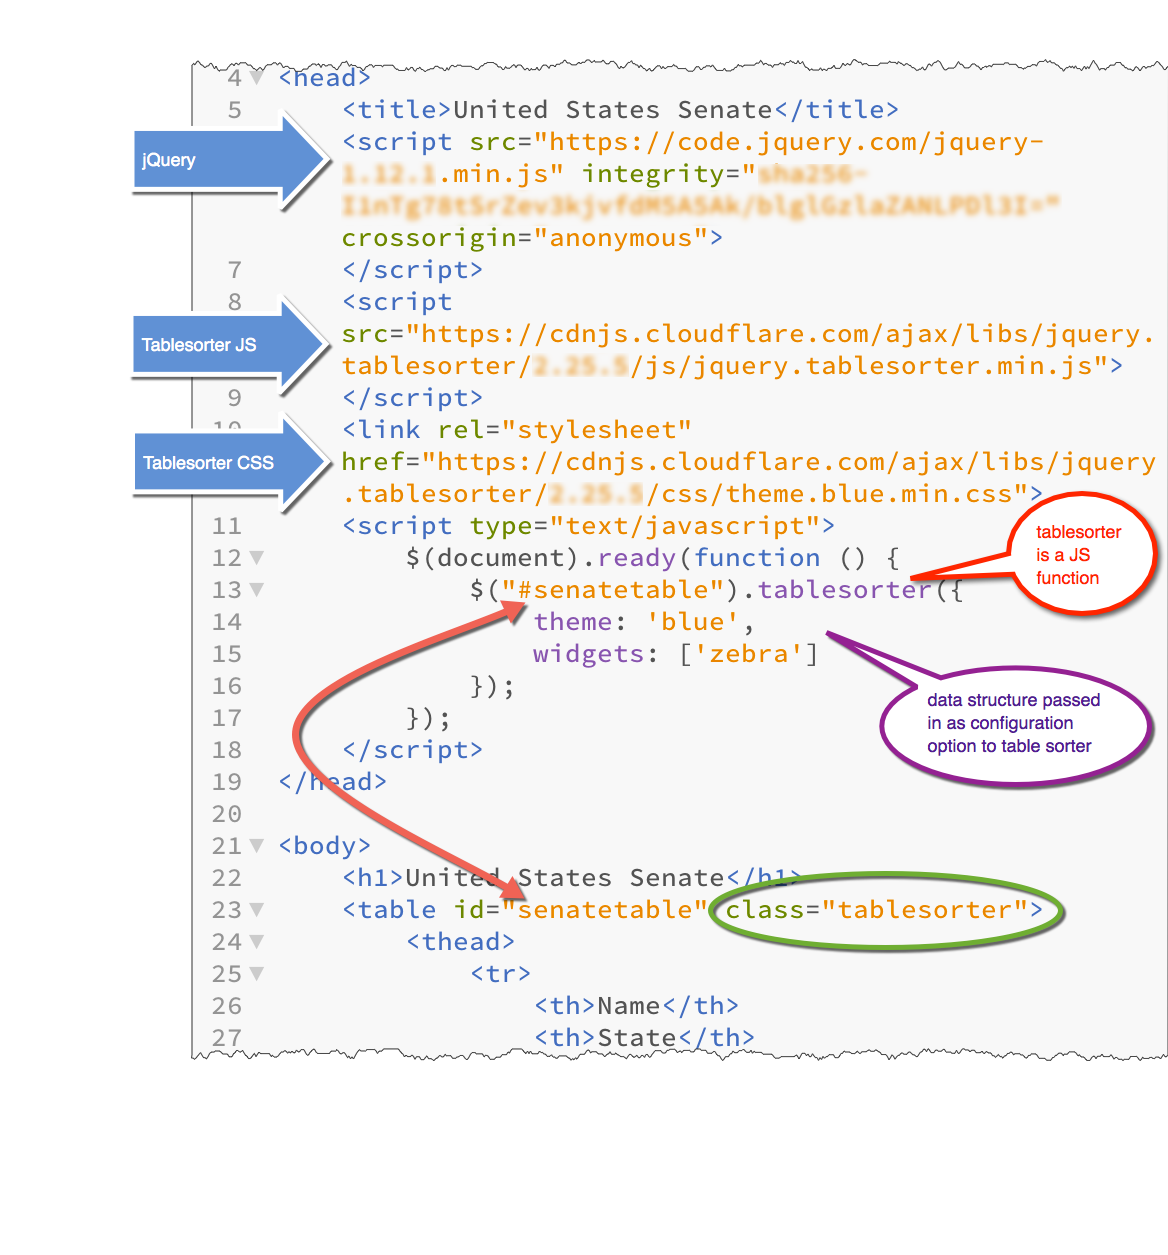
jQuery Plugin - Tablesorter
jQuery Tablesorter Plugin makes dealing with tables even easier!
$(document).ready(function()
  {
    $("#senatetable").tablesorter(
     {
       theme: 'blue',
       widgets: ['zebra']
     }
   );
  }
);- Plain table: senate-plain.html
- Sortable table: senate-tablesorter.html
- Javascript
- jQuery
- jQuery Tablesorter Plugin
- CSS
- Use the "blue" theme from the tablesorter plugin
- Assign tables with classes
- jQuery "ready" function
- Javascript
Data passed to the "tablesorter" plugin:
     {
  theme: 'blue',
  widgets: ['zebra']
}
Sortable table: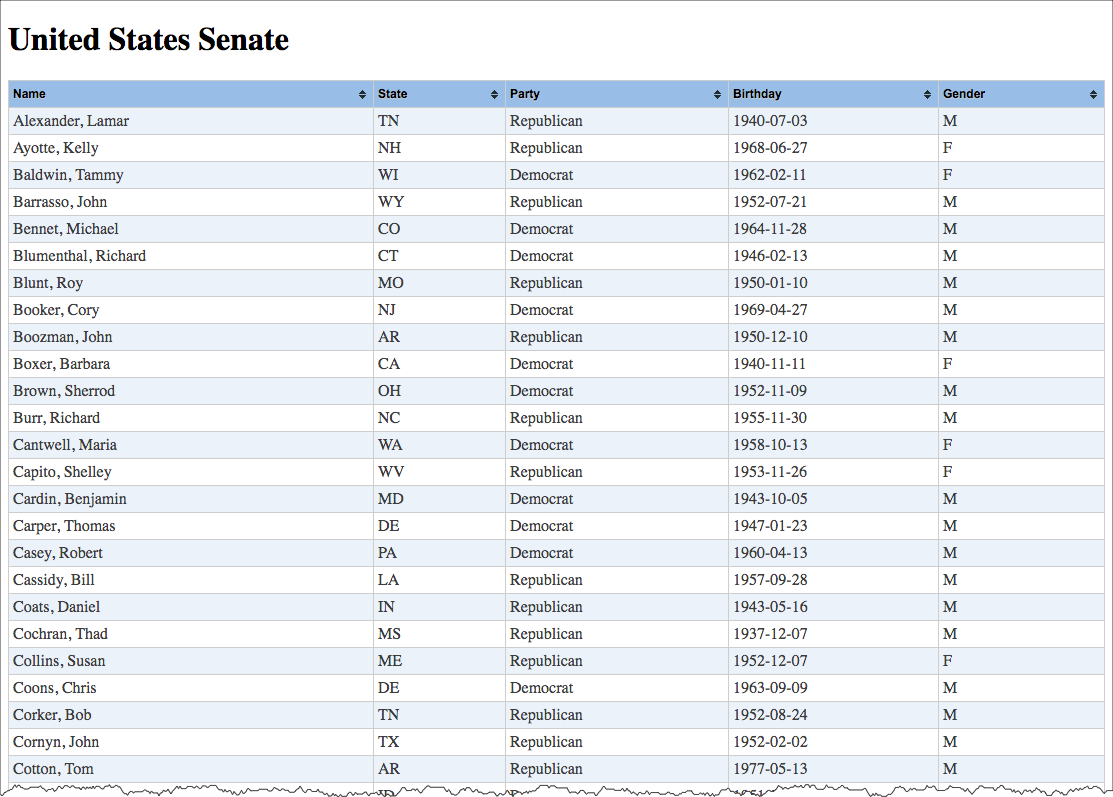
Tables are constructed with thead and tbody. Simply by giving them a class="sortable",
the jQuery Tablesorter Plugin makes them 'sortable' and 'striped' with $("table.sortable").tablesorter({widgets: ['zebra']})
Senate data used with permission from GovTrack.US.
Table sorting is
achieved through jQuery and the
jQuery Tablesorter Plugin
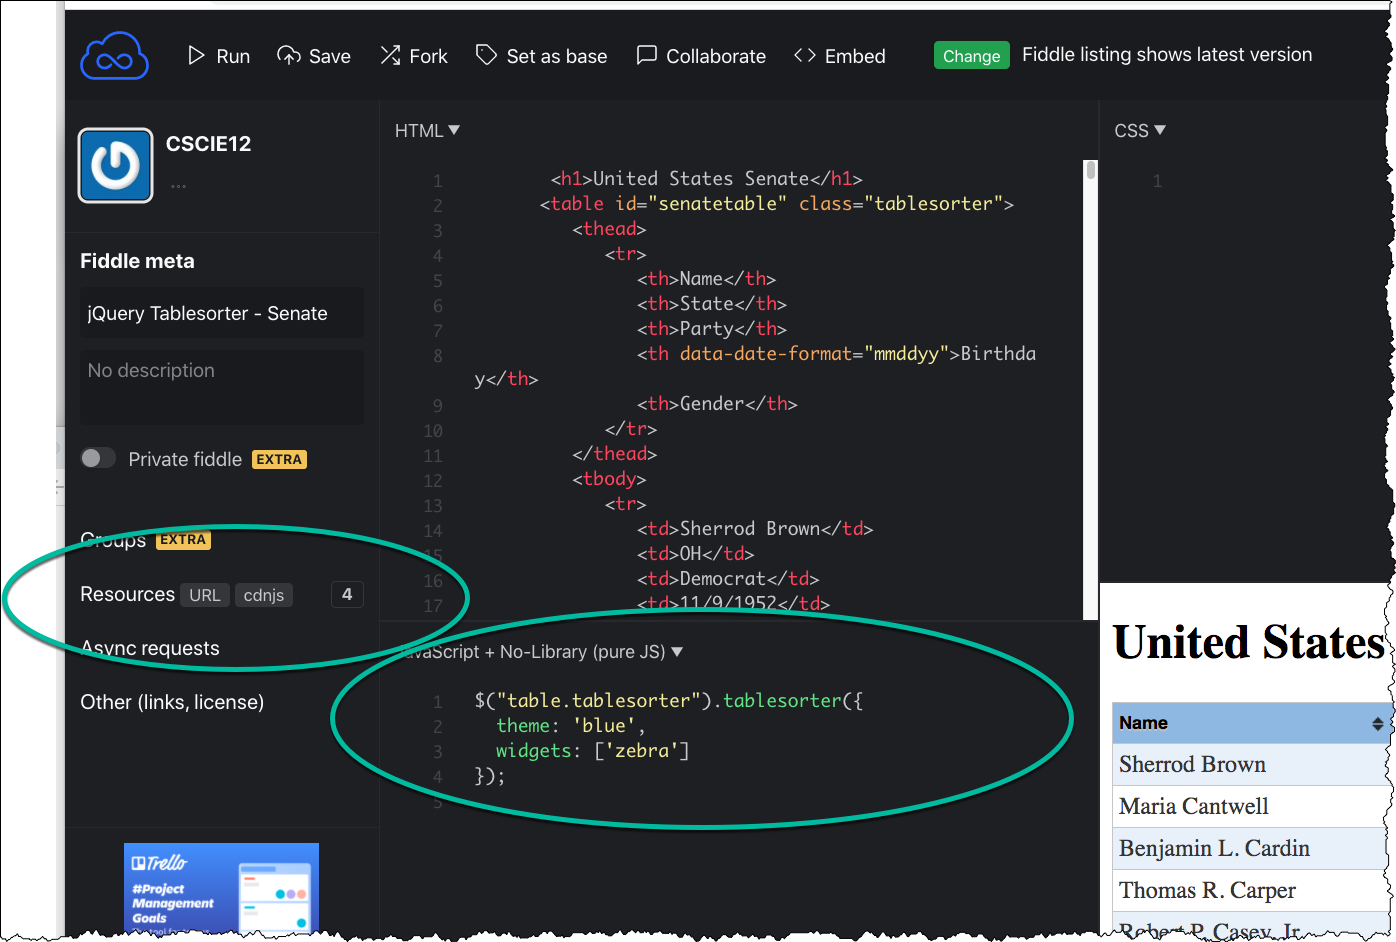
Tablesorter Example as a JSFiddle
Tablesorter Example as a JSFiddle
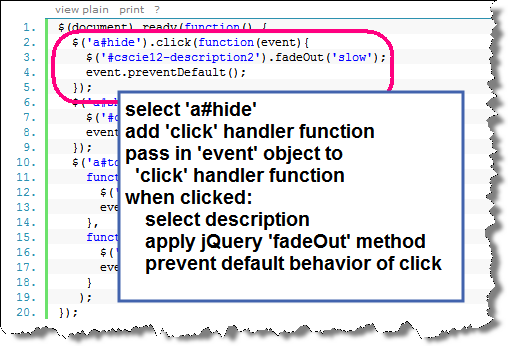
Separation from Markup
In an earlier example, we used the "onclick" attribute to specify a javascript function to call:
hide-show.html | Hide/Show as JSFiddle

In JavaScript, we saw the "addEventListener" method to add event listeners using JavaScript!
Separation from Markup
- Use Javascript to add the "onclick" listener
Let's see how we can do this with jQuery. Items to note:
- Separation. The "click" handler is bound via JavaScript and not the onclick attribute.
- Fancier. jQuery provides many "effects" and "animations" (basic ones here are
fadeOutandfadeIn) - Default Behavior Stopped. The default behavior for event propagation can be stopped.
- Unobtrusive. JS is used to hide additional form elements.
 <div id="cscie12-course2" style="font-family: calibri,verdana,tahoma,helvetica,sans-serif; float: left; width: 50%; padding: 10px; margin: 10px; border: medium solid black; background-color: #ffb;">
   <h3>CSCI E-12: Fundamentals of Website Development   </h3>
   <p>Harvard Extension School
     <br/>
David Heitmeyer
     <br/>
CSCI E-12
   </p>
   <p id="cscie12-description2">This course provides a comprehensive overview of website development. Students explore the prevailing vocabulary, tools, and standards used in the field and learn how the various facets including HTML5, XHTML, CSS, JavaScript, Ajax, multimedia, scripting languages, HTTP, clients, servers, and databases function together in today's web environment. The course provides a solid web development foundation, focusing on content and client-side (browser) components (HTML5, XHTML, CSS, JavaScript, multimedia), with an overview of the server-side technologies. In addition, software and services that are easily incorporated into a website (for example, maps, checkout, blogs, content management) are surveyed and discussed. Students produce an interactive website on the topic of their choice for the final project and leave the course prepared for more advanced and focused web development studies.
   </p>
 </div>
 <div style="width: 20%; float: left; margin-left: 2em;">
   <p>
     <strong>Hide/Show/Toggle Description     </strong>
   </p>
   <ul>
     <li>
       <a href="#" id="hide">Hide       </a>
     </li>
     <li>
       <a href="#" id="show">Show       </a>
     </li>
     <li>
       <a href="#" id="toggle">Toggle       </a>
     </li>   </ul>
 </div>
In
script element within head element (<script>):
$(document).ready(function() {
  $('#hide').click(
   function(event){
     $('#cscie12-description2').fadeOut('slow');
     event.preventDefault();
   }
  );
  $('#show').click(
   function(event){
     $('#cscie12-description2').fadeIn('slow');
     event.preventDefault();
   }
  );
  $('#toggle').click(
   function(event) {
     console.log('toggle!');
     $('#cscie12-description2').toggle('slow');
     event.preventDefault();
   }
  );
});
jQuery Examples
- Exposing additional form elements
- Check and Uncheck
- Add another
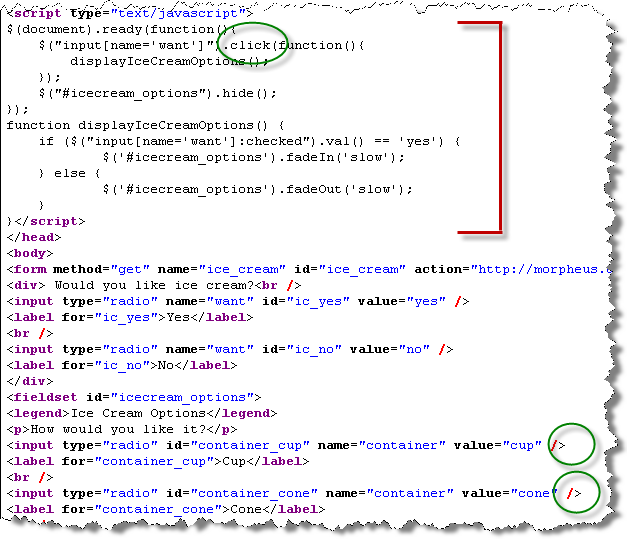
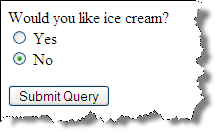
Ice Cream
- Use JavaScript to add the "onclick" listener
- Use JavaScript to hide the
divcontaining the additional options.
Let's see how we can do this with jQuery. Items to note:
- Separation. The "click" handler is bound via JavaScript and not the onclick attribute.
- Fancier. jQuery provides many "effects" and "animations" (basic ones here are
fadeOutandfadeIn)
 <form method="get" name="ice_cream" id="ice_cream" action="https://cscie12.dce.harvard.edu/echo">
   <div>Would you like ice cream?
     <br/>

     <label>
       <input type="radio" name="want" id="ic_yes" value="yes"/>
Yes     </label>
     <label>
       <input type="radio" name="want" id="ic_no" value="no"/>
No     </label>
   </div>
   <fieldset id="icecream_options">
     <legend>Ice Cream Options     </legend>
     <p>How would you like it?
     </p>
     <label>
       <input type="radio" id="container_cup" name="container" value="cup"/>
Cup     </label>
     <br/>

     <label>
       <input type="radio" id="container_cone" name="container" value="cone"/>
Cone     </label>
     <br/>

     <p>Pick your toppings:
     </p>
     <label>
       <input type="checkbox" name="toppings" id="toppings_wc" value="whipcream"/>
Whipped cream     </label>
     <br/>

     <label>
       <input type="checkbox" name="toppings" id="toppings_j" value="jimmies"/>
Jimmies     </label>
     <br/>

     <label>
       <input type="checkbox" name="toppings" id="toppings_nuts" value="nuts"/>
Nuts     </label>
     <br/>

     <label>
       <input type="checkbox" name="toppings" id="toppings_cherry" value="cherry"/>
Cherry     </label>   </fieldset>
   <p>
     <input type="submit"/>

   </p>
 </form>
In style
element
(<style>) within head element:
#icecream_options {
    background-color: #eee;
    margin-left: 2em;
}
label { display: block; }
In
script element within head element (<script>):
$(document).ready(
function(){
$("#icecream_options").hide();
$("input[name='want']").click(
function(){
displayIceCreamOptions();
}
);
}
);
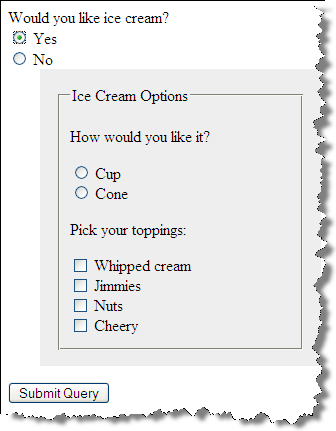
function displayIceCreamOptions() {
if ($("input[name='want']:checked").val() == 'yes') {
$('#icecream_options').fadeIn('slow');
} else {
$('#icecream_options').fadeOut('slow');
}
}
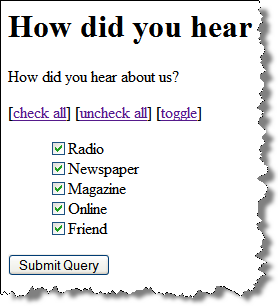
Check and Uncheck All
JavaScript:
Here we take advantage of an attribute value selector ([name="how"])
the ability to retrieve and set property values. Note too that we iterate through
each of the checkboxes.
To read more about attributes vs properties in jQuery, see: .prop() and .attr()
 <form action="https://cscie12.dce.harvard.edu/echo" method="get">
   <h3>How did you hear about us?   </h3>
   <p>[
     <a href="#" id="checkall">check all     </a>] [
     <a href="#" id="uncheckall">uncheck all     </a>] [
     <a href="#" id="togglecheckboxes">toggle     </a>]
   </p>
   <ul style="list-style: none;">
     <li>
       <input type="checkbox" name="how" value="radio"/>
Radio
     </li>
     <li>
       <input type="checkbox" name="how" value="newspaper"/>
Newspaper
     </li>
     <li>
       <input type="checkbox" name="how" value="magazine"/>
Magazine
     </li>
     <li>
       <input type="checkbox" name="how" value="online"/>
Online
     </li>
     <li>
       <input type="checkbox" name="how" value="friend"/>
Friend
     </li>   </ul>
   <input type="submit"/>

 </form>
In
script element within head element (<script>):
$(document).ready(function() {
  console.log($('#input[name="how"]'));
  $('#checkall').click(function() {
    $('input[name="how"]').prop('checked',true);
    console.log('check all!');
  });
  $('#uncheckall').click(function() {
    $('input[name="how"]').prop('checked',false);
    console.log('uncheck all!');
  });
  $('#togglecheckboxes').click(function() {
    $('input[name=how]').each(function (i) {
      if ($(this).is(':checked')) {
        $(this).prop('checked',false);
      } else {
        $(this).prop('checked',true);
      }
    });
  });
 });
Add Another
Example: add_another.html | Add Another in JSFiddle
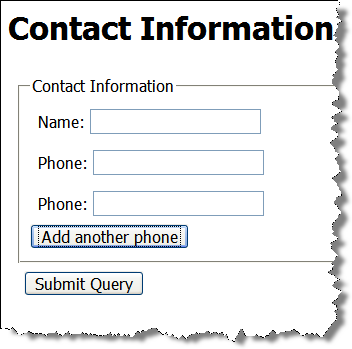
JavaScript:
- select the "div" we want to duplicate
- clone the "div" to create a new one
- change the id (to maintain uniqueness) of the new div
- insert the new div into the document
$(document).ready(function() {
    var numberofphones = 1;
    $('#addphone').click(function() {
      numberofphones++;
      newid = 'phone' + numberofphones;
      var phonediv = $('#phone1');
      var newphonediv = phonediv.clone();
      newphonediv.attr('id',newid);
      newphonediv.insertBefore('#addphone');
  });
 });
Markup:
<form action="https://cscie12.dce.harvard.edu/echo" method="get">
  <fieldset>
    <legend>Contact Information</legend>
    <div>Name:
      <input type="text" name="name"/></div>
    <div id="phone1">Phone:
      <input type="text" name="phone"/> </div>
      <input type="button" id="addphone" value="Add another phone"/>
  </fieldset>
  <div><input type="submit"/></div>
</form>
Chaining jQuery
- calculate the new "id" string
- select the phone div to be duplicated
- duplicate (clone) the phone div
- change the id of the new phone div
- insert the new phone div into the document
jQuery methods return nodes, so we can easily chain these steps together.
Stepwise:
$(document).ready(function() {
    var numberofphones = 1;
    $('#addphone').click(function() {
      numberofphones++;
      newid = 'phone' + numberofphones;
      var phonediv = $('#phone1');
      var newphonediv = phonediv.clone();
      newphonediv.attr('id',newid);
      newphonediv.insertBefore('#addphone');
  });
 });
Chained:
$(document).ready(function() {
    var numberofphones = 1;
    $('#addphone').click(function() {
      numberofphones++;
      newid = 'phone' + numberofphones;
      $('#phone1').clone().attr('id',newid).insertBefore('#addphone');
  });
 });
Unobtrusive Javascript / Progressive Enhancement
Principles of Unobtrusive JavaScript
- Separation
- Progressive Enhancement (Graceful Degradation)
Progressive Enhancement for "add another"
- One strategy would be to hide the "Add Another" button and make it visible through JavaScript.
- Alternatively, we could create the "Add Another" node in JS and then adding it to the page via JS.
$(document).ready(function() {
  $('#addphone').css('display','inline');
  var numberofphones = 1;
  $('#addphone').click(function() {
      numberofphones++;
      newid = 'phone' + numberofphones;
      $('#phone1').clone().attr('id',newid).insertBefore('#addphone');
  });
 });
A browser with JS disabled would display form with a single phone field.
Example: add_another_unobtrusive.html
With JavaScript disabled in browser: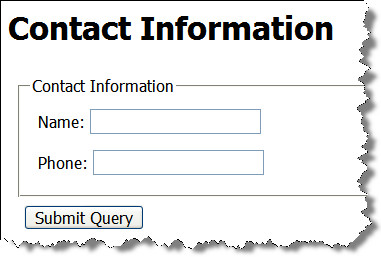
Ice Cream
Start with everything visible, then hide with JavaScript:
Key piece here is: $("#icecream_options").hide();
 <form method="get" name="ice_cream" id="ice_cream" action="https://cscie12.dce.harvard.edu/echo">
   <div>Would you like ice cream?
     <br/>

     <label>
       <input type="radio" name="want" id="ic_yes" value="yes"/>
Yes     </label>
     <label>
       <input type="radio" name="want" id="ic_no" value="no"/>
No     </label>
   </div>
   <fieldset id="icecream_options">
     <legend>Ice Cream Options     </legend>
     <p>How would you like it?
     </p>
     <label>
       <input type="radio" id="container_cup" name="container" value="cup"/>
Cup     </label>
     <label>
       <input type="radio" id="container_cone" name="container" value="cone"/>
Cone     </label>
     <p>Pick your toppings:
     </p>
     <label>
       <input type="checkbox" name="toppings" id="toppings_wc" value="whipcream"/>
Whipped cream     </label>
     <label>
       <input type="checkbox" name="toppings" id="toppings_j" value="jimmies"/>
Jimmies     </label>
     <label>
       <input type="checkbox" name="toppings" id="toppings_nuts" value="nuts"/>
Nuts     </label>
     <label>
       <input type="checkbox" name="toppings" id="toppings_cherry" value="cherry"/>
Cherry     </label>   </fieldset>
   <p>
     <input type="submit"/>

   </p>
 </form>
In style
element
(<style>) within head element:
#icecream_options {
    background-color: #eee;
    margin-left: 2em;
}
label { display: block; }
In
script element within head element (<script>):
$(document).ready(function(){
    $("#icecream_options").hide();
    $("input[name='want']").click(function(){
      displayIceCreamOptions();
    });
});
function displayIceCreamOptions() {
    if ($("input[name='want']:checked").val() == 'yes') {
      $('#icecream_options').fadeIn('slow');
    } else {
      $('#icecream_options').fadeOut('slow');
    }
}
JavaScript - Minifying and CDNs
Minified JS
Comments and unnecessary whitespace are removed.
- 288 kb for jquery-3.5.1.js
- 9 kb for jquery-3.5.1.min.js
70% reduction!
Load Your Core JS Library through a CDN
MaxCDN (jQuery CDN), Google, Microsoft, and cdnjs.com host several JS libraries through their CDNs.
Using jQuery with a CDN
Three reasons why you should let Google host jQuery for you (or any other CDN):
- Decreased latency
- Increased Parallelism
- Better Caching

CDNs to Use
But not just jQuery! Several JavaScript libraries are hosted through various CDNs: